Oh, the pressure! Everyone wants that perfect chocolate volcano on a plate, right? That moment when you poke the top and liquid gold oozes out? Well, stop stressing! I’ve spent years—and frankly, eaten entirely too much under-baked chocolate—to nail this **lava cake** recipe. Trust me when I say this ratio of butter, eggs, and chocolate is foolproof. We’re talking about a truly classic, rich, and decadent dessert that comes together faster than ordering takeout. This is the one recipe you’ll keep forever.
Why This Classic Lava Cake Recipe Works Every Time (E-E-A-T Focus)
I’ve tried every trick out there for a truly molten experience, and I finally understood: it’s all about the physics—and trusting the heat! Most people overbake these bad boys by just a minute or two. If you use good quality bittersweet chocolate, like the recipe calls for, you’re halfway there. I used to get a tiny, sad puddle in the middle, but after adding that extra egg yolk, everything changed. It provides structure to hold the cake shape but keeps the inside beautifully unset.
This simple modification guarantees you get a perfect **lava cake** every single time, whether you’re an absolute baking beginner or tackling dessert for a very important date. For years I struggled with recipes that called for only whole eggs, but that extra richness from the yolk truly locked in the gooey success. For another take on super-rich chocolate, check out my flourless version here; it’s intense!
The Secret to a Truly Gooey Center Desserts
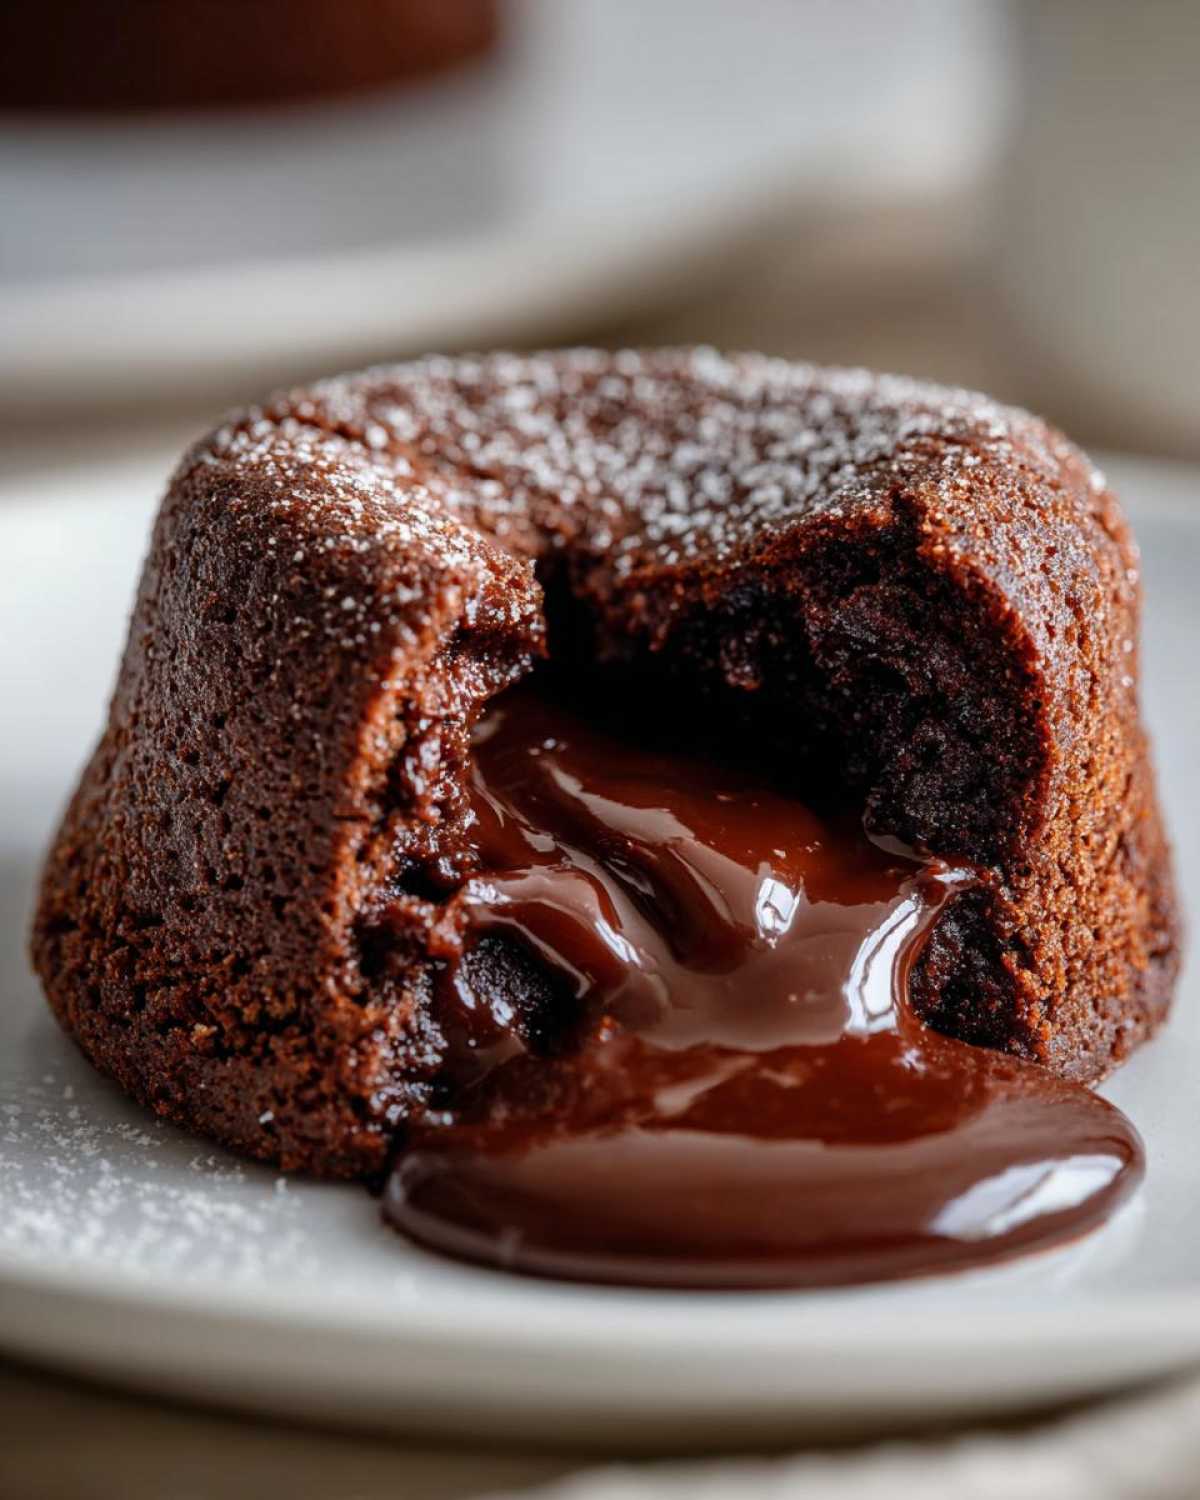
The magic truly happens when the edges appear firm and set while the very center still wobbles slightly when you gently tap the tray. We aren’t aiming for custard; we are aiming for liquid sauce trapped inside a tiny cake coat. That balance comes from using the specified recipe volume—don’t try to double it in one ramekin! That extra minute in the 425-degree oven is what turns molten into just ‘soft cake.’ You need to pull them out when they look *almost* done.
Ingredients for Your Decadent Lava Cake
Okay, gather your troops! Since this is about maximizing decadence in minimum time, we need quality ingredients. You’ll notice we use four ounces each of both bittersweet chocolate and lovely unsalted butter. Chop that chocolate finely because we want it to melt evenly! The eggs are crucial here—you need two whole eggs plus two extra yolks. Pro tip: make sure they aren’t straight from the fridge; room temperature eggs whip up nicer and blend into that chocolate base without making things tricky.
We keep the dry stuff simple with just two tablespoons of flour and a tiny pinch of salt to make the chocolate pop. That’s honestly it for the batter! Remember to have extra butter and cocoa powder ready to prep your little baking vessels while the oven heats up.
Ingredient Notes and Substitutions
If you find that really intense, rich flavor is what you crave—and who doesn’t with this dessert?—feel free to bump up to a good quality dark chocolate instead of bittersweet. That creates a deeper flavor profile, perfect for a true Dark Chocolate **Lava Cake**. Also, a quick note about dusting: we use cocoa powder in the ramekins rather than flour. Why? Because it gives the outside a dark, velvety finish that looks gorgeous when you flip it out, and it tastes better than slightly baked flour.
How to Prepare Your Homemade Lava Cakes
Alright, ready for the speedy part? Since this is one of those fantastic **Quick Chocolate Desserts**, you’ll be amazed how fast the prep goes—we’re talking ten minutes max before this batter hits the oven! The first thing you absolutely must do is get that oven cranked up high to 425 degrees Fahrenheit. That high heat is what shocks the outside into setting while the inside stays liquidy and wonderful.
Next up is prepping the ramekins. Don’t even think about skipping this step! This is where we guarantee those beautiful **Individual Chocolate Cakes** pop right out when they’re done. You have to be thorough here; use soft butter to coat every single little nook and cranny inside the ramekin. Then, take your cocoa powder and lightly dust the inside walls. Tip it upside down and tap, tap, tap until all the loose powder is gone. That cocoa coating acts like tiny non-stick shields! This quick prep happens while you’re gently folding in the flour, finishing up one of the fastest **Homemade Lava Cakes** you’ll ever make.
Preparing the Ramekins for Perfect Release
Seriously, this is non-negotiable for a good outcome. If you try to rush the buttering, or if you miss a spot near the rim, the **lava cake** will stick, tear, and ruin all your hard work. I use a silicone pastry brush to make sure I get that butter right up the sides. The cocoa dusting, as I said, gives us that deep chocolate crust and makes the release smooth. It’s the best insurance policy you can buy for this dessert! If you ever need a great recipe for zucchini bread that also uses careful pan prep, check out this one; the principle is the same!
The Crucial Baking Time for a Molten Lava Cake
Here’s where absolute focus is required—we’re playing with fire (well, 425-degree fire). The instructions say 12 to 14 minutes, and you really need to treat that like law. At 12 minutes, check them. The edges should look mostly cooked, maybe a little crumbly looking, but the center has to still look soft and jiggly, almost wet when you gently shake the baking sheet. If the entire top looks solid and firm, you’ve gone too far and you have a delicious, but standard, chocolate cup. When they look slightly unfinished on top, pull them out immediately! They’ll set up just a touch more while they rest for that single minute before inverting.
Once filled, the baking itself is lightning quick. While those are in the oven, you can get those plates ready—maybe you’re setting up for a romantic **Date Night Dessert**!
Tips for Success When Making Lava Cake
Look, I know staring into the oven window waiting for that perfect wobble is stressful, but you got this! Beyond the ramekin prep, a few little secrets make all the difference for these **Individual Chocolate Cakes**. If you live somewhere high up—say, above 3,000 feet—you might need to bump that temperature up 15 degrees or so, or add a minute to the baking time, because water boils faster up there, which messes with our delicate balance.
The best way to test doneness without jiggling the whole tray is the visual check I already mentioned: edges set, center soft. But if you are nervous, instead of sticking a toothpick all the way in, just gently touch the very edge of the cake with your finger—if it springs back slightly but doesn’t suck your fingerprint in, you’re golden. Remember, slightly underbaked is always better than overbaked here. If you ever worry about the texture being fudgy enough, try comparing it to my recipe for Moist Fudgy Chocolate Cake; it uses a similar chocolate base but we bake it all the way through!
Honestly, the biggest tip is to just time it once. Make this exact recipe exactly as written. See what 13 minutes does in *your* oven so you have a solid benchmark for your next batch of **Quick Chocolate Desserts**.
Serving Suggestions for Your Warm Chocolate Dessert
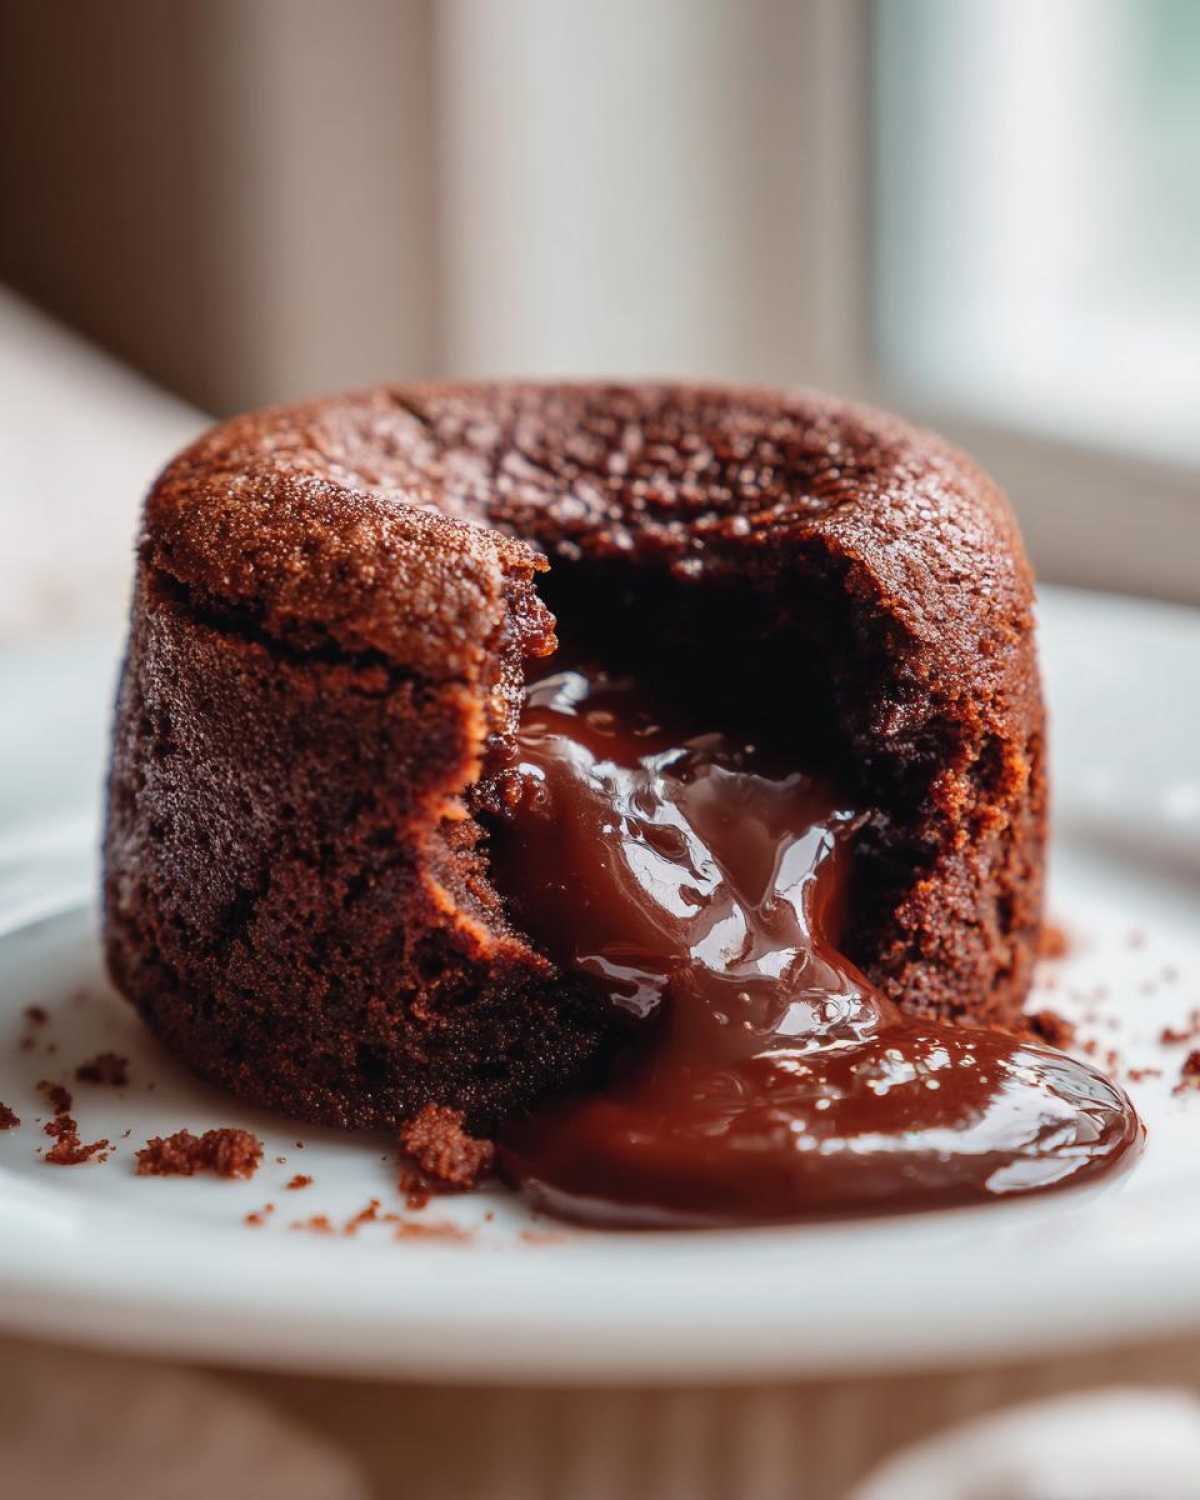
This **lava cake** demands to be eaten right out of the oven. Seriously, if you wait even five minutes, that incredible molten center starts to firm up, and we can’t have that! This is truly the perfect finale for any **Date Night Dessert** lineup.

My absolute go-to is a scoop of good quality vanilla bean ice cream—the contrast between the hot, dark chocolate and the cold creaminess is pure heaven. If you want something brighter, fresh raspberries or strawberries are fantastic companions; their tartness cuts right through the richness. For a simpler presentation that still feels fancy, just give the top a generous sift of powdered sugar. You can even swap that frosting out for a quick homemade buttercream if you’re feeling ambitious, though I usually save my buttercream recipe for layer cakes!
Whatever you choose as an accompaniment, serve it immediately! That warm, gooey chocolate is fleeting, and that’s what makes this **Warm Chocolate Dessert** so special.
Storage and Reheating Instructions for Individual Chocolate Cakes
You know, sometimes you just can’t eat four of these decadent delights in one sitting! While they are definitely best fresh off the oven, don’t fret if you have leftovers. You can absolutely refrigerate these little single servings, or even freeze them once they’re totally cooled down. If you’re freezing them, wrap each one tightly in plastic wrap first. That’s key!
When you’re ready for round two, reheating is simple but requires a careful touch. I prefer the oven method if I have a few minutes: wrap the cake in foil and heat at 350 degrees F for about 10 minutes. If you only have seconds, the microwave works too, but go easy—just 15 to 20 seconds usually does the trick before the center solidifies. If you want to compare notes on other make-ahead treats, my fudgy keto brownie recipe is also great for freezing and reheating!
Variations on the Classic Lava Cake
I love sticking to the classic, but sometimes you need a little flair! It’s surprisingly easy to twist this basic formula into something totally new. If you want a hint of something extra exciting for your **Decadent Chocolate Treats**, try adding a teaspoon of espresso powder right in with the flour. It doesn’t make it taste like coffee, it just deepens the chocolate flavor, almost like magic!
For a fun change, swap out about an ounce of that bittersweet chocolate for good quality Nutella. That creates a fantastic, creamy center—a real **Nutella Lava Cake Recipe** experience! You can also play with extracts. A dash of peppermint extract when the chocolate cools, or even some orange zest folded in before baking, can completely change the game. Just remember that if you add any extra wet ingredients, like a spoonful of liqueur, you might need to bump that baking time up by 30 seconds just to be safe. If you like rich, dark chocolate flavors, you might also enjoy my dark chocolate avocado mousse when you need a break from baking!
Frequently Asked Questions About Lava Cake
I get so many questions about these little chocolate surprises, and honestly, that’s a good sign! It means you all are getting ready to make some incredible **Decadent Chocolate Treats** for your families. Here are the ones I hear most often about pulling off that perfect molten center.
Can I make this lava cake ahead of time?
Yes, you absolutely can! This is great news for anyone trying to coordinate a fancy meal or just wanting a **Second Chance Chocolate Dessert** ready to go. You have two options. You can prep the batter completely, pour it into the prepared ramekins, cover them tightly with plastic wrap, and keep them in the fridge for up to 24 hours. If you do this, you might need to add 1 to 2 minutes onto your bake time since the batter will be colder than room temperature. Or, bake the cakes fully, let them cool, and store them in the fridge. To reheat, just microwave them for about 20 seconds to bring that gooey center back to life!
What if my lava cake comes out fully cooked?
Oh, don’t panic! It happens to the very best of us, even me sometimes when I get distracted talking on the phone. If your center is completely solid when you cut into it, it means you overbaked it, likely by a minute or two. For your next batch of these **Gooey Center Desserts**, try reducing your oven temperature by about 10 degrees, or pull them out right at the 12-minute mark and trust your instincts. Underbaking slightly is always the way to go with this recipe!
Is this considered a Date Night Dessert?
Are you kidding? This is the official royalty of **Date Night Desserts**! They are individual servings, they look incredibly sophisticated when you flip them onto a plate, and the drama of cutting into that molten center is just unbeatable. Plus, since these are such **20 Minute Desserts** to make, you don’t spend your whole evening stuck in the kitchen; you spend it enjoying your partner! Serve it with a dusting of powdered sugar and maybe a little raspberry sauce, and you’ve won the night.

If you are looking for other super-fast sweet endings, I have a truly simple recipe for three-ingredient chocolate fudge that is also amazing and requires no oven at all!
Estimated Nutritional Data for This Lava Cake
Now, listen closely because while this is the ultimate **decadent chocolate treat**, it’s also rich! The numbers below are just estimates, okay? Every brand of chocolate and butter is slightly different, so don’t treat this like medical fact, but it gives you a good general idea of what you’re diving into with these **homemade lava cakes**.
When I calculate these out, I try to remember that we’re eating four of these between two very hungry people on a special occasion, which helps soften the blow of the fat content! Remember, these are based on the recipe yielding four servings.
- Calories: About 350 per serving
- Sugar: Roughly 20 grams
- Fat: That’s around 24 grams total (don’t stress the good fats!)
- Saturated Fat: About 14 grams (hello, butter!)
- Carbohydrates: Around 28 grams
- Protein: Roughly 7 grams
- Cholesterol: Around 150mg
It might look heavy on the sugar and fat, but honestly, when you’re having a **warm chocolate dessert** like this, you aren’t looking for a health food experience; you’re looking for pure joy! And trust me, this recipe delivers joy in spades.
Share Your Decadent Chocolate Treats
So, that’s it! You’ve made the most incredible, show-stopping, molten **lava cake** known to humankind. Now comes my favorite part—hearing about it! Did you manage that perfect gooey center? Did you serve it with raspberries, or did you go all out with a scoop of melting ice cream?
I wholeheartedly want you to come back here and leave a comment below. Tell me how it went! If you followed my advice and pulled them out at the 13-minute mark, let me know if that worked for your oven—your feedback genuinely helps other home bakers trying to conquer this **decadent chocolate treat**.
If you managed to snap a picture before you devoured it (I always struggle with that step!), tag me on social media! I love seeing your beautiful creations. If you have any last-minute questions that I didn’t cover in the FAQs, please shoot me a message via my contact page. I’m always here to help troubleshoot any chocolate emergencies!
Happy Baking, and enjoy that gorgeous, warm, overflowing **lava cake**!
Print
Classic Molten Chocolate Lava Cake
- Total Time: 24 min
- Yield: 4 servings 1x
- Diet: Vegetarian
Description
Make rich, individual chocolate cakes with a signature gooey, molten center. This recipe is quick and perfect for a decadent dessert.
Ingredients
- 4 ounces bittersweet chocolate, chopped
- 4 ounces unsalted butter
- 2 large eggs
- 2 large egg yolks
- 1/4 cup granulated sugar
- 2 tablespoons all-purpose flour
- Pinch of salt
- Butter and cocoa powder for dusting ramekins
Instructions
- Preheat your oven to 425 degrees Fahrenheit. Butter four 6-ounce ramekins thoroughly. Dust the inside of each buttered ramekin with cocoa powder, tapping out any excess.
- Place the chopped chocolate and butter in a heatproof bowl set over a saucepan of simmering water, or microwave in short bursts. Stir until completely smooth. Remove from heat and let cool slightly.
- In a separate medium bowl, whisk together the eggs, egg yolks, and sugar until the mixture is pale and slightly thickened, about 2 minutes.
- Gently whisk the cooled chocolate mixture into the egg mixture until just combined.
- Sift the flour and salt over the chocolate mixture. Fold gently with a spatula until no streaks of flour remain. Do not overmix.
- Divide the batter evenly among the prepared ramekins.
- Place the ramekins on a baking sheet. Bake for 12 to 14 minutes. The edges should look set, but the center should still look soft.
- Let the cakes cool in the ramekins for 1 minute. Carefully run a thin knife around the edge of each cake. Invert each cake onto a serving plate. Serve immediately.
Notes
- For a darker flavor, use dark chocolate instead of bittersweet.
- Dust the finished cakes with powdered sugar or serve with fresh raspberries for color.
- If you do not have ramekins, you can use a muffin tin, but baking time may decrease slightly.
- Prep Time: 10 min
- Cook Time: 14 min
- Category: Dessert
- Method: Baking
- Cuisine: American
Nutrition
- Serving Size: 1 cake
- Calories: 350
- Sugar: 20
- Sodium: 150
- Fat: 24
- Saturated Fat: 14
- Unsaturated Fat: 10
- Trans Fat: 0.5
- Carbohydrates: 28
- Fiber: 2
- Protein: 7
- Cholesterol: 150