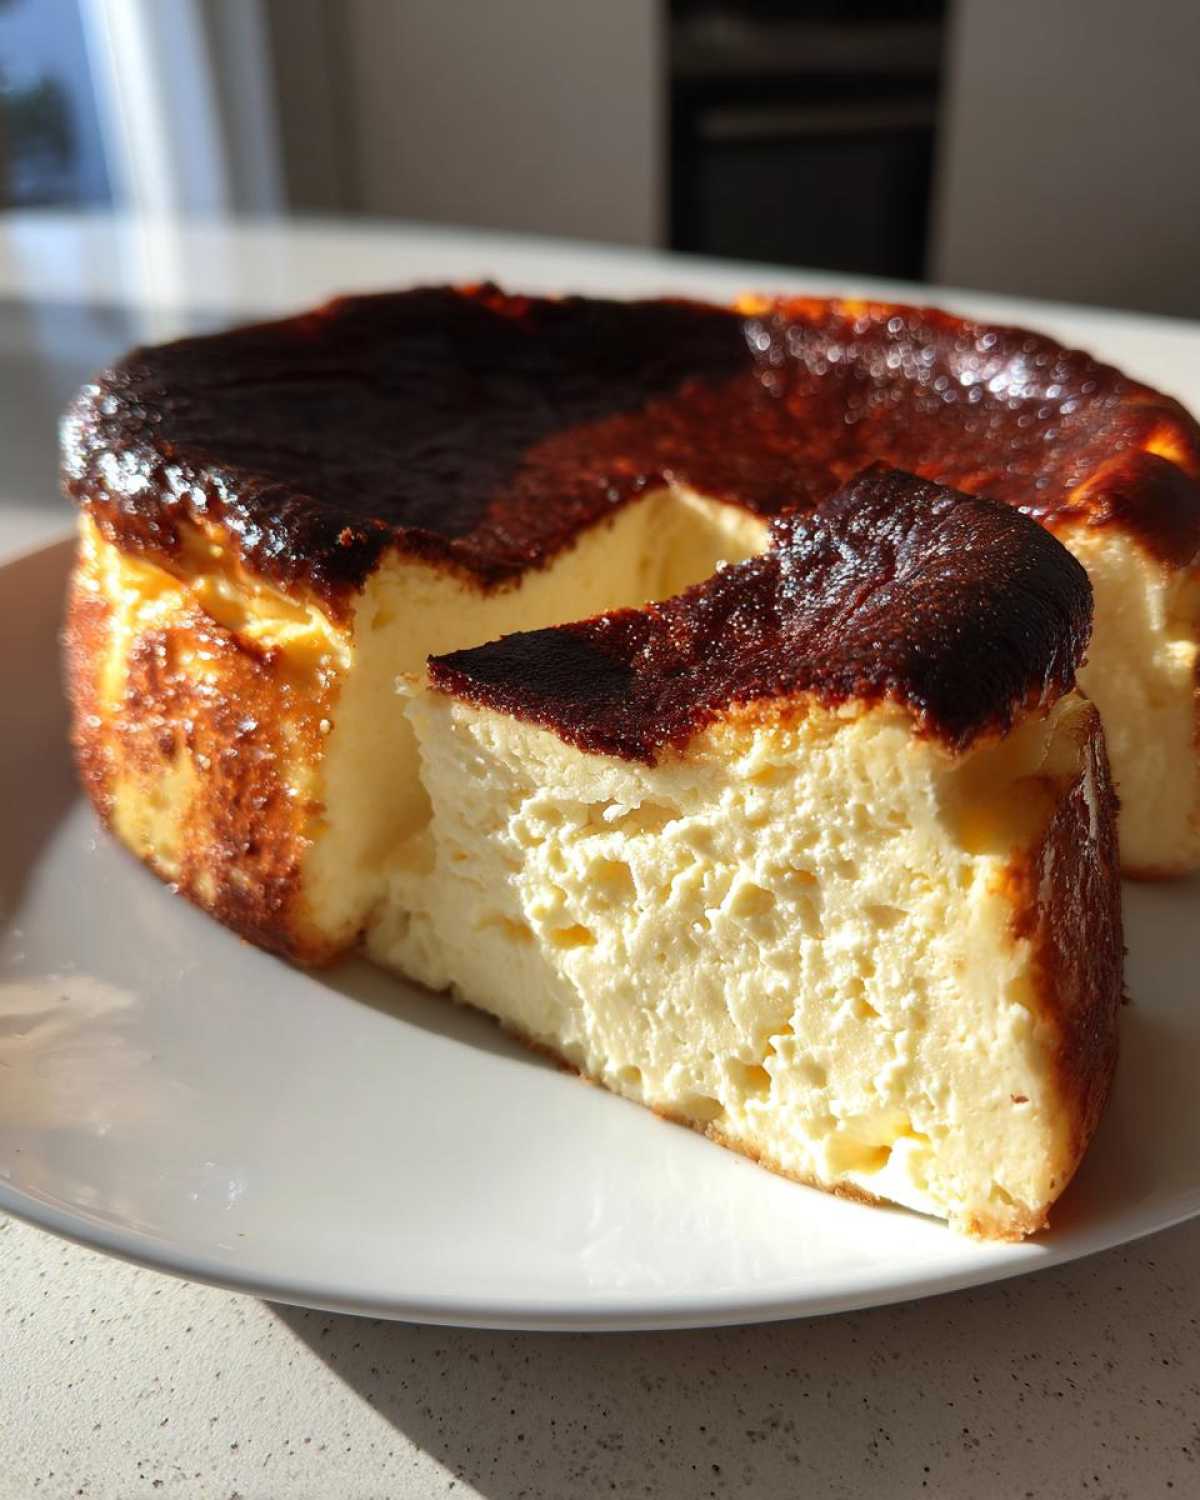
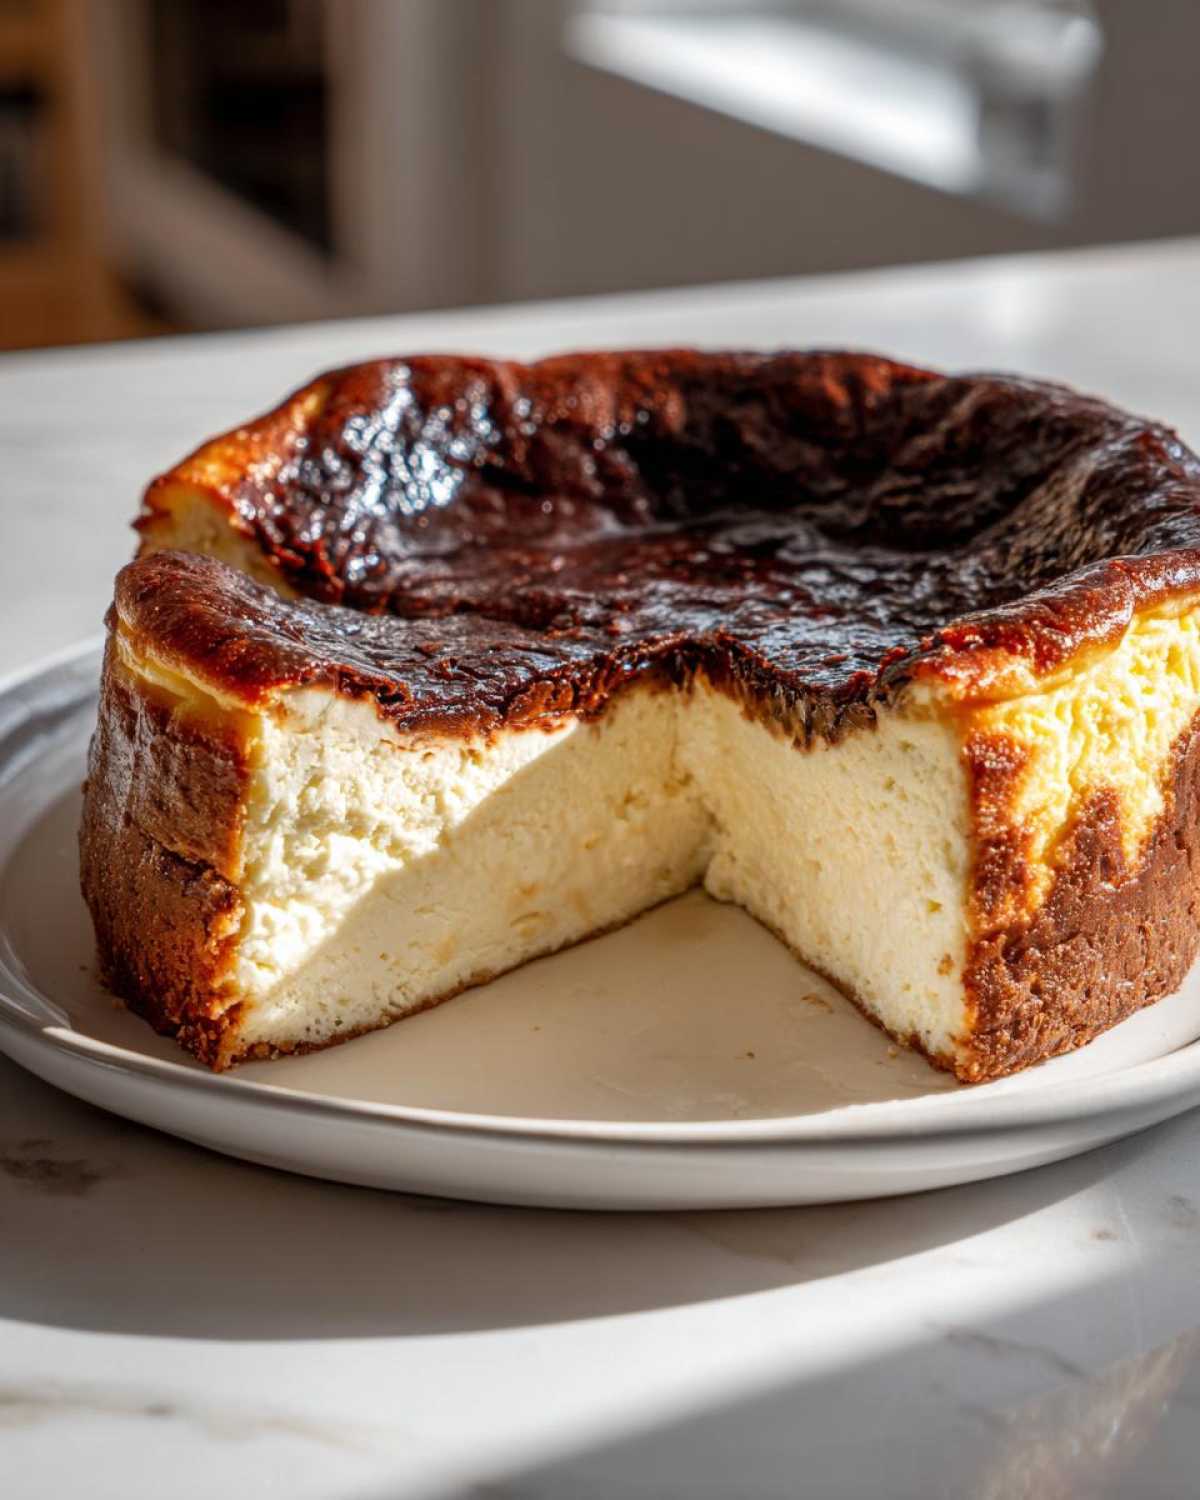
If you’ve ever seen photos of that stunningly dark, almost blackened top giving way to an impossibly smooth, creamy interior, you know the magic of the Basque Burnt Cheesecake. Honestly, I wrestled with this one for ages! I tried every trick to stop it from collapsing or getting grainy. But I finally cracked the code. This isn’t just another dessert; it’s the ultimate, easy basque burnt cheesecake recipe that actually works perfectly on the first try. Forget fussy water baths or crusts—this is pure, decadent Spanish simplicity, and I promise, achieving that perfect velvety center is easier than you think.

Why This Easy Basque Burnt Cheesecake Recipe Works (E-E-A-T Focus)
You’ll find a million versions out there, but what matters with the basque burnt cheesecake is reliable texture. We nailed this by paying strict attention to temperature and mixing. There are no complicated steps here, just a few non-negotiables for that perfect mousse-like result when you slice it. Trust me, sticking to these core principles means you get the real deal every single time. If you want to know more about how I test my recipes until they are foolproof, you can check out my little bio page right here.
- Absolutely NO over-mixing after the sugar goes in.
- Using a hot oven for that essential dark burn.
- Allowing ample time for the mandatory cooling process.
Achieving the Velvety Interior of Your Basque Burnt Cheesecake
This is where people go wrong! If your cream cheese or eggs are cold, you’ll get clumps, plain and simple. For a truly Creamy Burnt Cheesecake that melts on your tongue, everything must be perfectly at room temperature. I mean, push your finger into the cream cheese block—it should give easily. Warm ingredients blend without friction, creating that luscious, uniform batter we’re aiming for.
The Secret to the Signature Caramelized Cheesecake Top
Don’t panic when you see it turning dark! That deeply caramelized, almost black shell is the signature of a genuine basque burnt cheesecake, and it’s what makes it taste so complex and rich. We need high heat—200°C, that’s the magic number—to achieve that bittersweet crust. That dark color isn’t a mistake; it’s the flavor payoff. If it doesn’t look scary at the end, you didn’t bake it long enough!
Ingredients for Your Basque Burnt Cheesecake Recipe
Okay, let’s talk about what we are throwing into this beautiful, crustless dream. Since this basque burnt cheesecake recipe is so beautifully straightforward, that means ingredient quality *really* shines through. You don’t need a giant shopping list, but you do need the right amounts of the core things. We are using 900 grams of cream cheese—yes, that’s a lot, but this is a decadent dessert! Make sure those six large eggs and that heavy cream are at room temperature; it saves you so much grief later, seriously.
You’ll also need 250 grams of sugar, a touch of salt to wake everything up, a teaspoon of vanilla, and just 45 grams of all-purpose flour. That little bit of flour is what keeps this basque burnt cheesecake from spreading out too thin during baking, but notice how little there is? That’s how we keep it silky!
Ingredient Notes and Substitutions for Easy Basque Cheesecake
Listen, you can cheat on a lot of things in the kitchen, but not here. If you try to swap out the cream cheese for low-fat, it will weep water and refuse to set right. You absolutely need the full-fat, brick-style cream cheese. Aim for a brand you love, because that cheesy tang is central to this basque burnt cheesecake.
As for the heavy cream—that 35% fat stuff where I live—don’t try to do half-and-half or milk. The richness of the heavy cream is what contributes that signature moist collapse we want as it cools down. It transforms from that thin batter into a Rich Cream Cheese Cake that tastes like heaven.
I know someone will ask, so yes, you can technically use a lighter cream if you absolutely must, but I won’t vouch for the texture. For the best results in a homemade burnt cheesecake, stick to the full-fat dairy and room-temperature eggs. Simple as that!
How to Make Basque Burnt Cheesecake: Step-by-Step San Sebastian Cheesecake Instructions
Now for the fun part! Making this basque burnt cheesecake is honestly quite therapeutic once you get rolling. First things first: get that oven screaming hot—200°C (400°F). I always set my timer for the prep work before I even start mixing so I’m ready to go when the time comes. Remember, we aren’t fussy bakers here, but precision in the steps matters for texture!
We’ll start by getting our 9-inch springform pan ready. Then, we mix everything, being super gentle, and finally, we bake until it looks completely wrong on top, but feels perfect in the middle. Don’t rush the cooling! That’s the secret handshake for a truly decadent Spanish dessert.
Preparing the Pan for Your Crustless Cheesecake Recipe
This step is critical for that signature rustic edge everyone loves on their basque burnt cheesecake. Grab two large sheets of parchment paper. I mean, really crinkle them up in your hands like you’re making paper airplanes; don’t be gentle here! This intentional rumpling is what gives you those lovely, uneven ruffles around the edge of the finished cake.
You need to layer them in the pan so they cross each other and stick way up over the sides—maybe four inches too tall! This high collar protects the sides while the middle bakes and bubbles up. It keeps the outside from burning before the middle is set. It’s messy looking, but it’s the best preparation for a no crust cheesecake.
Mixing the Batter for a Velvety Cheesecake Dessert
Once your cream cheese is soft, beat it smooth. Then add the sugar. Here’s your first major boundary: Mix until they are just acquainted. Once the sugar is incorporated, stop the mixer and scrape down the sides. Eggs go in one at a time. Mix barely enough to combine each one. If you whip in too much air here, your basque burnt cheesecake won’t collapse nicely; it will be too cakey, not velvety!
Keep mixing speeds on low. After the cream, salt, and vanilla are in, gently sift in that flour. Mix until you see zero white streaks. That’s it! The batter will look thin—almost like heavy cream—but that’s exactly what we want for that beautiful, flowing texture. If you feel like you’ve mixed too much, just pour it in the pan quickly and move on!
Baking and Cooling Basque Burnt Cheesecake Instructions
Pop that thin batter into your prepped pan and slide it into that hot oven for about 50 to 60 minutes. You are looking for a top that is very dark brown—I mean, worryingly dark! The edges need to look set, but when you gently shake the pan, the center should still jiggle like Jell-O. Seriously, a significant wobble is good!

When it’s done, take it out. Now, this part is hard, but resist opening your fridge! Let it cool completely on the counter for at least three hours. It will sink dramatically in the middle—that’s normal; it’s how the velvety cheesecake dessert sets its final texture. Only after it’s room temperature do you cover it and chill overnight for the official setting process. If you want the absolute best slicing experience for your simple cheesecake baking, plan for an overnight chill!
If you’re interested in how I make my creamy homemade chocolate pudding, that recipe relies on careful heating, which is the opposite of the gentle mixing we need here!
Best Burnt Cheesecake Baking Tips for Perfect Results
So you’ve baked it, and maybe it didn’t look exactly like the pictures, or you’re already planning your next one. That’s the fun of this basque burnt cheesecake—it’s forgiving! I’ve learned a few things over the years about getting that truly decadent texture, especially when I don’t have a full 9-inch pan handy.
One thing I absolutely recommend for any high-sugar bake like this is using a bit of homemade cake release—you know, that greasy paste? It works wonders, even if you think your springform pan is non-stick. I have a great recipe for that simple recipe tutorial if you need it, though for Basque cheesecake, the parchment paper does most of the heavy lifting!
For troubleshooting, remember that wobble test we talked about—if you’re pulling it out and it’s totally solid, you baked it too long, and it’s going to be firmer, less like mousse. Next time, pull it sooner!
Now, let’s talk pan size. Most folks use the 9-inch springform, but if you’re keen to make a smaller batch or try a truly unique presentation, adapting for a Loaf Pan Basque Cheesecake is a fantastic option. You’ll need to use the same amount of parchment lining trickery so you can lift it out, but you must reduce the baking time significantly—maybe down to 35 or 40 minutes. Keep an eye on the edges setting, and remember, the thicker the cake, the longer the center needs to wobble before you pull it!
Serving Suggestions for Your Homemade Burnt Cheesecake
This is the moment of truth! After all that patient waiting—and believe me, keeping this homemade burnt cheesecake wrapped up in the fridge overnight felt like torture—you need to know how to serve it for the absolute best experience. My biggest piece of advice for this rich cream cheese cake is this: resist the urge to slice it straight from the back of the fridge!
When it’s ice cold, the interior is dense and firm. While some people like that, to truly appreciate the velvety, almost pudding-like texture that makes the basque burnt cheesecake famous, you need to let it relax on the counter for at least an hour. Seriously, serving it at room temperature unlocks all the flavor and makes it feel incredibly decadent.
Since this decadent Spanish dessert is so rich and tangy on its own, you don’t need to pile on heavy toppings. Sometimes, I just serve it plain because that caramelized top is all the drama you need. But if you want a little something extra to cut through the richness, simple fruit pairings are fantastic.
Raspberries are my go-to. They offer a sharp tartness that is just divine against the smoky sweetness of the burnt top. You can serve them fresh, or, if you want to get a little fancy without making a fuss, a simple homemade raspberry coulis is perfect. I use a quick simmered sauce recipe that’s super easy—it’s the same basic technique I use for my classic strawberry shortcake topping, just swap the berries!
A tiny dusting of powdered sugar is also beautiful if you’ve managed to get a very dark top but want to soften the look just a bit. But honestly, slice it into wedges, let it warm up slightly, and prepare yourself for the creamiest bite of your life!
Storage and Reheating for Your Simple Cheesecake Baking Creation
Making this incredible basque burnt cheesecake is a labor of love, but the best part is that it keeps getting better! Since this is such a rich and dense creation, storage is surprisingly simple, though there is one rule you absolutely have to follow: chilling time is your friend, reheating is not.
Right after it cools down on the counter for three hours, you need to cover it loosely—I usually use plastic wrap, but make sure it’s not touching the top unless you’ve put a layer of parchment over it first—and pop it into the refrigerator. You need a minimum of six hours for everything to firm up properly. Honestly, I wait until the next day. Letting your simple cheesecake baking masterpiece chill overnight is the secret weapon for getting those clean, beautiful slices.
When you pull it out the next day, it is the perfect, slightly chilled, rich cream cheese cake texture. It should last beautifully, tasting just as good, for about four or five days wrapped tightly in the fridge. The flavor actually deepens; the tanginess seems to bloom after a full overnight rest.
Now, for reheating—don’t bother! This cheesecake is designed to be eaten cool or at room temperature. Trying to warm up that caramelized top would just make it soggy and melt that gorgeous velvety center prematurely. If you accidentally left a slice out too long and it got too soft, just pop it back in the fridge for 30 minutes. I have a recipe for a truly decadent classic tiramisu that tastes amazing cold, but this cheesecake definitely prefers to rest properly before serving!
Frequently Asked Questions About Basque Burnt Cheesecake
I get so many questions about this recipe! It’s a showstopper, but because the look is so iconic, people worry when things look slightly different. Don’t stress! Most of the quirks of this basque burnt cheesecake are completely normal, but here are the answers to the most common things I hear from fellow bakers.
My Basque Burnt Cheesecake didn’t burn on top. What went wrong?
Oh, that’s usually just a temperature issue! Remember, we need that oven seriously hot—200°C (400°F). If your top is pale gold instead of dark brown, it likely means one of two things: either your oven thermometer is lying to you and the actual temperature was too low, or you just didn’t leave it in long enough. For that authentic flavor in your homemade burnt cheesecake, you need to see deep caramelization. Don’t be shy; keep it in until the edges are totally set and the top looks almost scorched!
Is it normal for the center of my Creamy Burnt Cheesecake to sink?
Yes! In fact, if it doesn’t sink, you might have overbaked it just a tiny bit! When this decadent Spanish dessert comes out of the oven, the center needs to be very jiggly—like thick pudding. As it cools down on the counter, that loose center pulls inward, creating that signature dip we expect in a true San Sebastian Cheesecake. It’s nature’s way of collapsing into that perfect, dense, velvety texture. You can always check my privacy policy here, but I promise you, the sunken center is a good sign!
Can I make this No Crust Cheesecake recipe ahead of time?
Absolutely, and you should! While technically you *could* eat it after the three-hour room temperature cool down, I insist you chill this no crust cheesecake for at least six hours, but overnight is magic. When you chill it, the creamy interior firms up just enough so you can get those impossibly clean slices you see online. Store it wrapped tightly in the fridge, and it’s perfect to pull out an hour before your guests arrive!
Estimated Nutritional Data for a Slice of Rich Cream Cheese Cake
Who really bakes a basque burnt cheesecake to count calories? I mean, come on, it’s pure, glorious, caramelized cream cheese heaven! But I know some of you super-planners like to see what you’re getting into, so I pulled together the estimated numbers. Remember, this is for one slice, serving 10 people in total, based on the big 900g block of cream cheese we used!
These figures are just estimates, obviously. If you sneak a bigger slice (which I totally do sometimes!), your numbers will skew higher. If you want to check out my full disclaimer page, you can find it here.
| Nutrient | Amount Per Slice |
|---|---|
| Serving Size | 1 slice |
| Calories | 450 |
| Sugar | 35 g |
| Fat | 35 g |
| Saturated Fat | 22 g |
| Protein | 8 g |
| Carbohydrates | 28 g |
| Sodium | 250 mg |
See? It’s a true indulgence, which is exactly what a stunning rich cream cheese cake like this should be! Don’t forget that the most important metric for this homemade burnt cheesecake is sheer joy, not the macronutrients!
Share Your Experience Making This Impressive Dessert
That’s it! You have successfully conquered the ultimate basque burnt cheesecake. I truly hope you had as much fun watching that top turn beautifully dark as I always do. Now comes the best part: telling me how it went!
Please, please, please leave a rating below. Knowing that this recipe—which took me so much tweaking to get just right—is working for you truly makes my day. Did you serve it with berries? Did you chill it overnight? Did you worry about the wobble (you shouldn’t have!)?
I live for those comments because they help me make sure this easy Basque cheesecake guide is as helpful as possible for everyone wanting to bake this stunning dessert for the first time. If you made any cool swaps, or if you need to get in touch with me for any reason, you can always reach out via my contact page!
Happy baking, my friend. Enjoy every last bite of that smoky, creamy delight!
Print
The Ultimate Easy Basque Burnt Cheesecake: Perfectly Creamy with a Signature Caramelized Top
- Total Time: 7 hours 15 min
- Yield: 10 servings 1x
- Diet: Vegetarian
Description
Make a simple, crustless Basque Burnt Cheesecake that achieves a deeply caramelized exterior and a smooth, velvety interior. This recipe focuses on ease and achieving the classic San Sebastian style.
Ingredients
- 900 g cream cheese, softened to room temperature
- 250 g granulated sugar
- 6 large eggs, room temperature
- 480 ml heavy cream (35% fat)
- 1 teaspoon vanilla extract
- 1/4 teaspoon salt
- 45 g all-purpose flour
Instructions
- Preheat your oven to 200°C (400°F). Line a 9-inch springform pan with two layers of parchment paper, allowing the paper to extend several inches above the rim of the pan. Scrunch the paper slightly to help create the rustic edges.
- In a large bowl, beat the softened cream cheese with an electric mixer until completely smooth, about 2 minutes. Scrape down the sides.
- Add the sugar and beat until just combined and creamy. Do not overmix.
- Add the eggs one at a time, mixing briefly after each addition until just incorporated.
- Slowly mix in the heavy cream, vanilla extract, and salt until the batter is smooth.
- Sift the flour over the batter and mix on low speed until no streaks of flour remain. The batter will be thin.
- Pour the batter into the prepared pan.
- Bake for 50 to 60 minutes. The top should be very dark brown, almost black, and the edges should be set, but the center should still have a significant wobble.
- Remove the cheesecake from the oven and let it cool completely on a wire rack at room temperature for at least 3 hours. The center will sink as it cools.
- Chill the cheesecake in the refrigerator for at least 6 hours, or preferably overnight, before serving.
- When ready to serve, gently remove the parchment paper sides. Serve at room temperature for the best texture.
Notes
- Use full-fat cream cheese for the best creamy texture.
- Ensure all dairy ingredients are at room temperature before mixing to prevent lumps.
- Do not worry about the dark top; this caramelization is essential to the flavor profile.
- If you prefer a slightly firmer texture, bake for an additional 5 minutes.
- Prep Time: 15 min
- Cook Time: 60 min
- Category: Dessert
- Method: Baking
- Cuisine: Spanish
Nutrition
- Serving Size: 1 slice
- Calories: 450
- Sugar: 35
- Sodium: 250
- Fat: 35
- Saturated Fat: 22
- Unsaturated Fat: 13
- Trans Fat: 0.5
- Carbohydrates: 28
- Fiber: 0
- Protein: 8
- Cholesterol: 200