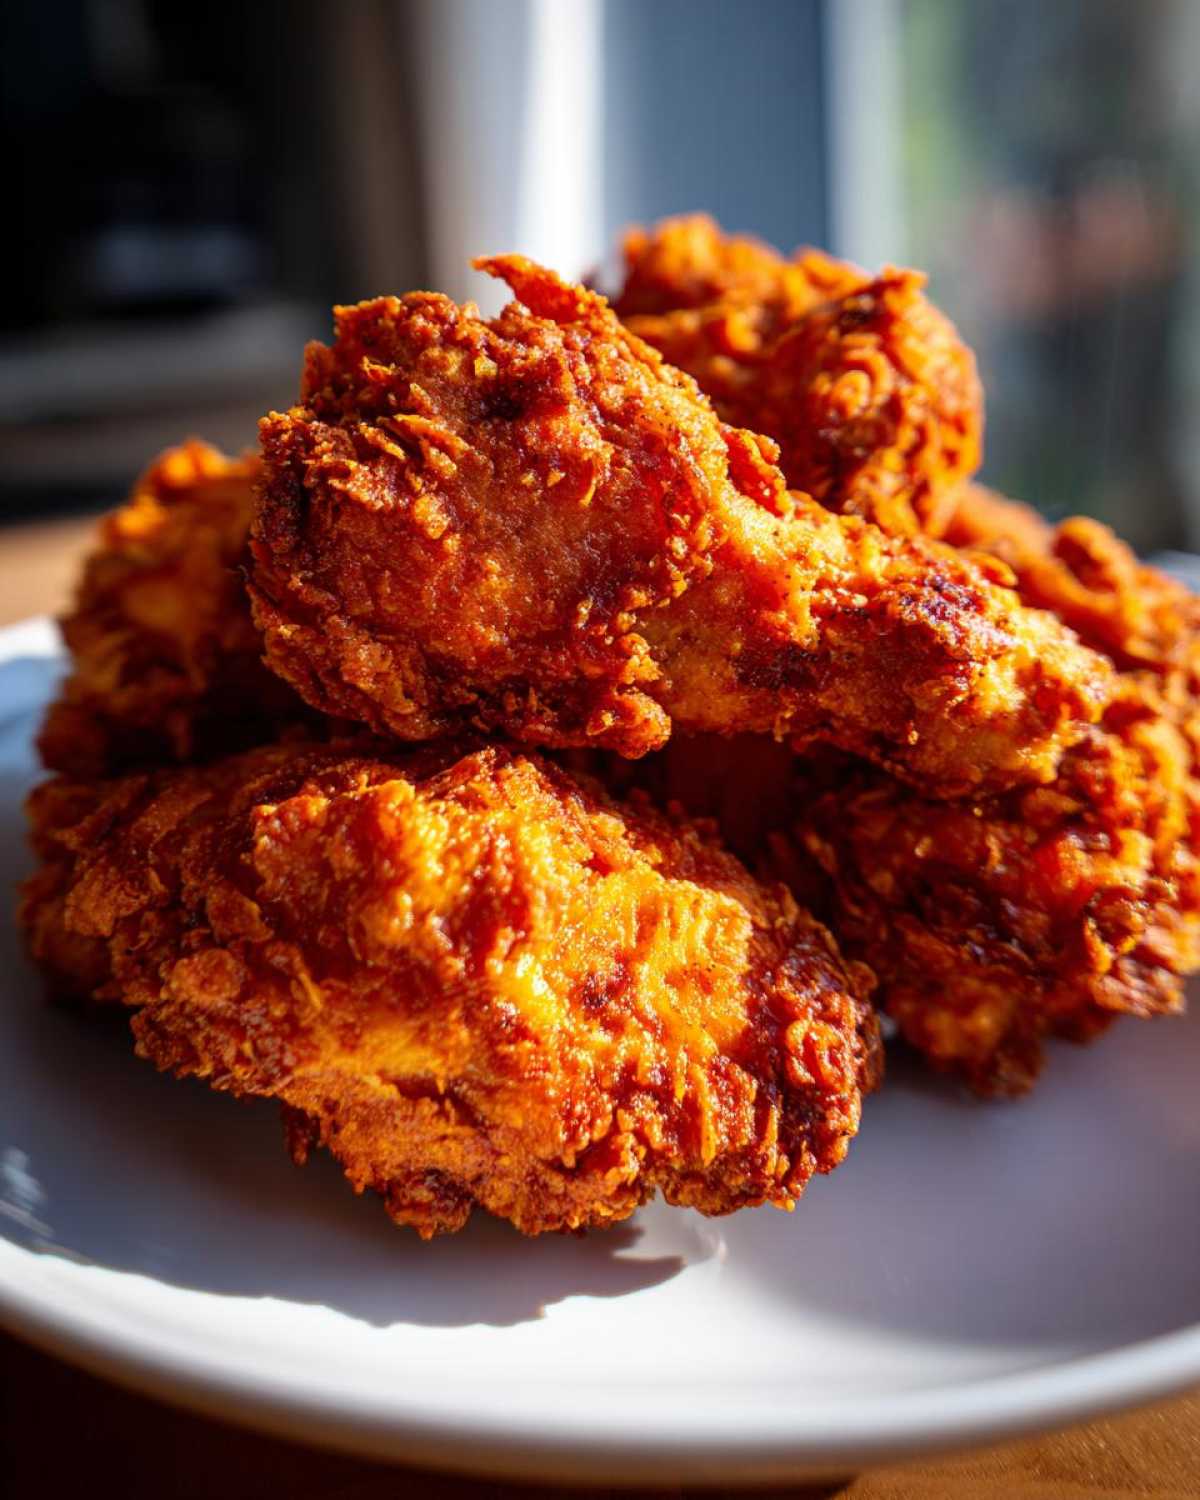
If you’ve ever dreamed of that perfect bite—that crackle when your teeth hit the crust, followed by the most tender, juicy meat you’ve ever had—then stop looking! Everyone wants the best fried chicken, the kind that makes everyone ask for your secret. Well, pull up a chair, because I’m finally sharing my recipe for Ultra-Crispy Buttermilk Fried Chicken. This isn’t just any recipe; this is the one I spent years tweaking to make sure the crust holds onto every bit of the flavor and stays ridiculously crunchy. It’s pure Southern comfort, perfected right here in my kitchen!
Why This Buttermilk Southern Fried Chicken Recipe Delivers Peak Crispiness
It’s not luck, my friends; it’s pure chemistry that makes this Southern fried chicken stand out from the crowd. When you’re after that perfect Juicy and Crispy Chicken result, you need to respect the process. We nail the texture because we treat the chicken right before it even thinks about hot oil. The combination of the buttermilk soak and my special dredge technique are what separates a soggy mess from the kind of deeply satisfying, golden crust you dream about.
We’re building flavor and texture in stages. Once you try this, you’ll understand why I never skip a single step. Want to see how we pair this with some classic sides? You should definitely check out my recipe for Southern Fried Cornbread when you finish up here!
The Secret to Juicy and Crispy Chicken: Buttermilk Brining
This is non-negotiable! The buttermilk isn’t just for flavor; it’s a tenderizer. The acid in the milk gently works on the muscle fibers, keeping your chicken incredibly moist inside. Plus, those milk solids are sticky—they cling to the flour later, which is the first step to a great coating. You really need at least four hours for this, but honestly, I always leave mine soaking overnight. Trust me, the longer it sits, the less likely you are going to deal with dry spots!
Achieving the Ultimate Crunchy Chicken Coating with a Double Dredge
Now for the real magic that delivers that iconic Crunchy Chicken Coating: the double dip! Once your chicken comes out of the buttermilk, give it a heavy coat in the seasoned flour. Don’t just toss it; press that flour in there. Then, that quick second dip back into the buttermilk—just a flash—and right back into the flour for another big, enthusiastic coating. This layering creates those fantastic, craggy nooks and crannies that get super golden and crunchy when they hit the deep fryer. That’s what that amazing sound is!
Essential Ingredients for Perfect Fried Chicken
Okay, pulling this incredible fried chicken together starts with knowing you have exactly what you need. Don’t try to cheat these ingredients, because they truly work together to create that perfect bite. Everything has a job, and we’re listing it out so you can gather your supplies before you even turn on the stove!
For the brine, you’ll need about 3 lbs of your favorite chicken pieces—I always use a mix of thighs and drumsticks for the best flavor. Make sure you have 2 cups of buttermilk and just a splash of your favorite hot sauce mixed in there. That’s what keeps the meat tender while it soaks!
Then comes the flavor coating—this is where we load up the spices. You need 3 cups of all-purpose flour, but that’s not all! We sneak in 1/2 cup of cornstarch and 1 teaspoon of baking powder. That baking powder is the sneaky little thing that helps the batter puff up just right. Don’t forget your salt, pepper, paprika, garlic powder, and cayenne to get that good Southern flavor!
How To Make Fried Chicken: Step-by-Step Instructions
Alright, now we get down to business! Making incredible fried chicken is all about following the sequence exactly so you don’t end up with soggy bottoms or undercooked insides. We’re going to break this down into three manageable chunks. If you follow these directions without rushing, you’ll have the most amazing, crispy, golden dinner imaginable. And hey, if you were looking for another deep-fried delight, make sure you bookmark my Chicken Katsu Curry for next week!
Preparing the Buttermilk Soak and Chicken
First thing’s first: get that chicken soaking! Take your pieces and plop them into a bowl with the buttermilk and hot sauce. Stir it around so everything is coated. Cover that bowl up tight and stick it in the fridge. I said it before, but I’ll say it again: minimum four hours, but overnight is when the magic *really* happens to tenderize everything. When it’s time to bread, just pull the chicken out, letting the extra buttermilk drip off—don’t wipe it clean!
The Dredging Process for Maximum Crunch on Your Fried Chicken
While the chicken is finishing its soak, whisk up all those dry ingredients in a wide, shallow dish—this is your dredge. Now comes the fun part! Take a piece of chicken and press it hard into that flour mixture. You want it completely covered, roughing it up so the coating is thick. Then, give it that quick dunk back into the leftover buttermilk, and immediately press it hard into the flour AGAIN. This double-dip creates those irresistible peaks and valleys that get perfectly crunchy.
Deep Frying Technique for Golden Brown Chicken
This is where vigilance counts! Heat your oil in that heavy skillet until it hits exactly 325 degrees Fahrenheit. We need that steady heat! Carefully lower your double-dredged pieces into the oil. Never, ever crowd the pan, or the oil temp will plummet and you’ll get greasy bird, which is a tragedy. Fry them for about 6 to 8 minutes per side until they’re deep golden brown. Use a thermometer to make sure anything over an inch thick hits 165°F internally. Then, you snatch them out and let them rest on a wire rack immediately!
Tips for Success with Your Crispy Fried Chicken Recipe
I know I get a little intense about the steps, but these final tips are what keep this recipe foolproof! Seriously, the difference between great fried chicken and legendary chicken often comes down to temperature management. You absolutely must keep that oil happy. I always watch my thermometer like a hawk, making sure the heat stays right between 300°F and 335°F while frying. Too cool, and you get a greasy mess; too hot, and you burn the coating before the inside cooks.
Here’s one of my absolute favorite tricks to guarantee that ultimate crunch: After you finish that second heavy dredge in the flour, let the pieces sit on the wire rack for about 15 minutes before they go anywhere near the oil. This resting time lets the flour absorb some moisture, setting up that coating perfectly. It really helps lock in that crunch factor! For those giant chicken breasts, if you are nervous about them cooking through, pull them out around 330°F and drop them right onto a sheet pan in a 350-degree oven to finish up. They’ll stay gorgeous and perfectly cooked!
If you’re looking for other ways to get crispy in the kitchen, you might want to check out my guide on Crispy Air Fryer Chicken Wings!
Ingredient Notes and Substitutions for Fried Chicken
I always get asked if you can swap out ingredients in this fried chicken recipe, and usually, my answer is yes, but you have to know what you’re trading for! The buttermilk is key, but please don’t panic if you’re out! You can fake it easily: just take regular milk and stir in a tablespoon of white vinegar or lemon juice. Let that sit for about five minutes until it curdles a little—that acidity is what matters most for tenderizing.
When it comes to oil, I usually grab vegetable or peanut oil because they have high smoke points. Some cooks swear by shortening for that classic, rich flavor, and that’s fine, but vegetable oil is easier to handle for most home cooks. Just make sure whichever you choose, you have enough of it to keep your chicken submerged for a proper deep fry!
Serving Suggestions for Your Southern Fried Chicken
This rich, savory classic deserves the best partners on the plate, right? You can’t just have amazing Southern Fried Chicken by itself. For the ultimate Savory Chicken Dinner Ideas, think about what balances that glorious, salty crunch! My go-to is always creamy mashed potatoes—you absolutely need to try my Buttery Garlic Mashed Potatoes because the gravy goes perfectly with them.
But you need something bright too! A sharp, vinegary coleslaw cuts right through the richness of the deep-fried crust. And of course, you need soft, warm biscuits to sop up any leftover seasoning or pan drippings. If you’re looking for a quick bread option instead of biscuits, my easy homemade naan bread is surprisingly good for scooping up all the juices too!
Storage and Reheating Instructions for Leftover Fried Chicken
Listen, I rarely have leftovers because everyone digs in, but when I do, storage is everything! Make sure that fried chicken drains completely on a wire rack after frying—never paper towels, because that traps steam and makes the crust soggy fast. Pop the cooled chicken into an airtight container in the fridge for up to three days. When it comes to reheating the Classic Fried Chicken, forget the microwave! Pop it in a 400-degree oven or, even better, hit it in the air fryer. If you need a side idea that reheats well, try my Air Fryer Baked Potatoes!
Frequently Asked Questions About Making Fried Chicken
I get so many messages after people make this recipe, and that’s the sign of a truly Foolproof Fried Chicken method! Here are some of the most common questions I hear when folks are tackling their first batch of Classic Fried Chicken.
Can I make this Crispy Fried Chicken Recipe in an Air Fryer?
You absolutely can try, but you won’t get the exact same experience! The air fryer is fantastic for getting things crispy, but since it doesn’t use the deep oil bath, the crust won’t have that same classic, craggy, shattering texture that the buttermilk and dredging process gives us. It’ll be healthier, but definitely different!
What is the best oil to use for deep fried chicken?
For deep frying chicken, you need something that can handle high heat without smoking out your kitchen. I always lean toward plain vegetable oil or peanut oil because they are reliable and flavor-neutral. Canola oil works great too! My only rule is make sure you have enough oil so the chicken is mostly swimming in it—that helps keep the temperature consistent.
Can I just use chicken breasts instead of mixed pieces?
Yes, you can! Chicken breasts are great, especially if you butterfly them or slice them in half horizontally. Since breasts are leaner and thicker, just remember that they take longer to cook internally, so keep a close eye on that oil temp, or pull them out and finish them in a moderate oven like I mentioned earlier. Don’t let those lovely crunchy edges burn waiting for the center to cook!
Why do I need to rest the coated chicken for 15 minutes?
That 15-minute rest is crucial for texture stability! If you drop the freshly dredged chicken straight into the hot oil, the coating can instantly flake off because the liquid hasn’t had time to meld with the flour base. Resting lets that coating hydrate just enough to truly stick and set up so it doesn’t fall apart during frying.
Nutrition Estimates for This Fried Chicken
I always try to give you folks the best picture of what goes into your plate, even if this is that ultimate comfort food indulgence! Keep in mind these numbers are just estimates because the cut of chicken you choose and exactly how much oil your coating soaks up will change things. For serving size (one piece), we’re looking at about 450 calories. You get a hefty 30 grams of protein, which is great, but you’ll also see about 28 grams of fat in there, so enjoy it responsibly!
We’ve got around 18 grams of carbohydrates. Everything else, like the sodium, sugar, and cholesterol numbers, can be found in more detail on my official recipe disclaimer page, but honestly, you only make this fried chicken recipe every once in a while, so don’t sweat the small stuff! Just savor that perfect crunch!
Print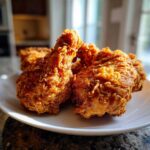
Ultra-Crispy Buttermilk Fried Chicken
- Total Time: 55 min
- Yield: 4 servings 1x
- Diet: Low Lactose
Description
A recipe for classic Southern fried chicken using a buttermilk soak to keep the meat juicy while achieving an extra crunchy, golden crust.
Ingredients
- 3 lbs chicken pieces (thighs, drumsticks, breasts)
- 2 cups buttermilk
- 1 tablespoon hot sauce
- 2 teaspoons salt
- 1 teaspoon black pepper
- 1 teaspoon paprika
- 1 teaspoon garlic powder
- 1/2 teaspoon cayenne pepper
- 3 cups all-purpose flour
- 1/2 cup cornstarch
- 1 teaspoon baking powder
- Vegetable oil or shortening for frying
Instructions
- Place the chicken pieces in a large bowl. Pour the buttermilk over the chicken, ensuring all pieces are submerged. Stir in the hot sauce. Cover and refrigerate for at least 4 hours, or preferably overnight.
- In a shallow dish, whisk together the flour, cornstarch, baking powder, salt, pepper, paprika, garlic powder, and cayenne pepper. This is your dredge mixture.
- Remove the chicken from the buttermilk, letting excess drip off, but do not rinse.
- Dredge each piece thoroughly in the flour mixture, pressing the flour onto the chicken to create a thick, craggy coating.
- For extra crispiness, dip the floured chicken back into the remaining buttermilk for a quick second dip, then immediately return it to the flour mixture for a second, heavy coating.
- Heat 2-3 inches of oil in a deep, heavy-bottomed skillet or Dutch oven to 325 degrees Fahrenheit. Use a thermometer to monitor the temperature.
- Carefully place the chicken pieces into the hot oil, ensuring you do not overcrowd the pan. Work in batches.
- Fry the chicken for about 6-8 minutes per side, turning as needed, until deep golden brown and cooked through (internal temperature of 165 degrees Fahrenheit). Smaller pieces cook faster than larger pieces.
- Remove the chicken from the oil and place it on a wire rack set over a baking sheet to drain excess oil. Do not place directly on paper towels, as this can steam the bottom crust.
- Serve hot.
Notes
- Maintain the oil temperature between 300F and 335F during frying for the best results. If the oil is too cool, the chicken absorbs too much grease; if too hot, the outside burns before the inside cooks.
- For the crispiest coating, let the dredged chicken rest on the wire rack for 15 minutes before frying. This allows the coating to hydrate slightly.
- If you are cooking larger pieces like breasts, you may need to finish them in a 350 degree Fahrenheit oven after frying to guarantee they reach a safe internal temperature without burning the exterior.
- Prep Time: 20 min
- Cook Time: 35 min
- Category: Dinner
- Method: Deep Frying
- Cuisine: American
Nutrition
- Serving Size: 1 piece
- Calories: 450
- Sugar: 3
- Sodium: 550
- Fat: 28
- Saturated Fat: 7
- Unsaturated Fat: 21
- Trans Fat: 0
- Carbohydrates: 18
- Fiber: 1
- Protein: 30
- Cholesterol: 110