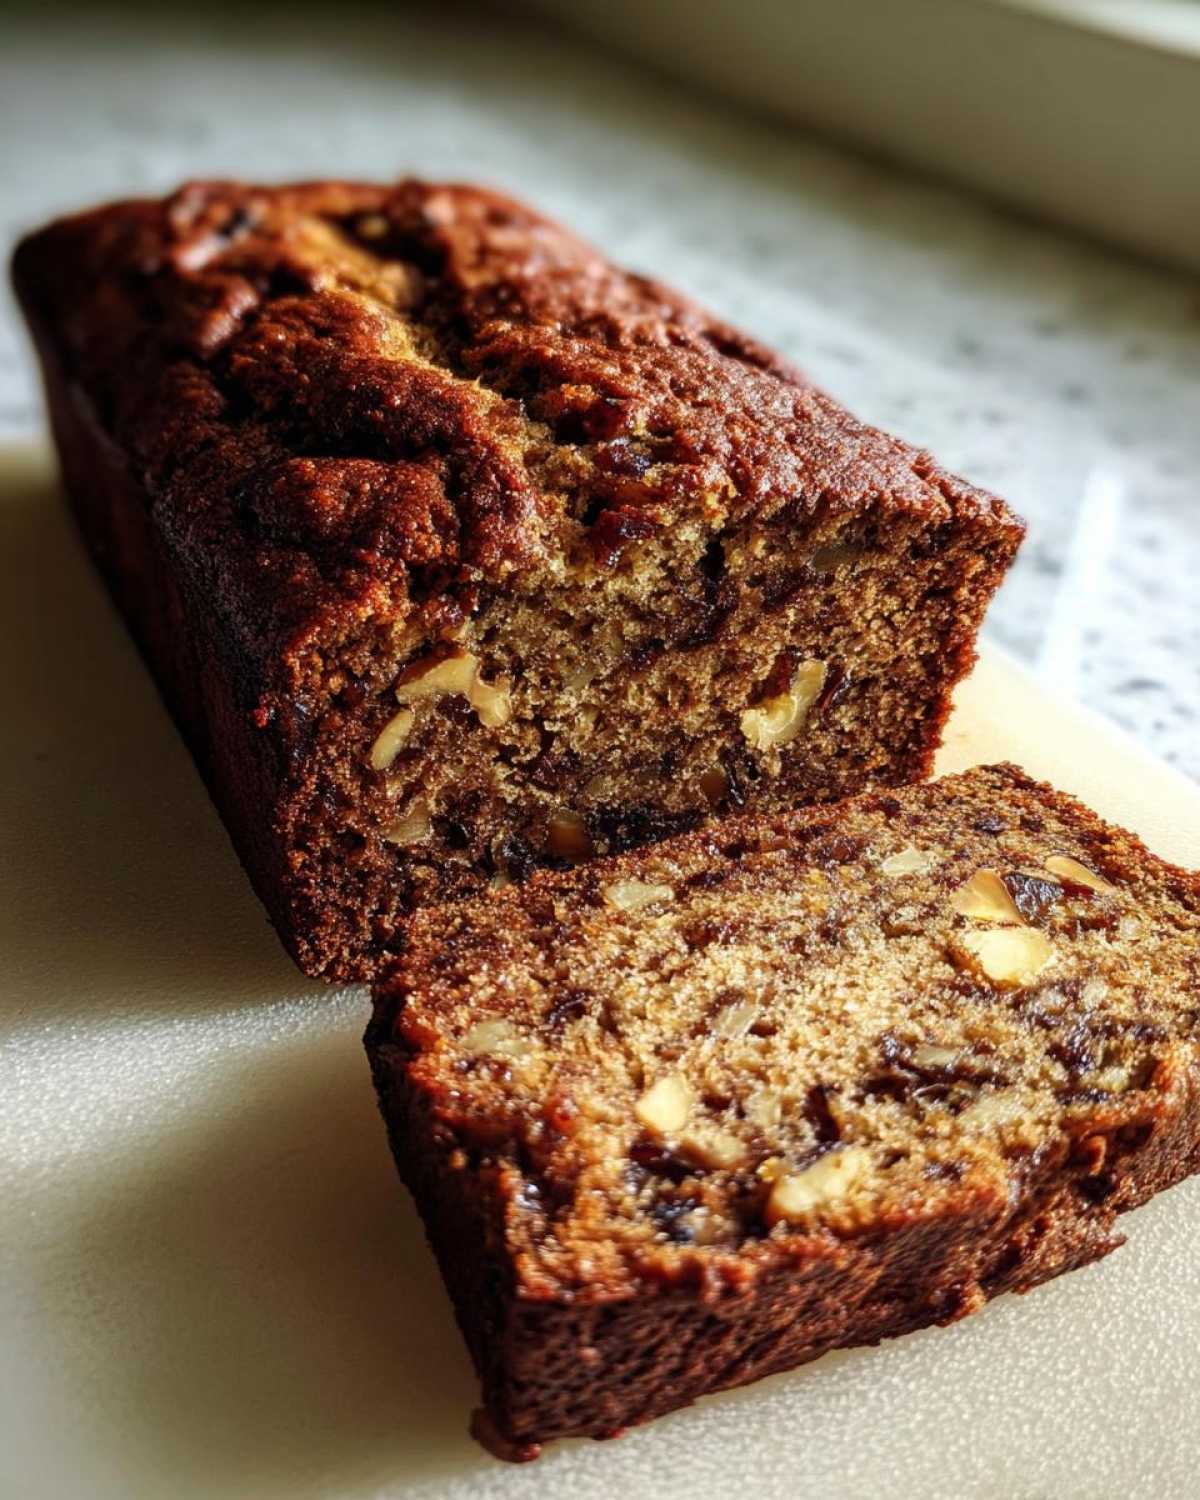
Oh, there is nothing that smells quite like home to me like a sweet, spiced quick bread baking away on a lazy afternoon. Forget fussy layer cakes; quick breads are where the real comfort lives in my kitchen! If you’ve ever been burned by a dry, crumbly loaf, you can stop Googling right now. I’m giving you my gold standard: this Old-Fashioned, Ultra-Moist Date Nut Bread Recipe—the one I’ve been making since I first learned to measure flour. Trust me, this version stays wonderfully tender for days. That lovely, dense date nut bread you dream about? This is it, made simple.
Why This Old-Fashioned Date Nut Bread Recipe Works So Well
There are a million quick bread recipes out there, but many skip the critical steps that turn a decent loaf into an absolutely unforgettable one. My goal with this Moist Date Nut Bread Recipe is to give you a result that is dense, fragrant, and stays moist enough to eat the next morning right out of the fridge. It’s pure comfort food baking, straight from the playbook. If you love finding ways to keep fruit breads tender, you might also adore tips from my guide on making moist and fluffy zucchini banana bread!
The Secret to Ultra-Moist Date Nut Bread
Forget just pouring hot water over your dates; we’re taking it one step further! The real magic happens right at the start when we combine the chopped dates, hot water, and baking soda in that first step. That little fizz isn’t just random; the baking soda reacts with the dates and water to dramatically soften them. This pretreatment ensures that every single piece of date practically melts into the bread, adding incredible moisture that lasts. If you’re looking for a reliably tender *date nut bread*, that initial soak is non-negotiable.
Classic Flavor Profile of Our Date Nut Bread
We keep things wonderfully traditional here. We aren’t messing around with too many exotic spices—it’s the deep, molasses notes from the packed brown sugar playing against the earthy walnuts that really make this loaf shine. It’s not overly sweet, either! The dark sweetness acts as a perfect backdrop for the naturally caramelized flavor of the dates. It’s the kind of loaf that demands a thick swipe of salted butter the second it comes out of the oven.
Gathering Ingredients for Your Date Nut Bread Loaf
Honestly, the beauty of a great quick bread baking recipe like this is that the ingredients list is straightforward. We aren’t reaching for obscure items here; it’s all pantry staples, which is why I love calling this a proper *Old Fashioned Quick Bread*. But even with simple things, attention to detail matters! When you gather your components, make sure you’re being specific—it really impacts that luxurious texture we are aiming for.
First up, your dates! You need 1 cup of dates, and I specify chopped. If you can get your hands on Medjool dates, absolutely go for them, as they are gloriously soft. If you’re using standard dried dates, just make sure they are nice and soft before chopping. Don’t forget the baking soda; it teams up with the boiling water to soften those dates beautifully during the soak.
On the fats and sugars front, we want 1/2 cup of unsalted butter, and it simply *must* be softened—not melted, just soft enough that your fingertip leaves a dent when you press it. We are using a full 1 cup of packed light brown sugar. Really pack that measuring cup down! Finally, grab two large eggs and your walnuts or pecans (I usually swap between walnuts and pecans depending on what I have). See? Simple, reliable, and ready for mixing!
Step-by-Step Instructions for Easy Quick Bread Baking
Setting up is half the battle when you’re aiming for a lovely loaf in only 60 minutes of cook time! This recipe is designed for maximum ease—the only slightly fussy part is the date prep, but trust me, that 10 minutes is worth gold later. Before you even start creaming butter, get that oven to 350°F (175°C). Then grab your standard 9×5 inch loaf pan, grease it up well, and dust it with flour. This classic preparation keeps our Homemade Date Bread from sticking!
Preparing the Dates and Activating Baking Soda
This is the absolute bedrock of a moist loaf. Take your chopped dates and pop them into a sturdy, heatproof bowl—don’t worry about finding a glass one, just something that can handle the heat. Carefully pour that cup of boiling water directly over the dates, and immediately toss in that teaspoon of baking soda. Stir it quickly. Now, walk away for 10 minutes! You’ll come back to a thick, sludge-like mixture. This soaking period is key because it begins dissolving the dates and helps the baking soda tenderize the starches, guaranteeing that luscious texture in your final *date nut bread*.
Mixing Wet and Dry Components for the Date Nut Bread
Time to bring the main components together! In a large mixing bowl, start your creaming: beat that softened butter and brown sugar until it’s genuinely pale and fluffy—it should look totally light. Next, introduce the eggs one at a time, making sure each one is incorporated before adding the next. Stir in the vanilla. Now, switch gears: in a separate bowl, whisk your flour, baking powder, and salt. You’ll add these dry ingredients to the wet mixture gradually. Watch closely here: mix only until you no longer see streaks of flour. If you combine them too much, you’ll activate too much gluten, and we want tender, not tough! If you’re looking for other easy baking methods, check out these tips for moist banana oatmeal muffins.
Baking and Cooling Your Homemade Date Bread
Once the batter is mixed, gently fold in the date mixture (yes, pour in all the liquid too, it’s needed!) and your nuts. Pour everything into your prepared pan and pop it in the oven. It generally takes about 55 to 65 minutes. How do you know when it’s done? Test it! Insert a wooden skewer right near the center. If it comes out clean, you’re golden. If it has wet batter, give it another 5 minutes. The final important step is patience: leave the loaf in the pan for exactly 10 minutes before turning it out onto a cooling rack. This resting time allows the structure of your *Homemade Date Bread* to set up perfectly so it doesn’t cling to the sides when you try to unmold it!
Tips for the Best Date Nut Loaf Success
Okay, we’ve covered the main steps for your absolute best *Date Nut Loaf*, but let me drop a couple of extra little secrets I’ve picked up over the years. These small adjustments take your loaf from great to absolutely addictive!
Remember that boiling water we used to soften the dates? Listen closely: substitute half of that water with really strong, hot black coffee. Seriously! The coffee doesn’t make the bread taste like coffee; instead, it deepens that rich, toffee-like flavor from the brown sugar and dates. It gives the whole loaf a wonderful background note that people can never quite place!
Also, when you’re deciding on nuts, pecans are often sweeter than walnuts, but either works beautifully. If you ever want to sneak some extra warm spice in there, a tiny pinch of ground cardamom along with the baking powder works wonders, especially if you’re looking to make a loaf similar to my favorite spiced breakfast bread. Just remember, a little goes a long way with those added elements!
Variations on the Classic Date Nut Bread
While I swear by this exact formula for the ultimate *Old Fashioned Quick Bread*, I know we all like to mix things up a little bit! Baking should be fun, and seeing as you’ve nailed the basic *Sweet Loaf Recipe*, why not experiment a little? I’ve made tons of slight tweaks over the years when the mood strikes me.
One of the easiest, healthiest swaps you can make is going partial whole wheat. If you swap out half of your all-purpose flour for whole wheat flour, you get a denser, slightly nuttier flavor profile. Just be careful—whole wheat can sometimes soak up a tiny bit more moisture, so trust your eye when pouring in that date mixture!
If you’re feeling like adding some extra warmth to this *Comfort Food Baking* star, sprinkle in a half teaspoon of ground cinnamon and a quarter teaspoon of nutmeg when you mix your dry ingredients. It turns this into a wonderfully fragrant *Spiced Date Bread* that is just heavenly during the cooler months. It smells incredible while it bakes!
Now, the most famous variation I ever get asked about is the *Banana Date Nut Bread Variation*. It’s ridiculously easy. If you have a couple of overripe bananas lying around—and who doesn’t?—just mash two medium ones and add them in right when you add the date mixture. The banana adds amazing creamy moisture, but be warned: it will change the baking time slightly, usually adding about 5 to 10 extra minutes in the oven. It’s a new classic in its own right, kind of like how my cranberry orange muffins are a total crowd-pleaser!
Serving Suggestions for Your Sweet Loaf Recipes
You’ve waited patiently while your glorious *Homemade Date Bread* cooled, and I know the temptation is to slice into it right away, but the best way to enjoy this loaf is when it’s slightly warm. It just melts the butter better, you know? This loaf is so versatile; it works as a perfect *Quick Bread for Breakfast*, or it’s robust enough to be a satisfying *Wholesome Snack Bread* any time of day.
My absolute favorite way to eat this is simple: slice it nice and thick, toast it lightly—just barely enough to warm it through—and slather it with quality salted butter. The slight melt of the salt crystals into the warm date pockets? Heaven on earth! That little bit of salt contrast is everything.
If you’re serving this loaf for a weekend brunch spread, you can certainly dress it up a bit more! Cream cheese is an amazing partner for date bread—either freshly whipped or even just a thick layer of store-bought spread works wonders. It adds a little tang to cut through the sweetness of the brown sugar and dates. If you’re looking for other amazing brunch ideas that use baked goods, you have to check out how I make maple pecan french toast roll-ups!
For an even more decadent treat, especially if you have leftovers the next day, try a very simple glaze. You don’t need anything heavy. Mix about half a cup of powdered sugar with just a splash of milk or even a tiny bit of orange juice (if you want to enhance the fruit notes) until it’s just pourable. Drizzle it quickly over the completely cooled loaf. Just a light coating is all you need. Enjoy every single slice!
Make Ahead Bread and Storage Instructions for Date Nut Bread
I love that this is considered a *Make Ahead Bread* because, honestly, like most good quick breads, it tastes even better the second day! That little bit of time lets all those spices and the date moisture really settle in and marry up. Since this *Date Nut Bread* is so moist by nature, storage is super easy, but you do need to follow a couple of quick rules to make sure it doesn’t dry out on you.
If you plan on eating the loaf within three or four days, just wrap it up tightly once it is completely cool. I mean *tightly*! Use plastic wrap—the good heavy-duty stuff works best—to create a snug seal right around that whole loaf. Then, I always add a layer of aluminum foil over the plastic wrap. This double barrier keeps air out, which is the enemy of moistness, you know?
If you made this big *Classic Loaf Cake* and know it’s going to sit around for a week or two, freezing is your best friend! Make sure the loaf is fully cooled down before you wrap it. Wrap it really well in that plastic wrap, sealing all the edges tight, and then wrap it snugly again in foil. You can even pop the foil-wrapped loaf into a large freezer bag for a third layer of protection against freezer burn. It thaws beautifully on the counter for a few hours, or you can pop the foil-wrapped loaf into a slightly warm oven (like 300°F) for about 15 minutes to bring it right back to life.
It’s perfect for holiday baking too, since you can make it ahead of time and have one less thing stressing you out on the big day. If you want a sweet, spiced bread ready to go for a holiday breakfast, this is a winner! For other great make-ahead favorites, take a look at how I make my cinnamon swirl banana bread loaf—it freezes just as well!
Frequently Asked Questions About Date Nut Bread
It happens every time I share this recipe—people have so many great questions about making sure their loaf turns out perfectly moist! It’s tricky when you’re used to drier recipes, but I promise, this is foolproof if you follow the steps. Ask away!
Can I make this date nut bread recipe without nuts?
Absolutely! This bread is fantastic with or without nuts. If you or a guest has a nut allergy, or you just ran out of walnuts, you can simply omit them entirely. To keep that lovely texture that the nuts provide, try substituting them with an equal amount of sunflower seeds or chopped pumpkin seeds. They toast up nicely in the oven and give you a little bit of crunch back!
How do I prevent my date nut bread from being dry?
This is the big one, right? Honestly, dryness in a quick bread usually comes from two places: overbaking or skipping the date prep. First, make sure you are pulling that loaf out as soon as the skewer comes out with moist crumbs—don’t wait for it to be totally clean dry, that’s when the edges dry out! Second, and this is crucial for our primary keyword, never skip step two: include *all* of that soaking liquid when you add the dates to the batter. That liquid is pure moisture insurance for your date nut bread!
What kind of dates are best for date nut bread?
My preference, hands down, is for Medjool dates. They are naturally softer, plumper, and carry more moisture, which just translates directly into a better loaf. However, if you’re out of those, don’t panic! Regular dried, pitted dates work just fine, but you absolutely must ensure they are thoroughly softened during that initial 10-minute hot soak. The hotter the water, the better the softening will be!
If you are looking for other reliable, deeply moist quick breads that stay fresh for days, you should really check out my secrets for making a moist sour cream coffee cake. It’s another guaranteed win!
Estimated Nutritional Information for This Classic Loaf Cake
Now, I know some of you are tracking macros, or maybe just curious what’s in this deeply satisfying loaf. I always want to be totally upfront with you about the numbers here!
Please keep in mind that the exact counts in this wonderful Classic Loaf Cake can change depending on what exact brands of butter or sugar you use, and obviously, if you decide to sneak in an extra handful of walnuts! The values provided in my kitchen notes are based on standard ingredient calculations for one slice (we yield 10 slices total from this recipe, remember?).
Think of this information as a general guide—a helpful baseline for enjoying your *Sweet Loaf Recipe*. If you make substitutions, like using maple syrup instead of brown sugar or swapping out the flour, those numbers will shift significantly. So, enjoy this fantastic homemade treat knowing that it’s made with love, and it’s certainly robust enough to count as a delicious, satisfying snack bread!
Share Your Old-Fashioned Date Nut Bread Creation
Whew! Now that you have the secret to making the ultimate, moistest Old-Fashioned Date Nut Bread, the best part for me is hearing from you all!
I put a lot of love and testing into this recipe so that you wouldn’t have to worry about dry loaves ever again. So, once you’ve pulled your beautiful loaf out of the oven, I would absolutely love for you to come back here and tell me how it turned out! Did you go for the coffee substitution I mentioned? Or maybe you tried adding cinnamon? Drop a comment below and give the recipe a star rating—it really helps other bakers who are looking for that perfect, reliable recipe!
And please, if you serve this for holiday brunch or have it cooling on your counter, snap a picture! Seeing your finished bakes always makes my day. You can tag me on social media—I love seeing how you serve up your *Homemade Date Bread*! If you ever need to reach out with a specific question that wasn’t covered, you can always find my direct line on the contact page, too. Happy baking!
Print
Old-Fashioned, Ultra-Moist Date Nut Bread Recipe
- Total Time: 75 min
- Yield: 1 loaf (about 10 slices) 1x
- Diet: Vegetarian
Description
Follow this simple recipe to bake a classic, moist date nut bread loaf perfect for snacking or serving warm.
Ingredients
- 1 cup boiling water
- 1 cup pitted Medjool or regular dates, chopped
- 1 teaspoon baking soda
- 1/2 cup (1 stick) unsalted butter, softened
- 1 cup packed light brown sugar
- 2 large eggs
- 1 teaspoon vanilla extract
- 1 3/4 cups all-purpose flour
- 1 teaspoon baking powder
- 1/2 teaspoon salt
- 1 cup chopped walnuts or pecans
Instructions
- Preheat your oven to 350 degrees Fahrenheit (175 degrees Celsius). Grease and flour a standard 9×5 inch loaf pan.
- Place the chopped dates in a heatproof bowl. Pour 1 cup of boiling water over the dates and stir in the baking soda. Let this mixture stand for 10 minutes.
- In a large bowl, cream together the softened butter and brown sugar until light and fluffy. Beat in the eggs one at a time, then stir in the vanilla extract.
- In a separate medium bowl, whisk together the flour, baking powder, and salt.
- Gradually add the dry ingredients to the wet ingredients, mixing until just combined. Do not overmix.
- Stir in the date mixture (including any remaining liquid) and the chopped nuts until they are evenly distributed throughout the batter.
- Pour the batter into the prepared loaf pan.
- Bake for 55 to 65 minutes, or until a wooden skewer inserted near the center comes out clean.
- Let the bread cool in the pan for 10 minutes before turning it out onto a wire rack to cool completely.
Notes
- For extra moisture, you can substitute 1/2 cup of the boiling water with 1/2 cup of strong brewed coffee.
- Serve slices warm with butter or cream cheese.
- This bread freezes well once cooled; wrap tightly in plastic wrap and foil.
- Prep Time: 15 min
- Cook Time: 60 min
- Category: Baking
- Method: Baking
- Cuisine: American
Nutrition
- Serving Size: 1 slice
- Calories: 305
- Sugar: 28
- Sodium: 180
- Fat: 13
- Saturated Fat: 5
- Unsaturated Fat: 8
- Trans Fat: 0
- Carbohydrates: 46
- Fiber: 2
- Protein: 5
- Cholesterol: 55