When the sun is high and you’re craving something bright, nothing cuts through the heat better than lemon and blueberry, right? I swear, these flavors feel like summer captured in a single bite. For ages, finding a truly great gluten-free dessert that isn’t crumbly or sandy felt impossible. Seriously, I nearly tossed my mixing bowl more than once!
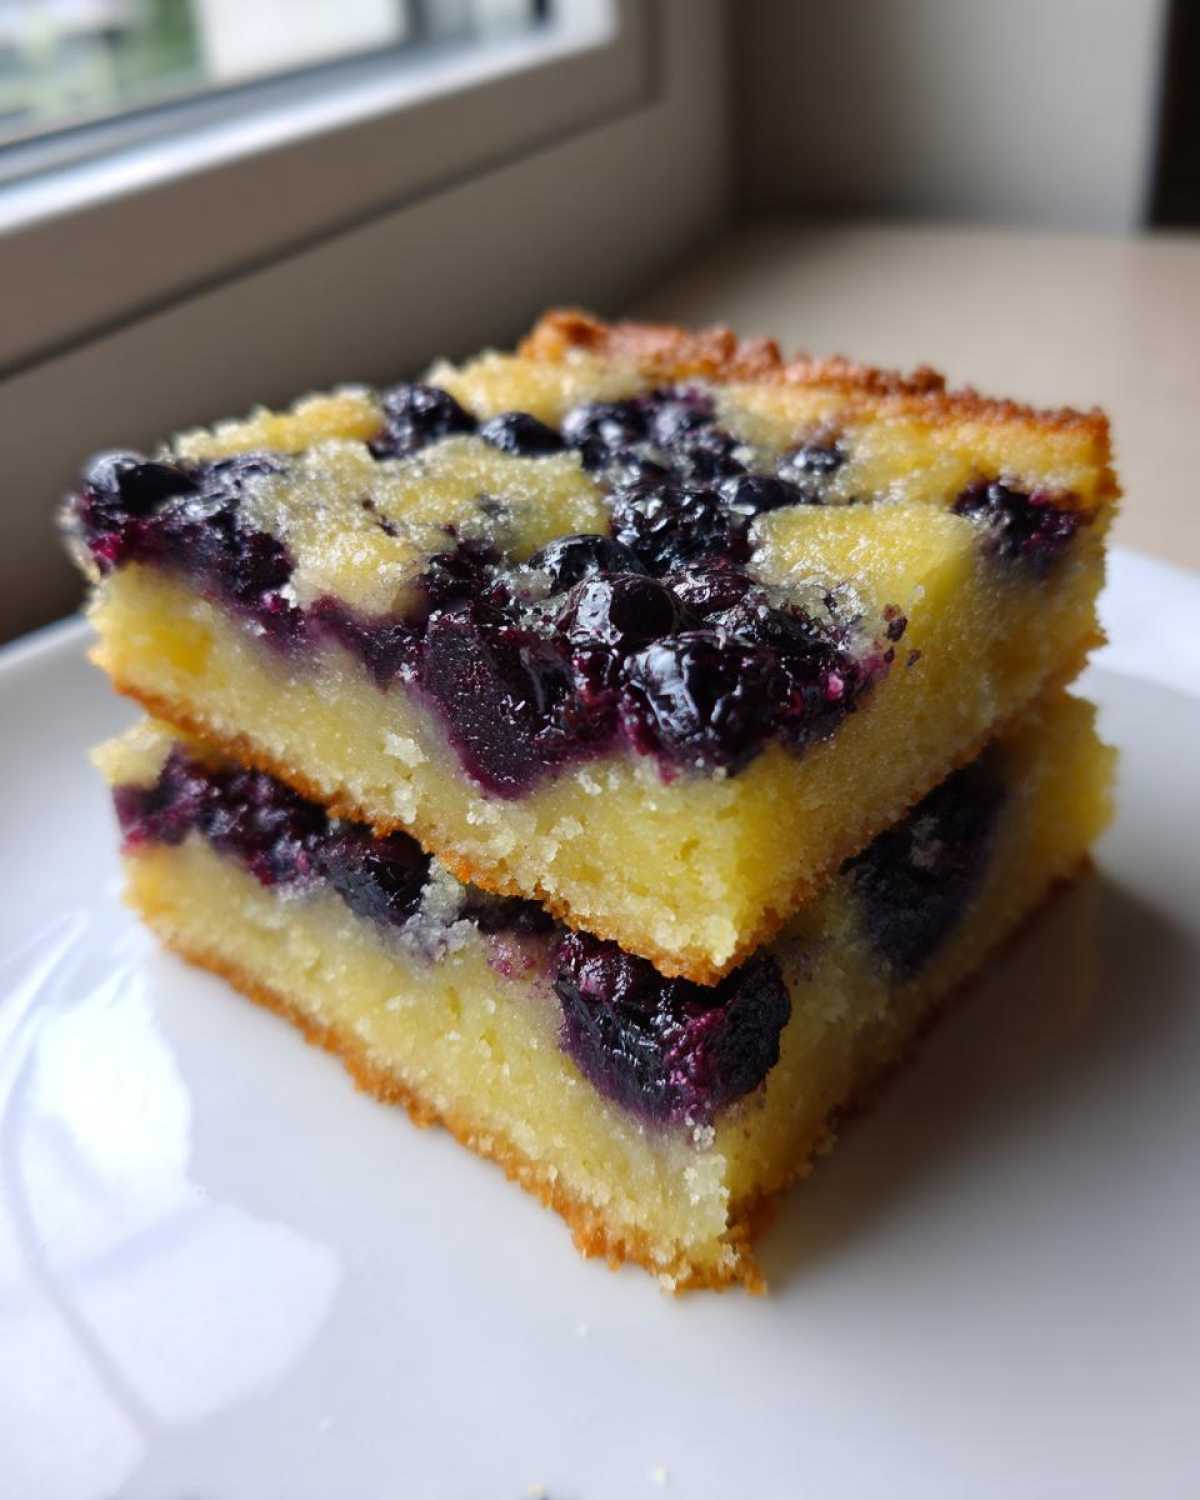
But trust me, I finally cracked the code on these Gluten-Free Lemon Blueberry Layer Bars. I spent weeks tweaking the crust ratio so it stays beautifully shortbread-like, not dusty. This recipe delivers that sharp, tart lemon filling stacked perfectly over that buttery base, topped with sweet, bursting blueberries. You won’t even realize it’s gluten-free, I promise!
Why You Will Love These Gluten-Free Lemon Blueberry Layer Bars
I know you’ve probably had some gluten-free baked goods that just didn’t deliver, but these are different. They are genuinely showstoppers, and they hold up! Here’s what makes this recipe my go-to:
- The texture of that bottom crust is unbelievable—it’s buttery and just short enough, exactly like a perfect shortbread base.
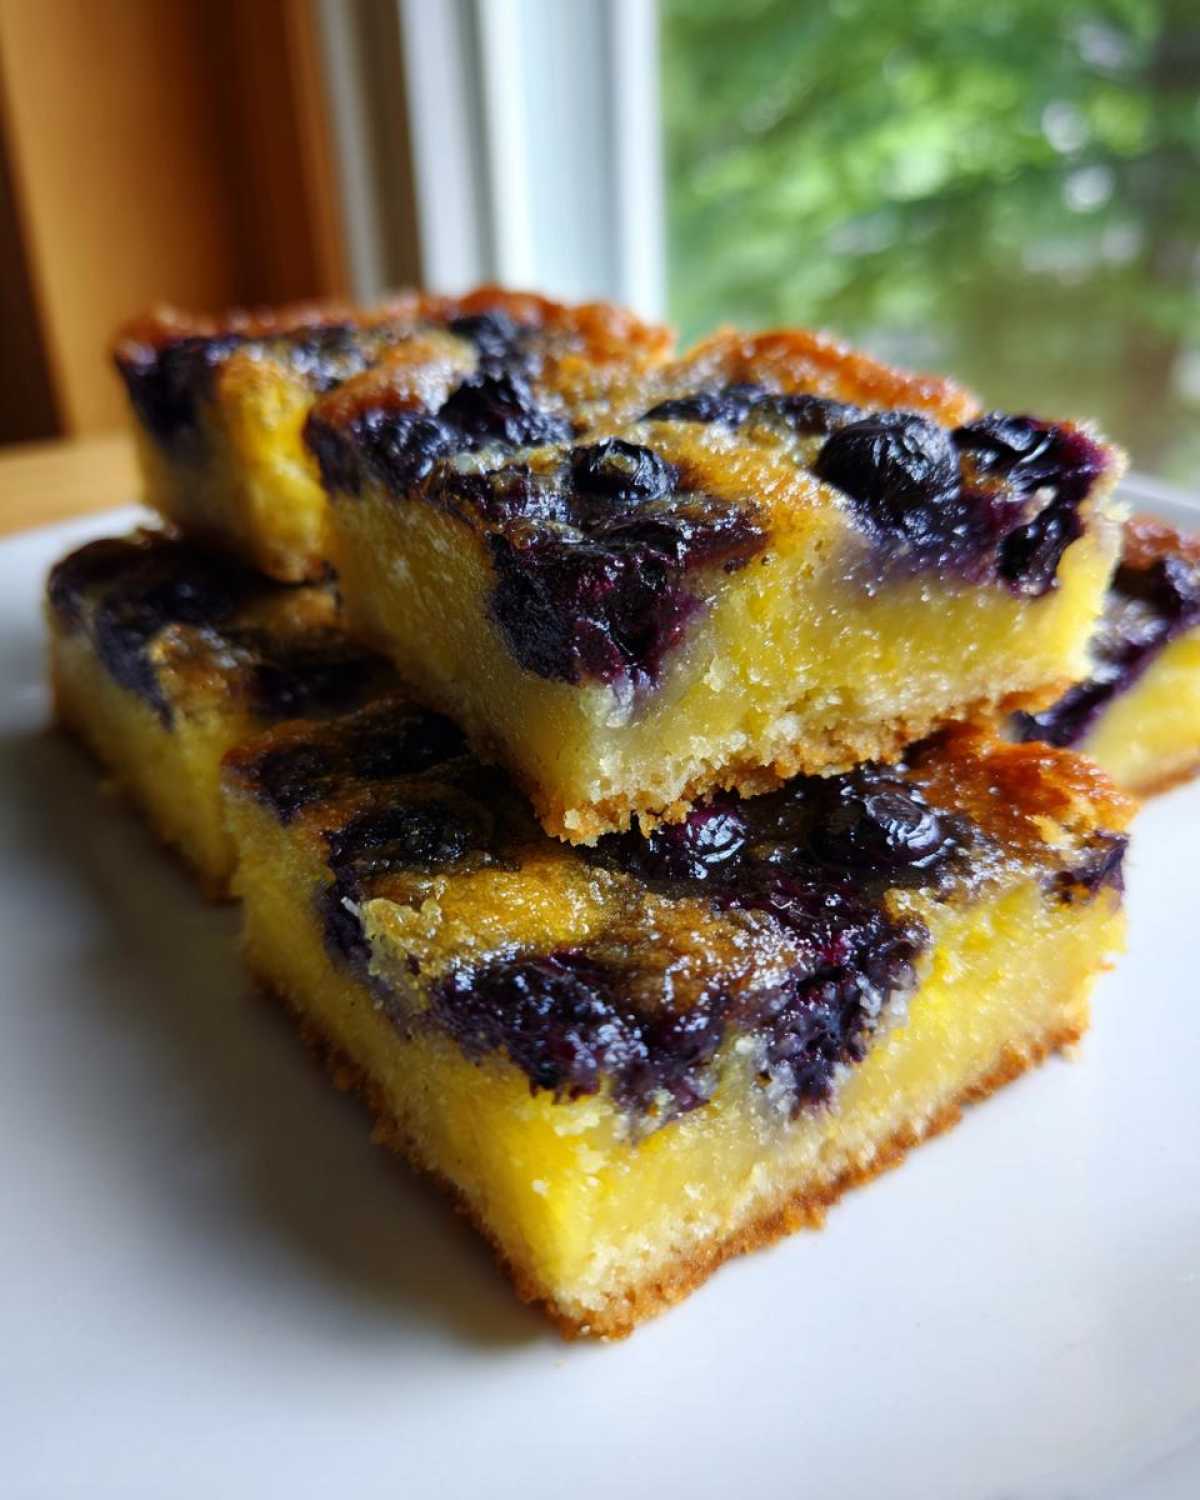
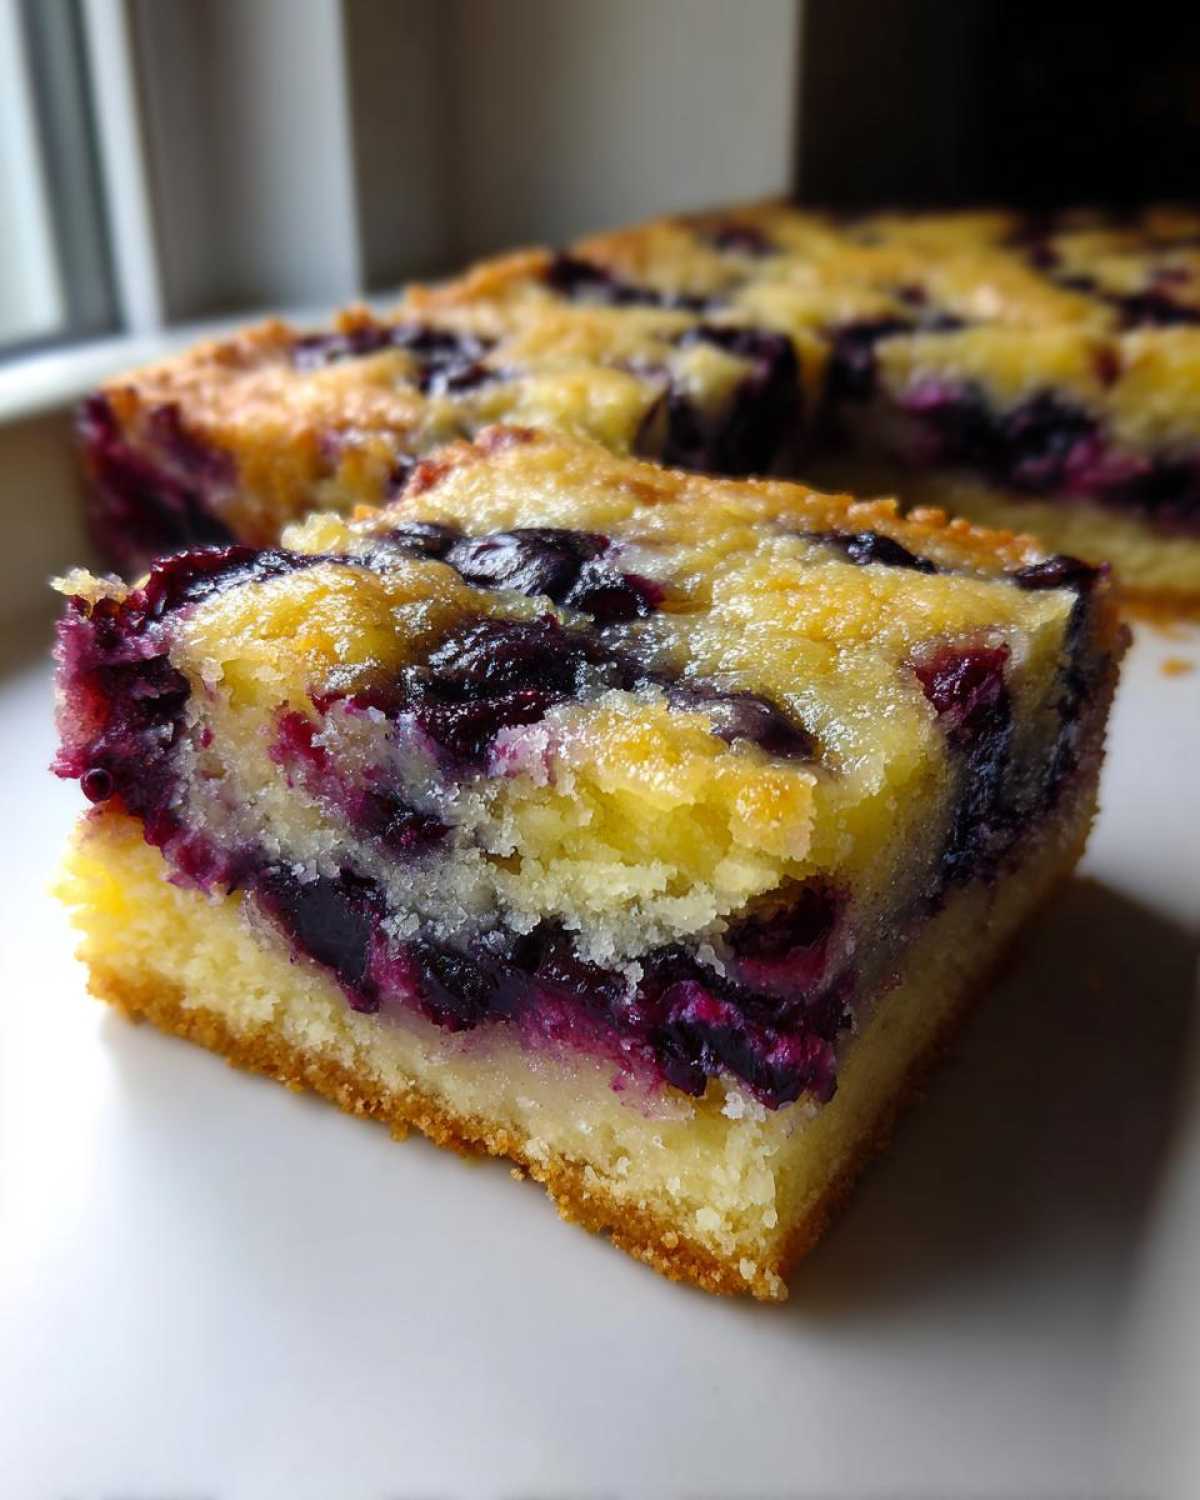
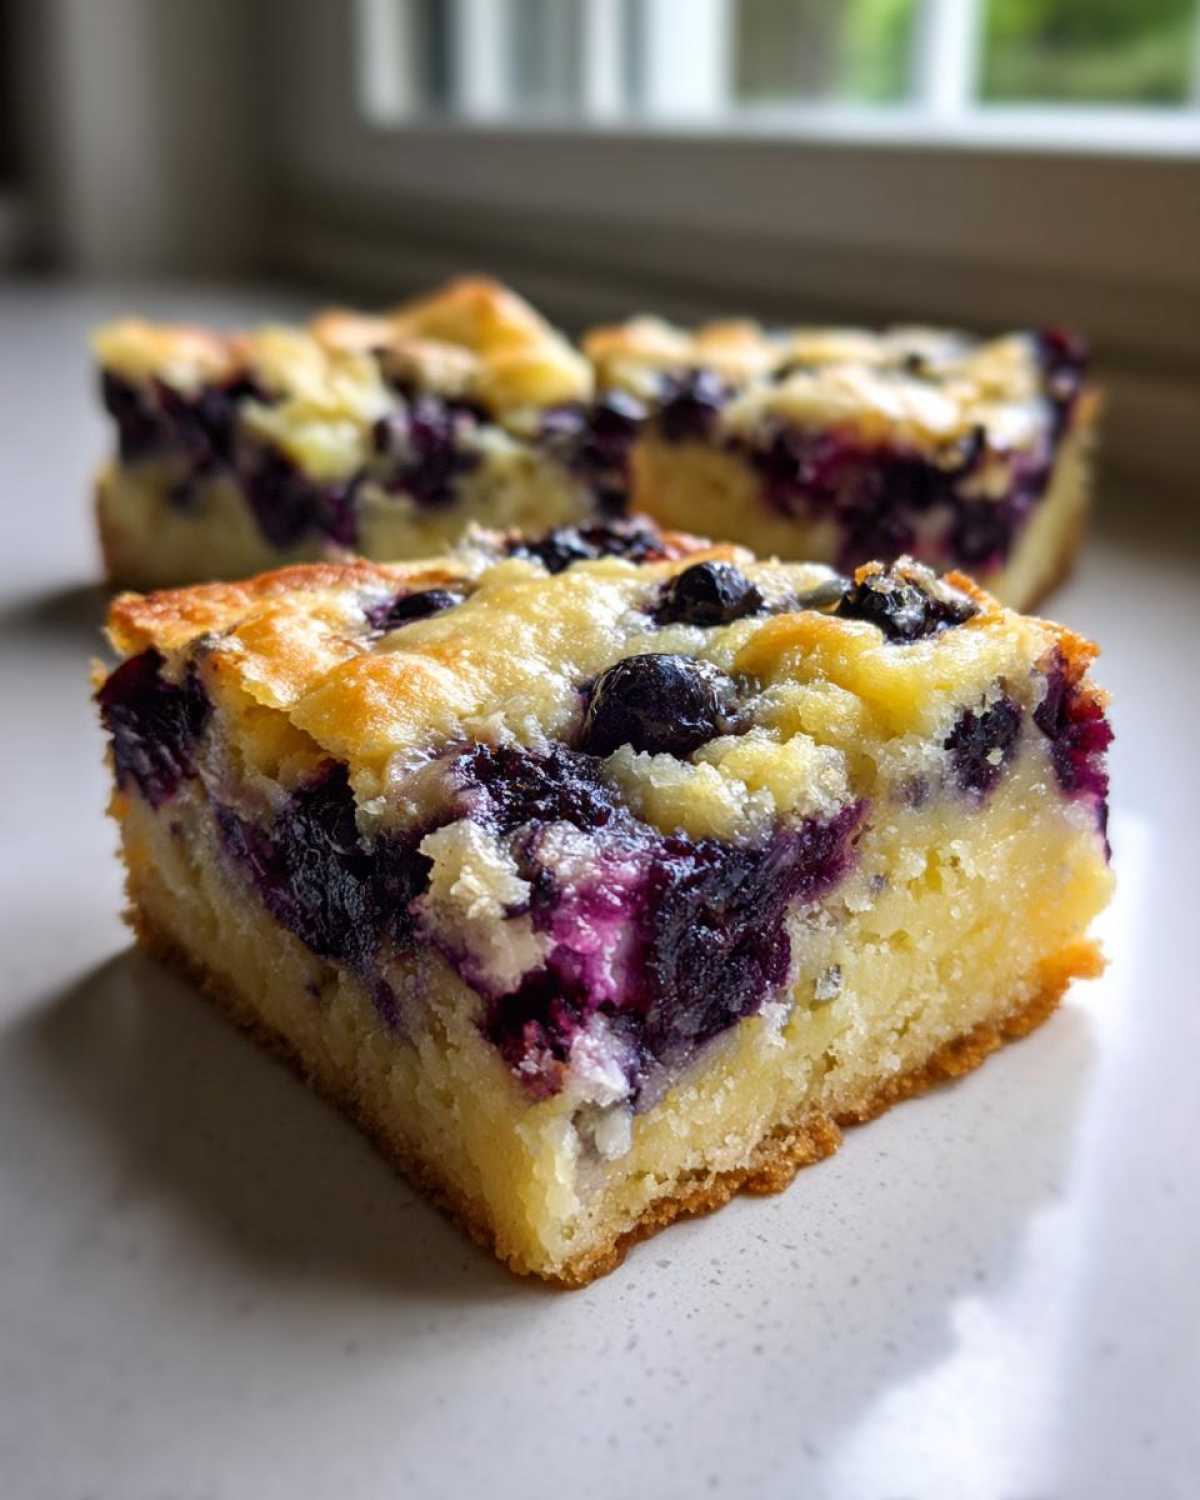
- The layers separate beautifully! You get that distinct tangy lemon layer right above the crust, and the blueberries sit just perfectly on top.
- They are intensely flavorful. That pop of fresh lemon zest mixed with sweet, warm blueberries is pure joy.
- These bars are fantastic for meal prep! You can make them ahead, and they actually taste even better the next day. Check out my gluten-free banana walnut muffins if you are looking for other make-ahead ideas.
- They look fancy! Seriously, when you cut them into neat squares, the layers look so professional, even though they are super straightforward to put together.
- They completely satisfy that craving for a rich, satisfying dessert, while being totally worry-free for anyone avoiding gluten.
Gathering Ingredients for Your Gluten-Free Lemon Blueberry Layer Bars
Okay, let’s talk about hoarding supplies! The beauty of these bars is that most of what you need can hang out in your pantry or fridge already. But we have to be smart about one key ingredient to avoid that dreaded crumbly texture we often get with gluten-free baking.
You’ll need all the goodies laid out before you start mixing. I always grab my ingredients in three groups: crust, blueberry toss, and lemon filling. It keeps me organized!
Crust Essentials
For what becomes that amazing shortbread foundation, pay close attention to the flour blend. I am really adamant about this:
- 1 1/2 cups gluten-free all-purpose flour blend (This MUST have xanthan gum mixed in! If yours doesn’t, you’ll need to add about 1/2 teaspoon separately, otherwise, your crust won’t bind up nice and sturdy).
- 1/2 cup granulated sugar
- 1/4 teaspoon salt
- 1/2 cup cold unsalted butter, cubed (Keep it cold, I mean icy cold!)
- 1 large egg yolk (Just the yolk keeps the crust tender, not cakey.)
- 2 tablespoons cold water
The Bright Fillings
This is where the magic happens! We’re mixing the blueberries directly with some of the filling ingredients, which is a total flavor shortcut. Don’t soak your berries—just a quick toss!
- 1 cup fresh or frozen blueberries (Honestly, frozen is great if they are out of season!)
- 1/2 cup granulated sugar (reserved for the blueberry mixing)
- 2 tablespoons gluten-free all-purpose flour blend (A little extra flour helps the berries suspend themselves so they don’t all sink to the bottom.)
- 1/4 cup fresh lemon juice (Don’t even think about using the bottled stuff; the fresh zest and juice make all the difference.)
- 1 tablespoon lemon zest
- 1 large egg (This goes into the wet filling mixture.)
- 1/4 teaspoon vanilla extract
Having that specific gluten-free flour blend made such a difference in my early baking days. It was the secret weapon that made me realize I could successfully make things like my gluten-free cauliflower pizza crust without it collapsing! Once you have these things lined up, you’re halfway to summer heaven!
Step-by-Step Instructions for Perfect Gluten-Free Layer Bars
Alright, this part is honestly the most satisfying because you can physically see these glorious layers forming! The trick here is not rushing the base—if the crust isn’t set right, the whole structure suffers. We’re going low and slow for that initial bake, which helps gluten-free dough firm up nicely.
Preparing the Crust and Initial Bake for Gluten-Free Lemon Blueberry Layer Bars
First things first: 350°F (175°C) is our magic temperature, and get that 8×8 pan lined with parchment paper, making sure you have an overhang. We need those handles later! For the crust, you’re just whisking the dry ingredients, then you cut in that cold butter until it looks like chunky sand or coarse crumbs. Now, mix in your egg yolk and that teeny bit of cold water until the dough actually clumps together—don’t overwork it, just bring it together. Press that dough evenly into the bottom of your pan. Pop it into the oven for just 15 minutes until it just starts to blush pale gold. That sets the stage for everything!
Assembling the Lemon Filling and Blueberry Topping for Gluten-Free Lemon Blueberry Layer Bars
While the base is baking, we make the toppers! In one small bowl, gently toss your blueberries with the half-cup of sugar and those two tablespoons of extra gluten-free flour. You want them coated but not drowning. In a separate bowl—this is key—whisk your lemon juice, zest, vanilla, and that single egg until everything is emulsified and smooth. We want that filling nice and homogenous.
When the crust comes out after 15 minutes, pour that bright lemon mixture right over the hot crust. Then, sprinkle those sugared berries evenly over the top of the lemon layer. Try to distribute them nicely so every slice gets some berry goodness!
Final Baking and Cooling for the Best Gluten-Free Layer Bars
Back into the 350°F oven they go for another 25 to 30 minutes. You’re looking for the edges to look set and the center of that lemon layer to not jiggle wildly anymore. If you’re looking for ideas on what to bake next, I just perfected some easy meringue cookies, which are naturally gluten-free too!
Now, listen closely—this is where most people mess up the presentation: You must let these bars cool COMPLETELY on a wire rack before you even think about lifting them out. If you tug them out warm, you’ll wreck the bottom layer. For those ‘Perfectly Layered Gluten Free Bars,’ chill them for an hour after cooling down. Seriously, patience pays off here!
Tips for Success When Making Gluten-Free Lemon Blueberry Layer Bars
Even though this recipe is super reliable, baking gluten-free always involves a few little tricks you pick up over time. I learned these the hard way, so you don’t have to! These little pointers ensure you get the best texture and stop those beautiful layers from turning into a fruity mess.
Follow these tips, and you’ll be serving up bakery-worthy Tart Lemon Blueberry Squares every single time. Trust me on these!
- Chill, Chill, Chill: I cannot stress this enough! If you try to slice them warm, everything squishes. After cooling on the counter, wrap the entire pan (still in the parchment sling!) and chill in the fridge for at least an hour. That firm chill is what gives you those beautiful, clean edges when you slice them.
- Handling the Gluten-Free Flour: When mixing the crust, don’t try to knead or press it too hard into the pan. Just use your fingers to gently spread the crumb mixture across the bottom. Over-handling gluten-free dough develops a gummy texture instead of that nice, crumbly shortbread feel.
- Frozen Berry Strategy: If you use frozen blueberries, do NOT thaw them first! Toss them straight from the freezer into the sugar/flour mixture. If they release too much juice too early, they can thin out your lemon filling and make the crust soggy.
- The Lemon Zest Trick: When zesting your lemons, try to only get the bright yellow part. The white pith underneath is bitter, and no amount of sugar can hide that harshness in a delicate lemon filling like this.
- Watch the Edges, Not Just the Middle: When checking if the bars are done, look primarily at the edges of the lemon layer. They should look set, slightly puffed, and maybe a little wrinkled. If the middle still looks translucent and jiggly, give it five more minutes.
If you love this bold citrus flavor, you absolutely must try my tangy and fluffy lemon meringue pie recipe next time you need a showstopper!
Ingredient Notes and Substitutions for Gluten Free Lemon Blueberry Bars Recipe
Listen, I get it. Sometimes you open the pantry expecting to have everything, and BAM! You’re missing that one specific bag of flour. Baking gluten-free sometimes feels like a balancing act, but don’t panic. We can usually swap things out successfully if we know the ground rules.
These Gluten Free Lemon Blueberry Bars Recipe rely heavily on the right binders, especially in that shortbread crust. Let’s go over the potential swaps so you can make these even if your pantry isn’t 100% stocked for my specific list.
The Gluten-Free Flour Dilemma
For the crust, that xanthan gum is essential. It acts as the glue that regular gluten provides. If your favorite GF blend—maybe you use a popular brand like King Arthur or Bob’s Red Mill—doesn’t have it listed in the ingredients, you must add it yourself. I usually run about 1/2 teaspoon of pure xanthan gum into the dry ingredients for the shortbread part to guarantee a sturdy base. Without it, you end up with very tasty, but very crumbly, lemon-flavored sand!
If you are using a reputable 1-to-1 blend that already includes xanthan gum, you can use that exact amount specified in the recipe for both the crust and the thin coating on the blueberries. No guesswork needed, which is my favorite kind of baking!
Butter Alternatives
This recipe works best with real, cold unsalted butter because of the distinct flavor and fat structure it lends to the crust. However, if you absolutely need to go dairy-free, you can swap the butter for a high-quality, firm vegan butter stick. Make sure it’s the stick kind, not the spreadable tub stuff, because the water content is completely different. Keep it frozen or ice-cold so you can cut it in correctly!
Fresh vs. Frozen Berries
I prefer fresh if I can get them because they hold their shape really nicely during that final bake. But hey, sometimes life dictates we use frozen, especially if you’re making these during the off-season or want to prepare a batch now for later (like my cranberry orange muffins with streusel). When using frozen blueberries, my biggest piece of advice is this: Do not thaw them! Toss them straight from the freezer into the sugar/flour mixture. If they start weeping juice before they hit the lemon layer, your bars will turn mushy at the base.
It’s all about managing moisture when you’re avoiding gluten, but honestly, these little adjustments make all the difference!
Storage and Make Ahead Gluten Free Desserts
One of the best things about these Gluten Free Layer Bars is that they are fantastic for making ahead of time! When you’re planning for a party or just want dessert ready for the week, these lemon blueberry squares are totally reliable. They actually firm up and the flavors seem to meld together beautifully after chilling, which is rare for baked goods!
My biggest secret to getting those magazine-worthy clean cuts? Chilling! I mentioned it before, but it bears repeating because it’s crucial for presentation. Once the bars have cooled down completely on the counter—and I mean totally cooled so they aren’t even slightly warm—wrap the whole thing snugly in plastic wrap inside the pan. Then, slide it into the fridge for at least an hour, maybe two. The cold makes that buttery crust super firm and keeps the layers from sliding apart when you slice them. It’s the easiest way to ensure you get beautiful, professional-looking squares.
For longer storage, these bars do wonderfully in the refrigerator. Kept tightly wrapped in an airtight container, they stay deliciously moist for up to four days. The lemon flavor stays bright and tart the whole time!
If you need to freeze them, that’s easy too, and perfect for stocking up on your favorite Make Ahead Gluten Free Desserts. Cut the bars into individual squares before freezing, which saves you a lot of hassle later. Once you’ve chilled them (remember the chilling step?), wrap each bar individually—I like using plastic wrap, followed by a layer of aluminum foil—to protect them from freezer burn and absorbing any weird freezer smells. They should last beautifully for about two to three months in the deep freeze!
If you are prepping for a big breakfast or brunch, you should absolutely check out how I make my cheesy egg cups ahead of time. They use the same principle of making life easier on a busy morning!
Variations on Your Gluten Free Citrus Crumb Bars
Part of the fun of baking, especially with reliable recipes like these Gluten Free Citrus Crumb Bars, is tinkering! Once you’ve mastered the base technique—getting that shortbread crust just right and managing the moisture levels—you can totally play around with the flavors. I love changing these bars up seasonally, or just when I spot a different fruit looking amazing at the market.
You don’t need to change a thing about the crust or the lemon filling ratios to swap out the blueberries, which is wonderful. It means you get a whole new recipe with minimal extra effort!
Berry Swaps for Your Gluten Free Lemon Bars
Blueberries are classic, but oh my goodness, raspberry version of these bars? They bake up with such a gorgeous jewel tone. Raspberries are a bit more tart, so they pair just brilliantly with that sweet-and-sour lemon layer underneath. If you swap them, use the exact same measurement—one cup, tossed with the sugar and the extra GF flour.
Another great option is mixing! Try tossing in half a cup of raspberries and half a cup of blackberries. It creates such a lovely, mottled look when you slice into the final squares. And if you need a fantastic raspberry alternative that uses lemon, my lemon raspberry almond tartlets are divine, though a completely different texture!
Zesting It Up: Other Citrus Twists
If you’re not in the summer mood for straight lemon, playing with the zest is a super easy way to pivot the flavor profile. Remember, we are only adjusting the zest measurement in the liquid filling mixture, not the lemon juice.
Try substituting half of the lemon zest with orange zest. The combination of orange and blueberry is just stunningly bright and warm. It gives the bars a slightly sweeter, less aggressive citrus punch that some people prefer. For a real zing, try adding just a teaspoon of lime zest along with the lemon zest. Lime and blueberry are a match made in heaven for a more tropical vibe!
Adding Texture to the Crust
If you want to feel like you’re making a true crumb bar instead of a shortbread layer bar, you can easily modify that crust mixture before you press it into the pan. After you’ve cut in the butter, try stirring in about a quarter cup of finely chopped pecans or slivered almonds. They toast up beautifully in that first 15-minute bake, adding a fantastic crunch to contrast the creamy layer on top!
Happy experimenting! These Gluten Free Lemon Blueberry Layer Bars are just the perfect base for all your fruity dessert dreams.
Frequently Asked Questions about Gluten Free Lemon Blueberry Layer Bars
It’s totally normal to have questions when you’re whipping up a new gluten-free recipe for the first time! We all want that perfect texture and guarantee that the layers hold up. I’ve gathered the most common things folks ask me about these bright, tangy bars. If you’ve been dreaming about making Easy Gluten Free Layer Bars that actually look like bars and not a glorious, fruity puddle, read on!
Can I use a different gluten-free flour blend for these Gluten-Free Lemon Blueberry Layer Bars?
Oh, absolutely! You can usually swap out the GF blend, but here’s the vital detail: check your bag! Most recipes perform best when the flour blend already contains xanthan gum, as it helps mimic the elasticity gluten provides, especially in that crust. If your blend doesn’t list xanthan gum in the ingredients, go ahead and add about 1/2 teaspoon right into your dry crust mixture. If you skip that binder, that delicious base might just crumble into dust when you try to lift it out. Results can vary slightly between brands, but adding xanthan gum is your safety net!
How do I get clean slices when cutting these Easy Gluten Free Layer Bars?
This is the secret sauce to making them look professional! You cannot rush the cooling process. First, let the bars cool down completely on the counter until they are room temperature or slightly warm. Then, wrap the whole pan up tightly using that parchment paper overhang. The most important step is to chill them! Pop them into the refrigerator for at least one hour—two is even better. This firms up the buttery crust and sets the lemon filling so they don’t smear. When you go to slice them, use a long, sharp knife that you briefly run under hot water and wipe dry between each cut. That little bit of warmth helps the knife glide right through!
If you’re looking for another easy, reliable bake that freezes well, have you seen my recipe for easy gluten-free chocolate chip muffins? They use a similar principle of letting the structure set before you mess with them!
Nutritional Estimates for Gluten Free Lemon Blueberry Layer Bars
Okay, listen up! I always feel a little cagey posting nutritional info because, let’s be real, these are dessert bars, not a salad! They are bursting with sweet fruit and rich, buttery crust, so they aren’t exactly low-calorie rocket fuel.
Everything I calculate is based on standard measurements and ingredients for the whole 8×8 pan, divided into 16 serving squares. If you eat a giant square, well, the numbers will be bigger! Consider these rough estimates—baking is tricky, and different brands of GF flour or the exact size of your egg can throw things off a bit. But it gives you a good ballpark idea!
If you are looking for a lighter way to get your fruit and fiber in, you might want to check out my blueberry spinach green smoothie recipe. That one is definitely lighter!
Here is the breakdown for one standard-sized Gluten Free Lemon Blueberry Layer Bar:
- Serving Size: 1 bar (out of 16)
- Calories: Around 210
- Fat: About 11g (6g saturated fat)
- Total Carbohydrates: Roughly 27g
- Sugar: I see about 18g of sugar here (Remember that comes from the fruit and the added sugar!)
- Protein: 3g
- Cholesterol: Approximately 45mg
- Sodium: About 55mg
Just enjoy them for what they are: bright, delicious, and perfectly safe for your gluten-free lifestyle. Don’t stress the numbers too much when you’re eating sunshine like this!
Print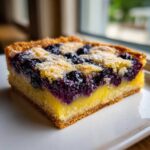
Gluten-Free Lemon Blueberry Layer Bars
- Total Time: 65 min
- Yield: 16 bars 1x
- Diet: Gluten Free
Description
Make bright, layered dessert bars with a gluten-free crust, tart lemon filling, and sweet blueberry topping.
Ingredients
- 1 1/2 cups gluten-free all-purpose flour blend (with xanthan gum)
- 1/2 cup granulated sugar
- 1/4 teaspoon salt
- 1/2 cup cold unsalted butter, cubed
- 1 large egg yolk
- 2 tablespoons cold water
- 1 cup fresh or frozen blueberries
- 1/2 cup granulated sugar
- 2 tablespoons gluten-free all-purpose flour blend
- 1/4 cup fresh lemon juice
- 1 tablespoon lemon zest
- 1 large egg
- 1/4 teaspoon vanilla extract
Instructions
- Preheat your oven to 350°F (175°C). Line an 8×8 inch baking pan with parchment paper, leaving an overhang for easy removal.
- Prepare the crust: In a medium bowl, whisk together 1 1/2 cups gluten-free flour, 1/2 cup sugar, and salt. Cut in the cold butter using a pastry blender or your fingers until the mixture resembles coarse crumbs.
- Mix in the egg yolk and cold water until the dough just comes together. Press the dough evenly into the bottom of the prepared pan. Bake the crust for 15 minutes until lightly golden.
- Prepare the blueberry layer: In a small bowl, gently toss the blueberries with 1/2 cup sugar and 2 tablespoons of gluten-free flour. Set aside.
- Prepare the lemon filling: In a separate bowl, whisk together the lemon juice, lemon zest, 1 egg, and vanilla extract until smooth.
- Pour the lemon filling evenly over the partially baked crust. Sprinkle the sugared blueberries over the lemon layer.
- Return the pan to the oven and bake for an additional 25 to 30 minutes, or until the lemon layer is set and the edges are lightly browned.
- Let the bars cool completely in the pan on a wire rack before lifting out using the parchment overhang. Cut into squares.
Notes
- Use a gluten-free flour blend that contains xanthan gum for the best crust texture.
- If using frozen blueberries, do not thaw them before adding them to the mixture.
- For cleaner cuts, chill the cooled bars for at least one hour before slicing.
- Prep Time: 20 min
- Cook Time: 45 min
- Category: Dessert
- Method: Baking
- Cuisine: American
Nutrition
- Serving Size: 1 bar
- Calories: 210
- Sugar: 18
- Sodium: 55
- Fat: 11
- Saturated Fat: 6
- Unsaturated Fat: 5
- Trans Fat: 0
- Carbohydrates: 27
- Fiber: 1
- Protein: 3
- Cholesterol: 45