Oh, I know the struggle! You grab those fancy store-bought protein bars thinking you’re getting a healthy treat, and half the time they taste like sweetened cardboard or leave you desperately craving something actually delicious. I got so tired of reading ingredient lists longer than my arm. That’s why I finally perfected what I call my ’emergency stash’ recipe. Trust me when I say this is the easiest, no-bake way to get amazing results. We are talking five core ingredients needed to whip up these chewy peanut butter beauties. I developed this because I needed snacks that fueled my early morning workouts without requiring me to turn on the oven. These truly taste better than anything I can grab at the checkout counter!
Why These Are the Best Homemade protein bars You Will Ever Make
Honestly, I keep these on rotation constantly! What makes these homemade protein bars my go-to choice is how minimal the effort is versus the payoff. You get incredible flavor and satisfying macros without any fuss.
- They’re ridiculously fast! Seriously, we are talking 10 minutes of actual work before they chill beautifully.
- You only need five main ingredients, which cuts down on cost and makes grabbing supplies so simple.
- No oven required! This is key for me in the summer months when I don’t want to heat up the kitchen. Plus, they hold together so much better when they aren’t baked.
Quick Prep for Busy Schedules
If you have ten minutes before your morning coffee, you have enough time to mix these up. They are the ultimate meal prep bars because the mixing is faster than boiling water. You just throw everything in a bowl and press it into the pan. That’s it!
Achieving the Perfect Chewy texture in no bake protein bars
This is where a lot of store-bought bars fail—they are too chalky or too hard. Because we are avoiding heat, we lock in the moisture from the peanut butter and syrup. The secret to these chewy protein bars is making sure that dough is perfectly uniform before it hits the fridge. Don’t skimp on that mixing time!
Essential Ingredients for Easy No-Bake protein bars
Okay, I know you are worried about using too many specialty items, but I promise these five things make the magic happen. The real anchors here are the peanut butter and the syrup—they’re our binders, holding everything together since we aren’t turning on the heat! Without them, you just get a pile of dry powder and oats, and nobody wants that mess. You need that sticky goodness to make these wonderful chewy protein bars.
Here’s what you need on hand:
- One cup of good old rolled oats.
- A half-cup of creamy peanut butter (I stick to regular, not the natural drippy kind, for better binding!).
- A half-cup of your favorite protein powder—vanilla or unflavored works best for this base flavor.
- A quarter-cup of maple syrup or honey to keep things sweet and chewy.
- Just two tablespoons of water or milk, which we might need to adjust.
- And if you want that gorgeous top, a quarter-cup of dark chocolate chips you’ll melt later!
Ingredient Notes and Substitutions for protein bars
If you have dietary needs or just ran out of something, don’t panic! These are flexible healthy snack bars. For a vegan approach, make sure you use maple syrup instead of honey to make your vegan protein bars recipe work perfectly. If nuts aren’t your friend, swapping the peanut butter for almond butter or sunflower seed butter is totally fine.
Also, if you need these to be gluten free protein bars, just read the label on your oats! Most rolled oats are naturally GF, but dedicated certification helps, especially if you’re concerned about cross-contamination for your meal prep bars.
Step-by-Step Instructions for Your easy protein bar recipe
Getting these mixed up is almost ridiculously straightforward, but technique matters since we aren’t baking them! First, you must prep your pan. Get an 8×8 pan ready and line it with parchment paper—make sure you leave an overhang on the sides. This is non-negotiable; it’s how we get the bars out in one beautiful, solid piece later. You don’t want to struggle trying to dig these out!
Next, grab a medium bowl. Toss in the oats, protein powder, peanut butter, and maple syrup. Get your hands in there, or use a sturdy spoon if you must, and mix until you have a thick, uniform dough. It should look kind of heavy and stiff. Then, press that dough down *firmly* into your prepared pan. I use the flat bottom of a measuring cup to really compact it—this ensures your easy protein bar recipe sets up perfectly.
If you’re adding that chocolate drizzle, melt the chips gently with just a tiny splash of water or milk, then drizzle it over the top. 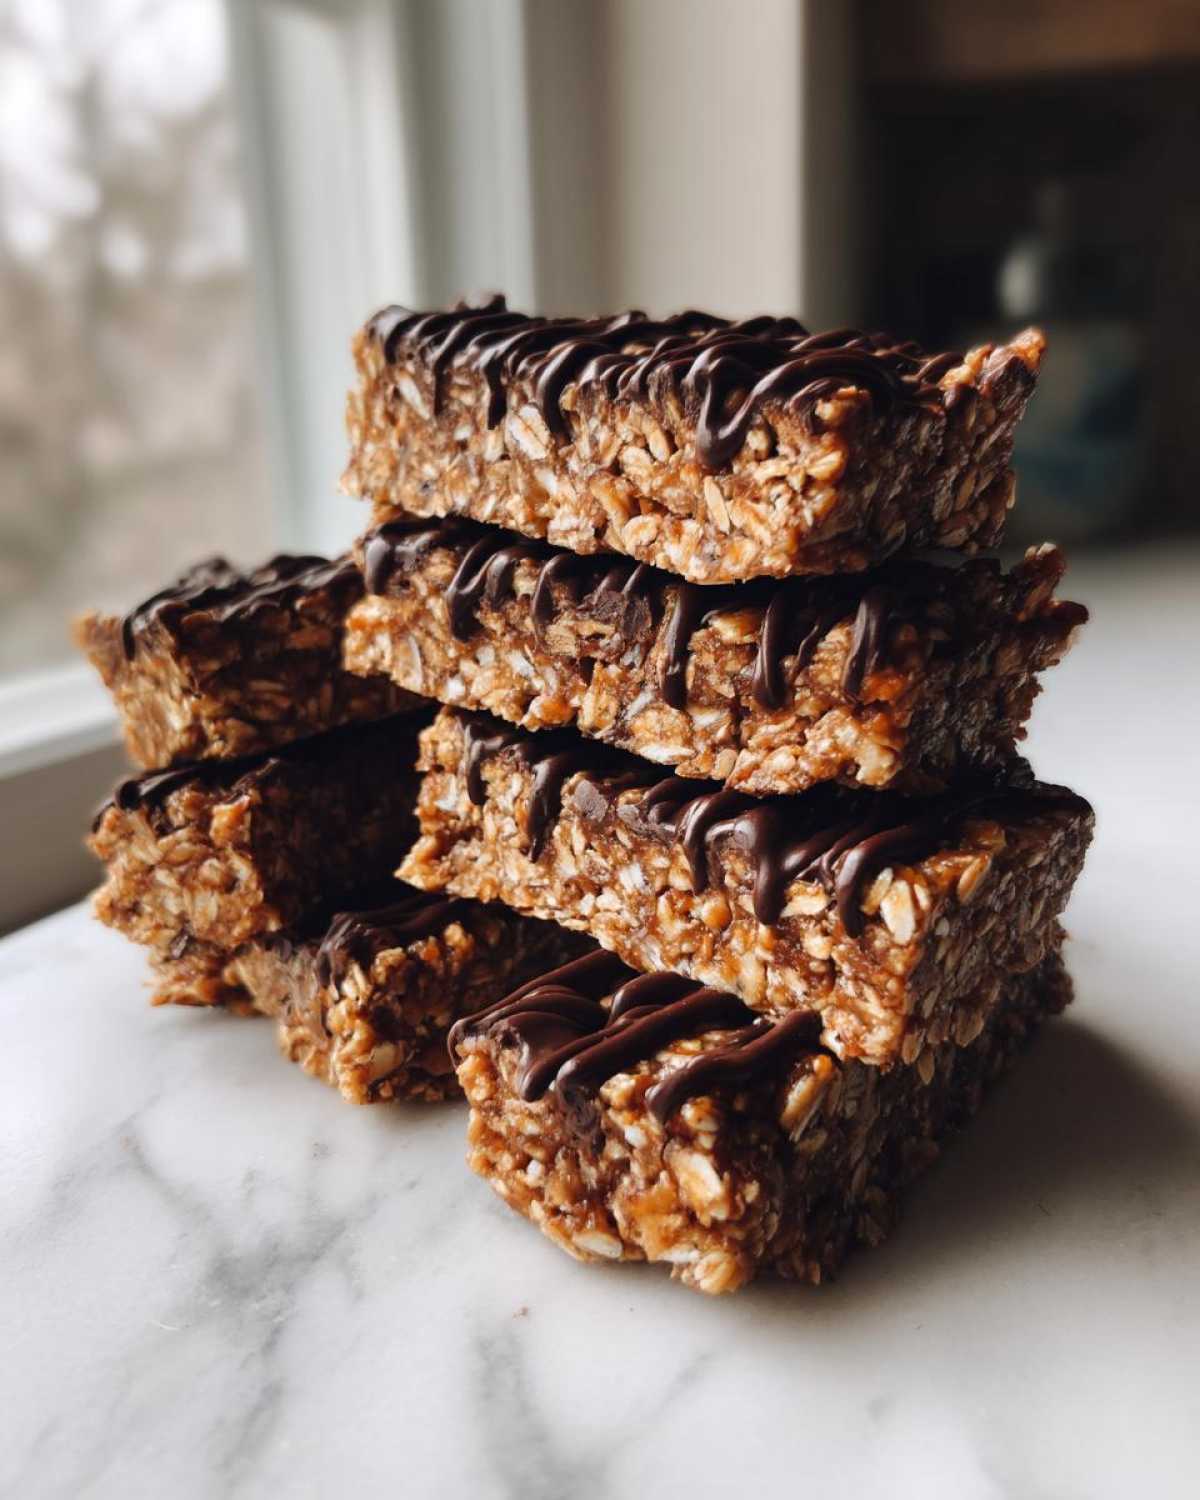 Now, the hardest part: step away! Place the whole thing in the fridge for at least two hours until it’s totally firm. Lifting them out using the parchment paper handles is the most satisfying part. Once they’re firm, slice them into 10 or 12 pieces.
Mixing Tips for Perfect Dough Consistency
Now, let’s talk sticking points. If your dough seems way too dry when you first start mixing—and this often depends on how oily your peanut butter is—don’t just dump in all your water at once! That’s how you get soggy no bake protein bars instead of perfect ones. Add liquid just one teaspoon at a time until that dough finally starts sticking together when you squeeze a handful. You want it cohesive, not wet. A little stickiness is good; soaking wet is not!
Tips for Success When Making Chewy protein bars
Even though this recipe is super simple, a few little tricks make the difference between a good bar and a *great* one. Think of these as the secrets I learned after my first few gooey, messy attempts! First, for the easiest mixing experience, make sure your peanut butter isn’t straight out of the fridge—room temperature peanut butter blends much smoother with the oats and protein powder. This prevents streaks and ensures you don’t need to add too much extra water.
Secondly, when you press the mixture into the pan, spend a minute making it absolutely level. If one side is thicker, it won’t set evenly, and you’ll end up with unevenly sized bars. And the final, most satisfying tip for presentation? Once they are fully chilled, use the sharpest knife you have. If the knife sticks, run it under really hot water for five seconds, wipe it dry quickly, and then slice. That warm blade will glide right through those dense, chewy protein bars and give you clean edges every time!
Storage and Make Ahead protein snacks
These are absolutely divine for anyone who struggles with afternoon slumps because they are the perfect make-ahead treat! These make ahead protein snacks thrive on chilling, which is such a win for busy weeks. They actually get denser and even chewier once they’ve spent a little quality time in the cold.
You must store them in an airtight container. If you just wrap them loosely, they tend to absorb smells from the fridge—and nobody wants their peanut butter bar smelling like leftover onion dip! I find that stacking them with little squares of parchment paper between them is the best way to keep them from sticking together if you’re making a big batch for your meal prep bars.
In the refrigerator, these high protein recipes stay wonderfully fresh for about a week, maybe even a little longer if you skipped the chocolate drizzle (which can sometimes soften first). But I highly recommend freezing them if you want to stash them away!
Freezing is simple: cut them into their individual bar shapes first, wrap each one tightly in plastic wrap or put them in a freezer-safe bag. They last up to three months in the freezer. The best part? You don’t even need to thaw them completely! I grab one straight from the freezer about 15 minutes before I need it, and they soften up just enough to be delightfully firm and cool. Try that with those chalky store-bought things!
Variations on These 5 Ingredient protein bars
So, what happens when you’ve perfected the basic peanut butter bar and you want to keep things exciting? The beauty of sticking to the five-ingredient base is that you can swap out foundational elements without wrecking the whole structure. It’s all about keeping the binder-to-dry-ingredient ratio the same, which is why this recipe works so well for experimentation!
If you want to move away from peanut butter, just grab almond butter or even cashew butter. That’s one swap down! If you want a chocolate blast instead of peanut butter, you can use cocoa powder mixed right in with your protein powder. You’ll just need a tiny bit more water or milk to bring the dough together, since cocoa powder sucks up moisture like crazy. That gives you fantastic chocolate protein bars no bake goodness!
You can also play with the oats—try using quick-cooking oats instead of rolled oats if you want a slightly softer final product. Just remember, the core elements—oats, powder, binder, sweetener—have to stay balanced for these healthy snack bars to work.
Making Vegan protein bars recipe
This is such an easy switch, and it’s important if you’re making snacks for friends or family with different needs! If you aren’t using honey, you are already 90% of the way there. For these easy protein bar recipe pals to be completely vegan protein bars recipe approved, you absolutely must use maple syrup instead of honey as your sweetener. That’s my only hard rule for keeping them plant-based!
Also, double-check your protein powder! Most powders are vegan these days, but whey protein is dairy-based, so make sure you are grabbing a pea protein, soy protein, or a blend that suits your dietary needs. Once you make that one swap, these are perfect, satisfying, chewy high protein recipes for everyone at the table.
Serving Suggestions for Your Healthy Snack Bars
Now that you have a whole pan of these delicious, no-bake treats cooling down, you might wonder the best way to enjoy them! Since these are so satisfying, they work in so many different scenarios. They are truly fantastic as a quick grab-and-go breakfast if you are rushing out the door. I usually pair mine with a big black coffee—the slight bitterness really cuts through the sweetness of the peanut butter and drizzle perfectly. If you’re looking for a quick refreshment, try slicing one thin and eating it alongside some tart green apple slices.
If you made these specifically for post-workout fuel, they pair wonderfully after a good session with a tall glass of water or an electrolyte drink. Since they have a decent amount of protein and carbs, they hit that sweet spot for recovery. I sometimes even warm one up for literally five seconds in the microwave—it makes the chocolate topping gooey again! It turns it into something that feels more like a decadent dessert than a simple homemade snack.
Frequently Asked Questions About Making Protein Bars
I knew you’d have questions! Whenever I share these protein bars with friends, they always need to know about swapping out different powders or how to keep the sugar down. Don’t stress about the small details; these recipes are forgiving, but here are the answers to the things I hear most often!
Can I use whey protein powder, or do I have to use plant-based powder?
You can absolutely use whey protein powder, which is dairy-based! If you need your quick protein treats to be vegan, then you should stick to plant-based options like pea or soy. Whey sometimes mixes a tiny bit differently than plant protein in a no-bake recipe, so if you use whey and feel it’s too dry, use an extra teaspoon of water or milk to get that perfect dough consistency we talked about for these high protein recipes!
How can I make these low sugar protein bars?
That’s a great choice! Since maple syrup is our main sweetener, you can swap it out for a sugar-free syrup alternative that is made for baking, like monk fruit syrup. Just be aware that sugar-free syrups act differently when they bind things, so you might need half a teaspoon less of that added water/milk compared to when you use the real stuff in these homemade protein bars.
What if I don’t have maple syrup? I only have honey!
If you still want to use a liquid sweetener and aren’t worried about making them vegan, honey is a perfectly fine substitute for the maple syrup—it works just as well as a binder. If you have absolutely no liquid sweetener because you were hoping to make protein bars for beginners but are out, then you’ll need to look at a different recipe entirely, because the liquid sweetener is crucial for holding these specific chewy protein bars together.
My dough is too sticky/wet—what did I do wrong?
Don’t worry, this is super common! It usually means your peanut butter was runnier than mine, or you added too much water when mixing. If you face this with your easy protein bar recipe, just stir in one more tablespoon of protein powder or about a quarter-cup of rolled oats. Mix that in well, and it should save the batch so you can press those lovely energy bars homemade!
Estimated Nutritional Data
Okay, let’s talk numbers! I always want to be transparent about what’s going into these amazing homemade protein bars, even though they are so simple. Remember, because we are making these at home, your exact values will swing a little bit based on the brand of protein powder you choose or whether you used honey or maple syrup. This is just a baseline to keep you informed about the great fuel you are making!
Based on my recipe breakdown (using vanilla whey protein and maple syrup, cut into 10 bars), here’s what you are looking at per bar:
- Serving Size: 1 bar
- Calories: 180
- Protein: 10 grams! That’s a solid hit for a quick snack.
- Total Fat: 9 grams (Most of this is the healthy fat from the peanut butter!)
- Total Carbohydrates: 18 grams
- Sugar: 7 grams (And we actually *control* that sugar, which is the best part!)
- Fiber: 2 grams
It’s important to know that those numbers are estimates, like I said. If you swap out peanut butter for sunflower seed butter, or use unflavored powder, it will shift slightly. But overall, you’re getting a fantastic balance of protein and healthy fats in these easy protein bar recipe snacks! Keep tracking with a reliable app if exact macros are super important for you, but for everyday fueling, this is a great starting point.
Print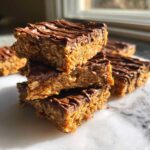
Easy No-Bake 5-Ingredient Peanut Butter Protein Bars
- Total Time: 2 hr 10 min
- Yield: 10 servings 1x
- Diet: Vegetarian
Description
Make simple, chewy peanut butter protein bars at home with only five ingredients. These require no baking and are perfect for quick meal prep.
Ingredients
- 1 cup rolled oats
- 1/2 cup peanut butter
- 1/2 cup protein powder (vanilla or unflavored)
- 1/4 cup maple syrup or honey
- 2 tablespoons water or milk (plus extra for drizzling)
- 1/4 cup dark chocolate chips (optional, for topping)
Instructions
- Line an 8×8 inch baking pan with parchment paper, leaving an overhang on the sides for easy removal.
- In a medium bowl, combine the rolled oats, protein powder, peanut butter, and maple syrup.
- Mix the ingredients thoroughly until a thick, uniform dough forms. If the mixture is too dry, add water or milk one teaspoon at a time until it holds together when pressed.
- Press the dough evenly into the prepared pan. Use the bottom of a glass or spatula to compact it firmly.
- If using chocolate chips, melt them gently with a teaspoon of water or milk. Drizzle the melted chocolate over the top of the bar mixture.
- Place the pan in the refrigerator and chill for at least 2 hours, or until firm.
- Lift the bars out using the parchment paper overhang. Cut into 10 to 12 equal bars.
- Store the bars in an airtight container in the refrigerator.
Notes
- Use gluten-free oats if you need a gluten-free option.
- For a vegan version, ensure you use maple syrup instead of honey.
- If you prefer a different flavor, swap peanut butter for almond butter or sunflower seed butter.
- Prep Time: 10 min
- Cook Time: 0 min
- Category: Snack
- Method: No-Bake
- Cuisine: American
Nutrition
- Serving Size: 1 bar
- Calories: 180
- Sugar: 7
- Sodium: 85
- Fat: 9
- Saturated Fat: 2
- Unsaturated Fat: 7
- Trans Fat: 0
- Carbohydrates: 18
- Fiber: 2
- Protein: 10
- Cholesterol: 0