Oh my goodness, if you need a dessert that screams luxury but whispers “I made this in 20 minutes,” you’ve found your new favorite thing! Seriously, sometimes you just don’t want the oven heating up the house, or maybe you just need something *fast* for a sudden dessert emergency—I’ve been there, trust me!
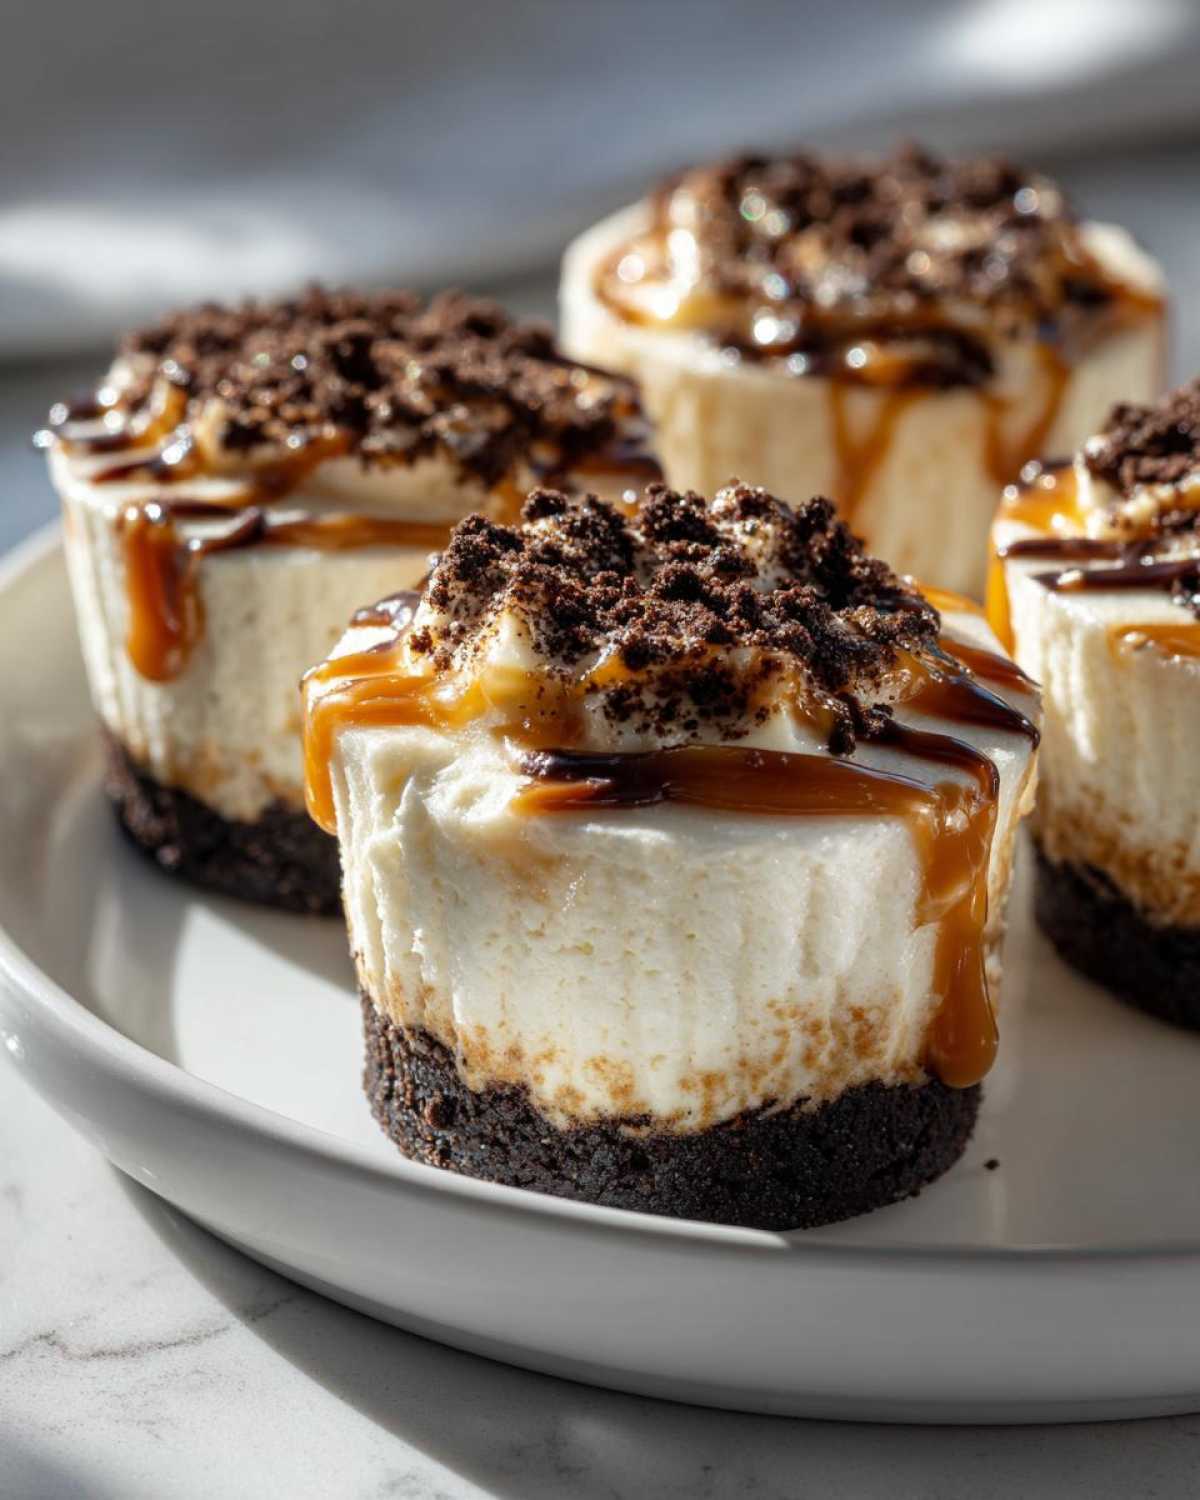
These **cookie butter cheesecake cups** are my absolute go-to for potlucks, birthday parties, or just a Tuesday when I need a little something sweet. They are perfectly portioned—no messy slicing involved! The best part? They are completely no-bake. We get that perfectly rich, creamy cheesecake filling resting on a buttery, crunchy cookie crust, all crowned with that warm, spiced goodness of cookie butter. They come together so quickly, and honestly, they look way fancier than the effort they actually take. You’ll be making these all the time, I guarantee it!
Why You Need These No-Bake Cookie Butter Cheesecake Cups
Honestly, I keep these in my back pocket for last-minute gatherings because they are just cheating! You don’t need an oven, which is a huge win anytime the weather is hot. Plus, making **individual cheesecake servings** means everyone gets a perfect slice every time. No more uneven wedges!
These are the ultimate comfort food in a neat little wrapper. They totally nail that rich texture you want in a cheesecake without any of the fuss. If you are looking for fantastic no bake dessert ideas, these **easy dessert cups** are going straight to the top of your list. They are perfect **party dessert ideas** because they set up beautifully in the fridge.
Gathering Ingredients for Your Cookie Butter Cheesecake Cups
Now for the fun part! The ingredient list for these **cookie butter cheesecake cups** is short, but the quality really matters here, especially with that star flavor. I always splurge a tiny bit on my cookie butter because that’s where all the rich, spiced magic comes from. Trust me, using the good stuff really elevates this **Biscoff cheesecake recipe**!
Since this is a no-bake situation, we want everything ready to go. We aren’t baking anything, so we rely on chilling to do all the hard work. Grab your liners and get these ingredients measured out; we’ll be whipping this up in a jiffy!
Crust Ingredients for Your Cookie Butter Cheesecake Cups
For that perfect **crumb crust dessert** base, you really only need two things, but here’s a pro-tip I learned the hard way: If you can find Biscoff cookies instead of graham crackers, PLEASE use them. The flavor is just unbelievable when it’s all cookie.
- 1 cup graham cracker crumbs (or Biscoff cookie crumbs if you’re feeling fancy!)
- 3 tablespoons melted unsalted butter
Creamy Filling for Your Cookie Butter Cheesecake Cups
This is where we create that amazing, cloud-like texture. The absolute most important thing here? Your cream cheese has to be perfectly soft—I mean, squishy soft—to avoid lumps in your **creamy cheesecake recipe**. Take it out at least two hours before you plan to mix!
- 8 ounces cream cheese, fully softened
- 1/2 cup powdered sugar (also called confectioners’ sugar)
- 1 teaspoon vanilla extract
- 1/2 cup heavy whipping cream
Cookie Butter Topping for the Cookie Butter Cheesecake Cups
You need enough to fold into the batter for flavor depth, and then just a little extra to drizzle right on top for that wow factor when serving. It looks so glossy and professional!
- 1/2 cup cookie butter (like Biscoff spread)
- 2 tablespoons cookie butter, melted, reserved for drizzling
Step-by-Step Instructions for No Bake Cookie Butter Cheesecake Cups
Okay, here’s where the magic happens! Since we aren’t baking, the steps are super simple, but the order and chilling time are crucial to getting that amazing firm texture in these **cookie butter cheesecake cups**. Remember, we went over how important room-temperature cream cheese is, so make sure you’re ready to go!
You’re going to work assembly-line style here. Get your muffin tin lined and ready to go before you even touch the mixer. If you have a piping bag, use that for the filling; it keeps things so neat! If not, a spoon is fine, but go slow for a prettier result.
Preparing the Crumb Crust for Your Cookie Butter Cheesecake Cups
First things first, line that 12-cup muffin tin with paper liners. Don’t skip this, or getting these little babies out will be a nightmare! In a small bowl, mix your crumbs and melted butter together really well. You want it to look like wet sand.
Take about a tablespoon of that mix and press it down *firmly* into the bottom of each liner. You need to press hard here so it doesn’t crumble when you try to eat it later! Once they are all pressed, pop the whole tray into the freezer—this helps them really set up while you tackle the filling.
Creating the Creamy Filling for Your Cookie Butter Cheesecake Cups
Grab your big bowl! Beat that softened cream cheese until it’s perfectly smooth—no lumps allowed, please! Then, add in your powdered sugar and vanilla extract. Mix that until it’s all happy and combined. Now, here’s the key for that light, **creamy cheesecake recipe** texture: whip your heavy cream in a separate bowl until you get stiff peaks. You want it to hold its shape!
Gently fold about half a cup of your **cookie butter dessert** spread into the cream cheese mixture first. Then, you *must* gently fold in the whipped cream. I mean gentle! Overmixing will deflate all that air we just beat into the cream, and we need that fluffiness for the best results in these **mini cheesecake bites**.
Assembling and Chilling the Cookie Butter Cheesecake Cups
Now we fill! Spoon or pipe that fluffy filling evenly over your chilled, frozen crusts. Try to get them level, but don’t stress too much since we have a drizzle coming later! Put the tray back into the refrigerator. You absolutely have to chill these things for a minimum of four hours. Honestly, overnight is even better, but four hours gets them firming up nicely so they aren’t liquidy.
This chilling time is non-negotiable for making sure these **no bake cheesecake cups** hold their **individual cheesecake servings** shape perfectly when you pull out the paper liner. It’s worth the wait!
Finishing Touches: Drizzling the Cookie Butter on Your Cookie Butter Cheesecake Cups
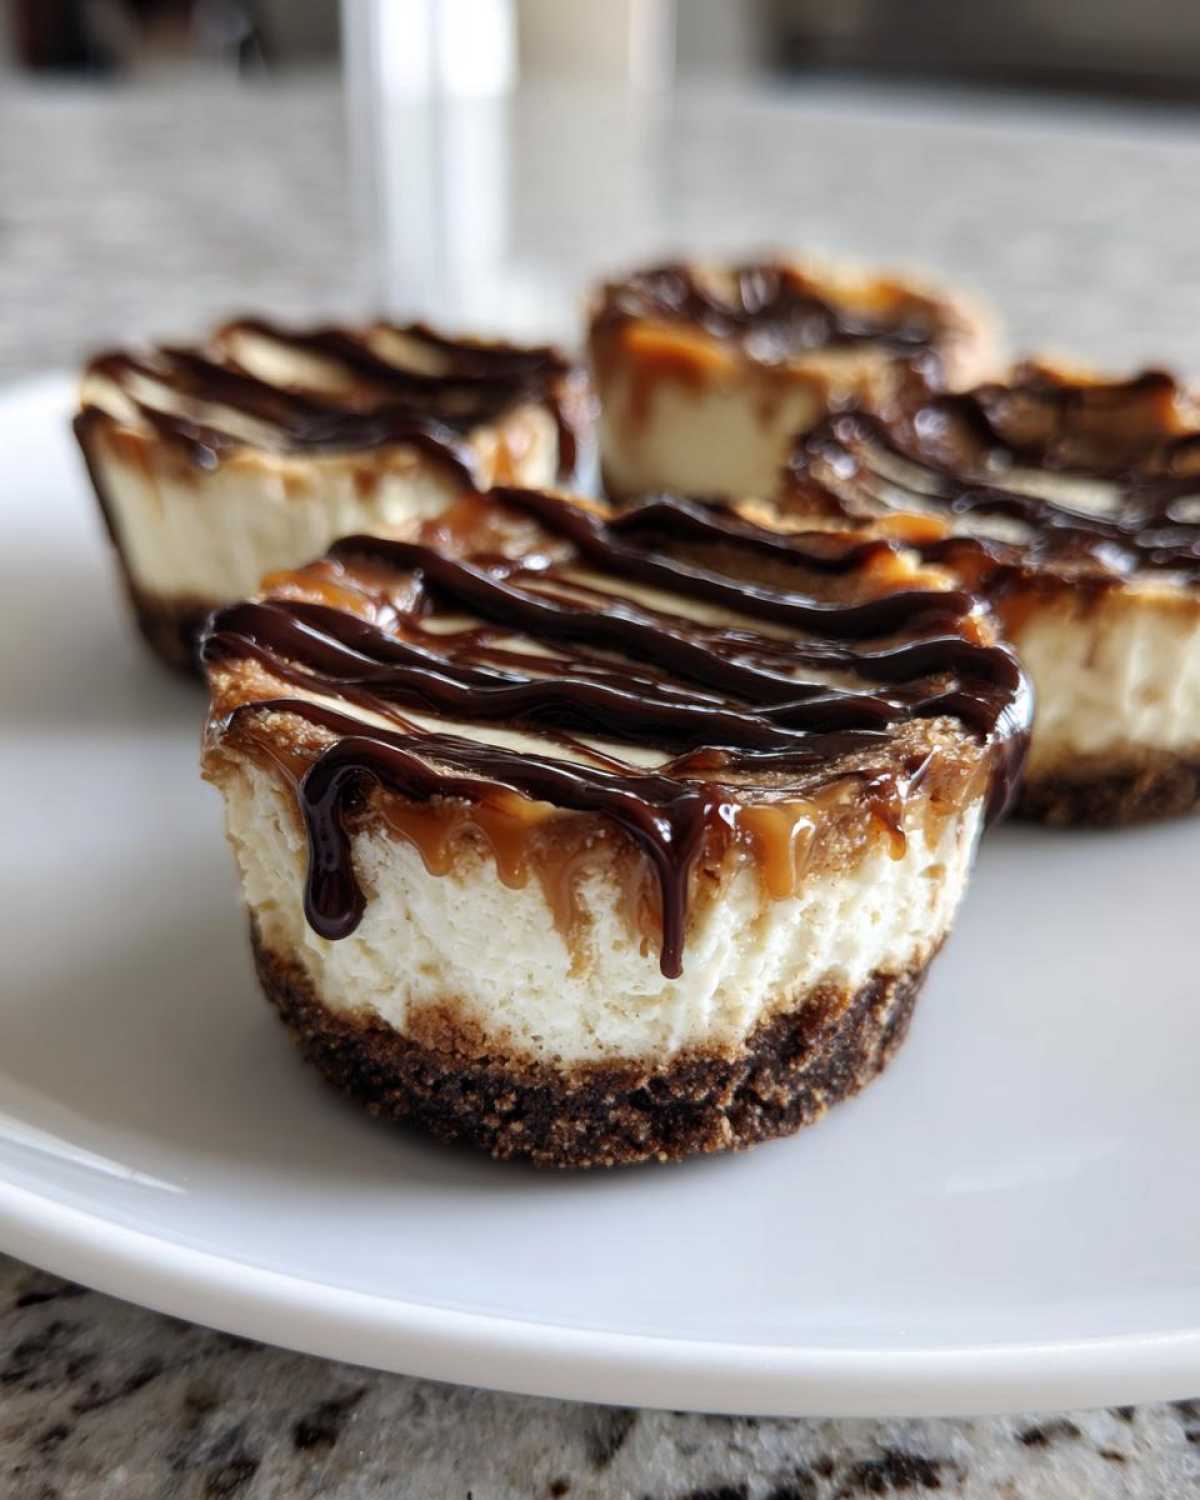
Right before you plan to serve them, take those last two reserved tablespoons of cookie butter and warm them up just slightly—you only need about 10 or 15 seconds in the microwave. You want it runny enough to drizzle easily, not hot or greasy. Use a tiny spoon to drizzle that rich melted **speculoos dessert idea** right across the top of each filled cup. It sets up just a tiny bit as it cools, making them look absolutely stunning for your guests. If you happen to be checking out some other great cheesecake recipes, remember that presentation matters!
Tips for Perfect Cookie Butter Cheesecake Cups
You know, even with a **simple cheesecake recipe** like this, the little things make a huge difference, especially since we aren’t using an oven to fix anything! The most common mistake I see people make is rushing the temperature step. If that cream cheese isn’t soft, your base will be lumpy, plain and simple. Then, when you fold in that beautifully whipped heavy cream, you have to stop mixing the second it vanishes. If you overmix, you deflate all the air, and suddenly your **cookie butter cheesecake cups** feel heavy instead of light and perfectly creamy.
Also, resist the urge to immediately drizzle the topping! Wait until they are fully chilled and set. A warm drizzle on a barely-set cheesecake means you’ll end up with a runny mess rather than those gorgeous, distinct swirls. If you’re prepping these ahead, keep them covered tightly in the fridge and only add the drizzle right before serving. Mastering that gentle fold is the real secret to a successful no bake dessert!
Variations and Substitutions for Your Cookie Butter Cheesecake Cups
I love seeing how you all play with this recipe! While I stand by the original recipe—using Biscoff crumbs and heavy cream gives you the best result, in my humble opinion—it’s fun to switch things up, especially if you have allergies or just want to try something new. This recipe is so flexible, making it a true kitchen workhorse.
When thinking about **speculoos dessert ideas**, feel free to experiment with the base. If you don’t have graham crackers or want a different cookie flavor mingling with the cookie butter spread, you totally can swap them out! Shortbread cookies crush up beautifully and give you a more buttery crust that still holds up well.
For the filling, the recipe note mentioned something helpful if you’re in a rush or just don’t want to pull out the hand mixer for the heavy cream. You can absolutely use Cool Whip! That’s my secret panic switch. Just use about 8 ounces of thawed, good-quality Cool Whip and gently fold it into your cream cheese mixture just like you would the homemade whipped cream. It whips up super fast and keeps that light, airy texture you want in these **cookie butter cheesecake cups**.
And regarding the star ingredient, cookie butter! While I mentioned Biscoff because it’s the most famous, any good speculoos brand works just fine. Don’t forget you can use other crunchy or creamy peanut butter alternatives if you’re trying to shake things up completely, though you’ll lose that distinct spiced note, of course. But hey, sometimes you just need a peanut butter cup vibe, right?
Storage and Make Ahead Tips for Cookie Butter Cheesecake Cups
One of the best reasons to adore these **cookie butter cheesecake cups** is that they are the ultimate **make ahead dessert**! You really want to make these ahead of time anyway, because chilling is what sets the filling perfectly. I usually make them the day before a big event, stash them in the fridge, and then drizzle the topping on in the morning. It just makes party day so much calmer, doesn’t it?
They hold up beautifully in the refrigerator for up to three days if you keep them sealed up tight. Make sure you use actual airtight lids or plastic wrap over the whole muffin tin tray—you don’t want them soaking up any weird smells from the fridge, especially since we are dealing with that fabulous cookie butter flavor.
Now, can you freeze them? Yes, you sure can! If you’re planning ahead for a massive holiday party or just want true grab-and-go treats later, these freeze wonderfully. I always remove the paper liners first—sometimes the paper sticks after thawing—and pop them into a freezer-safe container. You can layer them between sheets of parchment paper to keep them from squishing. They do great frozen for about a month.
When you’re ready to eat them, just transfer the frozen **mini cheesecake bites** to the refrigerator for a nice, slow thaw—it usually takes about 6 to 8 hours. If you are really impatient (I know the feeling!), you can leave them on the counter for about an hour, but slow thawing is always better for texture. Once they are thawed, add that lovely drizzle right before serving, just like the recipe says! If you are looking for more make-ahead magic, you should check out this amazing no-bake pie recipe for seasonal parties!
Serving Suggestions for These Easy Dessert Cups
Because these **cookie butter cheesecake cups** are so rich and decadent, you don’t need much else on the plate, but I do have my favorite accompaniments! They pair perfectly with a strong cup of coffee—maybe even one of my favorite breakfast coffee smoothies if you are enjoying these earlier in the day!
If you’re serving them as a dessert after a big meal, I love cutting the richness with something slightly tart. A few fresh raspberries or a tiny side scoop of tart lemon sorbet makes this **dessert in a cup** feel balanced and not *too* heavy. Honestly though, they are perfect all on their own too!
Frequently Asked Questions About Cookie Butter Cheesecake Cups
I get asked the same few questions every time I bring these **cookie butter cheesecake cups** to an event, so let’s clear those up! Knowing these small details will help your **Biscoff cheesecake recipe** turn out perfectly smooth and set every single time.
Can I skip the chilling time for these No Bake Cheesecake Cups?
Oh, please don’t try to speed this up in the freezer! You can put them in the freezer for about an hour to speed up the initial set, but you absolutely need those four hours in the fridge for the filling structure to firm up properly. If you skip the chilling, your **mini cheesecake bites** will just be a sad, creamy puddle when you try to lift the liner. Patience pays off here!
What exactly is cookie butter?
That’s a great question for anyone new to this delicious world! Cookie butter is basically spiced shortbread cookies (like the European speculoos biscuits) blended down with fat until it becomes a creamy, spreadable butter, almost like peanut butter but with warming spices like cinnamon and ginger. It is heaven, and it’s why this **speculoos dessert idea** is so popular!
Can I use premade graham cracker crusts instead of making my own?
Yes, you certainly can! If you are pressed for time, absolutely grab those pre-pressed shells or a full graham cracker crust from the store. The only thing I’d recommend is crushing up a few extra Biscoff cookies to mix into the store-bought crumbs for an extra flavor boost. It makes a big difference in the final taste of your **easy dessert cups**!
Do these need to be stored in the refrigerator?
Absolutely, yes! Because these **individual cheesecake servings** are made with real cream cheese and whipped cream, they need to stay chilled to stay safe and firm. You can take them out about 20 minutes before serving them at your party, but don’t let them sit out for hours, especially not if you’re hosting an outdoor event. Keep those goodies cool! If you’re ever in a pinch for a cool drink to go with them, check out my recipe for the Grinch Punch!
Estimated Nutrition for Cookie Butter Cheesecake Cups
I know some of you folks keep track of these things, and even though these **cookie butter cheesecake cups** feel like pure indulgence, I wanted to give you a ballpark idea of what’s in them! Remember, this is just an estimate, because every brand of cream cheese and every dollop of cookie butter seems to be slightly different, right?
This breakdown is based on 12 servings made exactly to the recipe above. Don’t shoot themessenger on the sugar count; it’s cheesecake! But hey, they are rich enough that one cup is usually plenty, which helps keep things balanced. Consider this your quick reference for your **no bake cheesecake cups**!
- Serving Size: 1 cup
- Calories: Around 280
- Fat: About 18 grams (including 10 grams of saturated fat)
- Carbohydrates: Roughly 26 grams
- Protein: 4 grams
- Sugar: Approximately 22 grams
It’s a treat, for sure, but a totally manageable one, especially considering you get that amazing spiced flavor in these **individual cheesecake servings** without ever turning on the oven. Enjoy them responsibly!
Share Your Cookie Butter Cheesecake Cups Experience
Now that you’ve whipped up a batch of these glorious **cookie butter cheesecake cups**, I absolutely need to know what you thought! Honestly, seeing your creations is my favorite part of being in the kitchen. Did you crush Biscoff cookies for the crust? Did you use a piping bag or just a spoon?
Don’t be shy! Come back here and give this recipe a rating—a simple 5-star review helps other bakers know just how simple and delicious this **Speculoos dessert idea** is. If you struggled with something, let me know that too so I can offer an extra tip! We are all learning together here.
And the absolute best feedback is a photo! If you snapped a picture of your perfectly chilled **mini cheesecake bites**, I’d love to see them. You can tag me on social media or send a picture right through my contact page—it truly makes my day to see this recipe making an appearance at your table. Happy eating!
Print
No-Bake Cookie Butter Cheesecake Cups
- Total Time: 4 hr 20 min
- Yield: 12 cups 1x
- Diet: Vegetarian
Description
Make easy, individual servings of creamy cheesecake topped with rich cookie butter. This no-bake recipe uses a simple cookie crust and is perfect for parties.
Ingredients
- 1 cup graham cracker crumbs (or Biscoff cookie crumbs)
- 3 tablespoons melted unsalted butter
- 8 ounces cream cheese, softened
- 1/2 cup powdered sugar
- 1 teaspoon vanilla extract
- 1/2 cup heavy whipping cream
- 1/2 cup cookie butter (like Biscoff spread)
- 2 tablespoons cookie butter, melted, for topping
Instructions
- Line a standard 12-cup muffin tin with paper liners.
- Combine the graham cracker crumbs and melted butter in a small bowl. Press about 1 tablespoon of the mixture firmly into the bottom of each liner to form the crust. Place the tin in the freezer while you prepare the filling.
- In a large bowl, beat the softened cream cheese with an electric mixer until smooth.
- Add the powdered sugar and vanilla extract. Beat until fully combined and creamy.
- In a separate bowl, whip the heavy whipping cream until stiff peaks form.
- Gently fold the whipped cream into the cream cheese mixture until just combined. Do not overmix.
- Spoon or pipe the cheesecake filling evenly over the chilled crusts, filling each cup almost to the top.
- Chill the cups in the refrigerator for at least 4 hours, or until firm.
- Before serving, warm the remaining 2 tablespoons of cookie butter slightly so it is pourable. Drizzle the melted cookie butter over the top of each chilled cheesecake cup.
Notes
- For a stronger cookie flavor, use crushed Biscoff cookies instead of graham crackers for the crust.
- You can substitute the heavy cream with 8 ounces of thawed, cool whip for a slightly faster filling process.
- These cups hold well in the refrigerator for up to 3 days.
- Prep Time: 20 min
- Cook Time: 0 min
- Category: Dessert
- Method: No Bake
- Cuisine: American
Nutrition
- Serving Size: 1 cup
- Calories: 280
- Sugar: 22
- Sodium: 150
- Fat: 18
- Saturated Fat: 10
- Unsaturated Fat: 8
- Trans Fat: 0
- Carbohydrates: 26
- Fiber: 1
- Protein: 4
- Cholesterol: 55