Okay, friends, if you’re hosting anyone—and I mean *anyone*—you need a dip that shouts FUN! Liam’s food is always so precise; sometimes I worry it’s too serious for a good game night, but not with this recipe. This seven layer dip is the exact moment I realized Liam’s cooking could have a soul! It’s the ultimate Tex-Mex appetizer because it gives everyone something to look forward to with every scoop. It’s not just about the layers of beans and cheese; it’s about the connection when everyone gathers around the dish, elbowing each other gently for the next chip full of everything delicious. Trust me, this is the first thing to vanish at every single gathering we have!
Why This is the Best 7-Layer Dip Recipe for Your Gathering
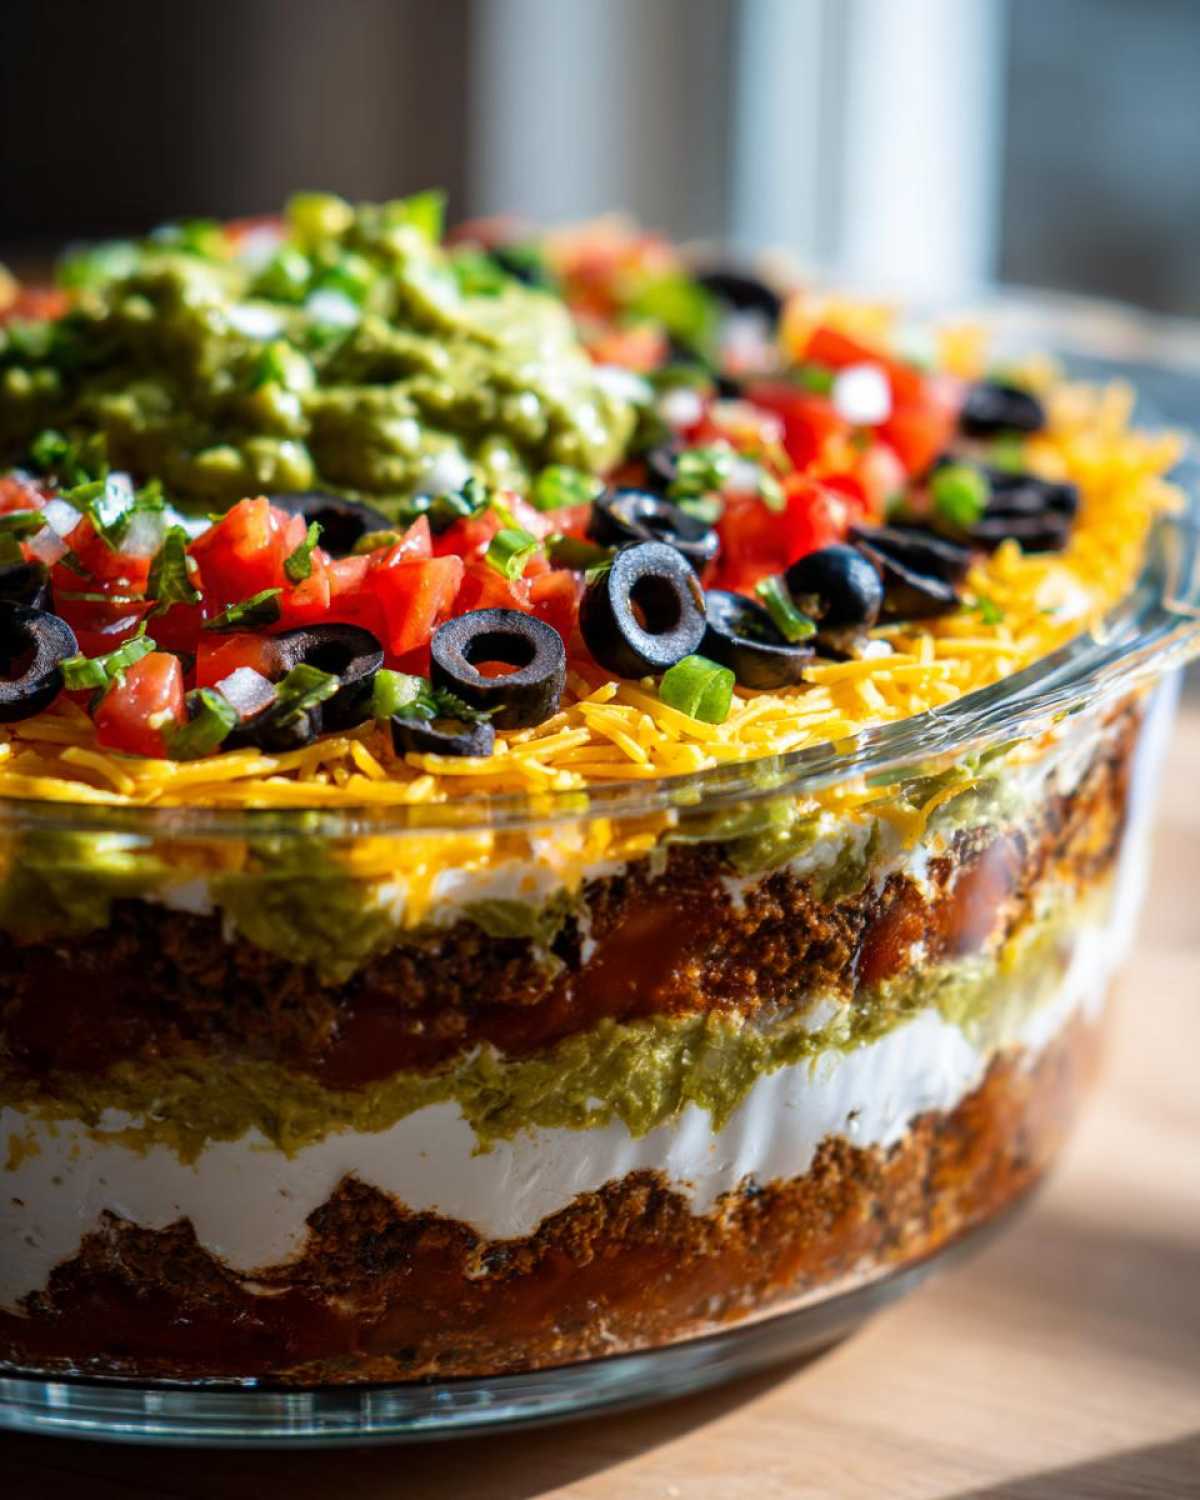
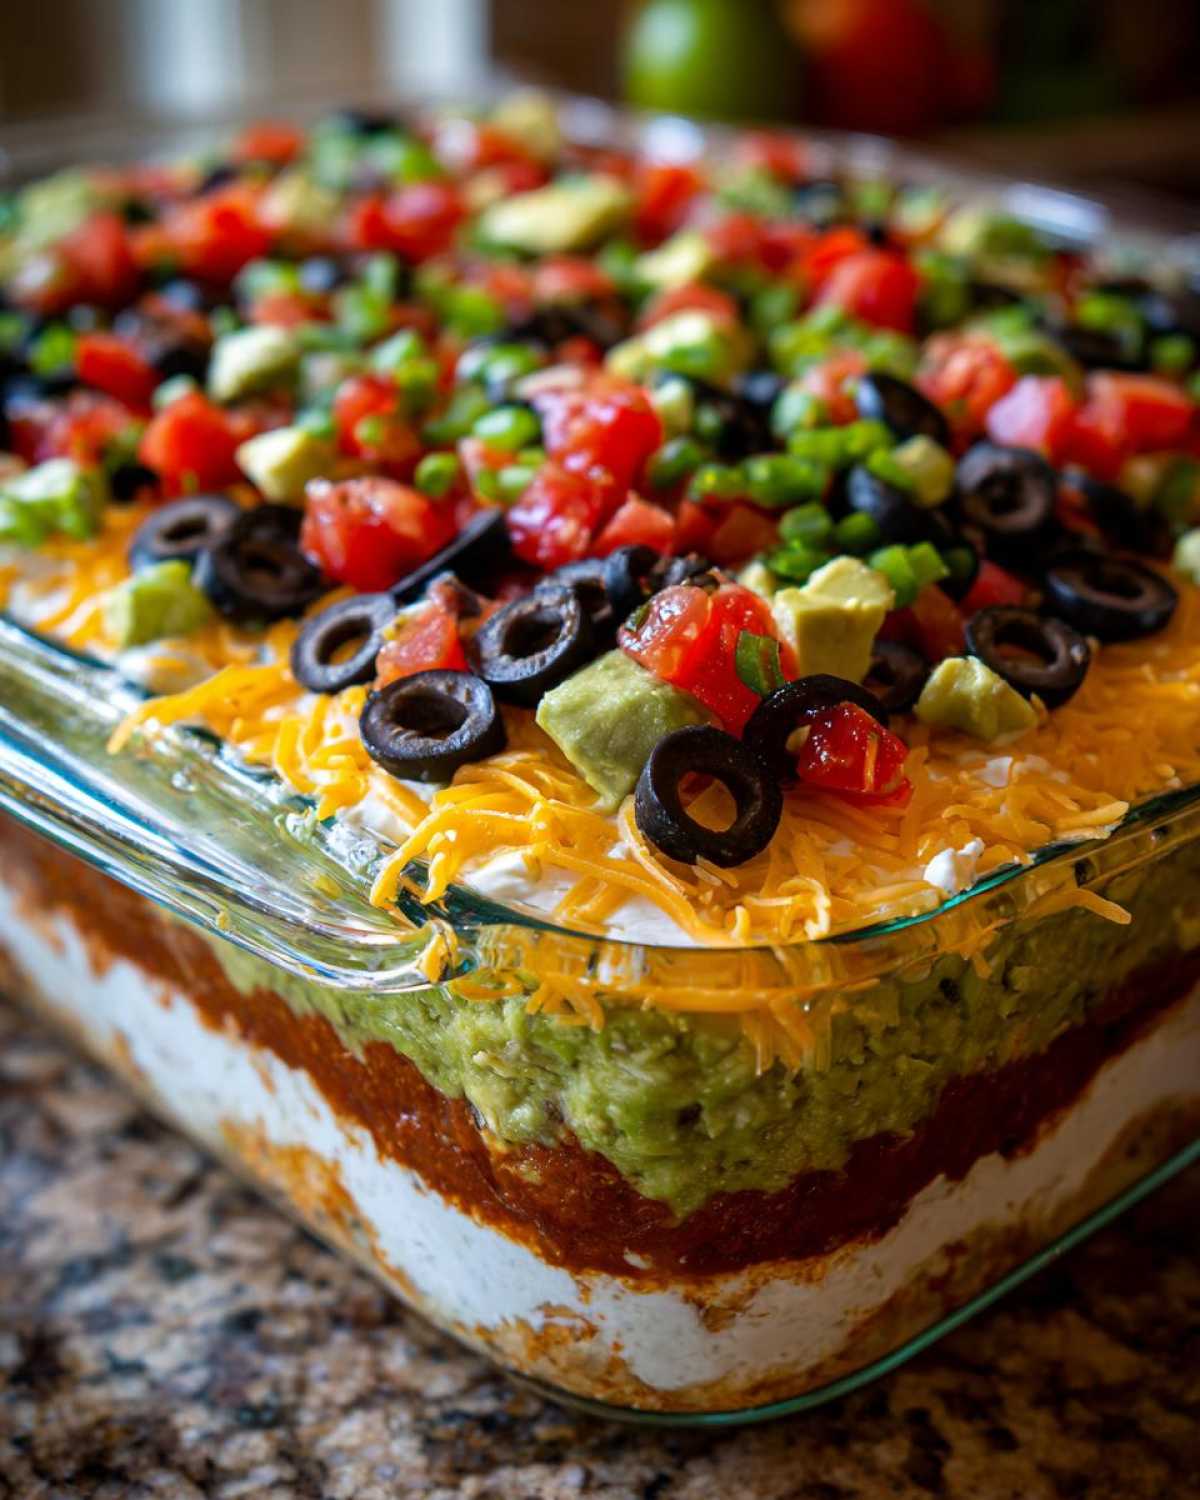
We’ve tried a lot of party dips over the years, but this version is the absolute champion! What makes this the best 7-layer dip is that it’s genuinely foolproof. Seriously, even if you think you can’t layer things neatly, you totally can here. The key to success for any party layered dip is making sure each component stays exactly where you put it. That’s why I insist on using a clear glass dish. You want your guests to see that magnificent stack of flavor before they even touch a chip! Liam loves how sharp it looks; it turns a simple appetizer into edible art, just like our Million Dollar Dip.
Quick Facts: Prep Time & Yield for Your Seven Layer Dip
Because this is mostly assembly, it comes together so fast, which is perfect when you’re rushing out the door to a party! You’ll spend about 15 minutes getting everything perfectly arranged. Since it yields 10 delicious servings, you might want to double it if you have a huge crowd. But you won’t need any cooking time at all—it’s all in the layering!
Gathering the Ingredients for Your Easy Seven Layer Dip
Okay, let’s talk about the goods! You need simple, sturdy ingredients for this easy seven layer dip. Think of this as building a delicious little tower that needs a good foundation. You’re mostly working with pantry staples here, which is why I love bringing this to any event. We’re going straight for the can of refried beans and that gorgeous shredded Mexican blend. Don’t forget those little sliced black olives—they bring the perfect salty pop!
Ingredient Notes and Substitution Tips
One crucial note: I used standard, store-bought taco seasoning for the sour cream layer because it’s reliable and easy. You’ll just mix one teaspoon into the sour cream. For the guacamole, feel free to use your favorite store-bought brand, or whip up a fresh batch if you have an extra five minutes. And hey, if you wanted to check out another simple, cheesy recipe, Liam made a stellar three-ingredient chili cheese dip, but for this layering magic, stick to what we have listed!
How to Assemble Your Foolproof Seven Layer Dip Step-by-Step
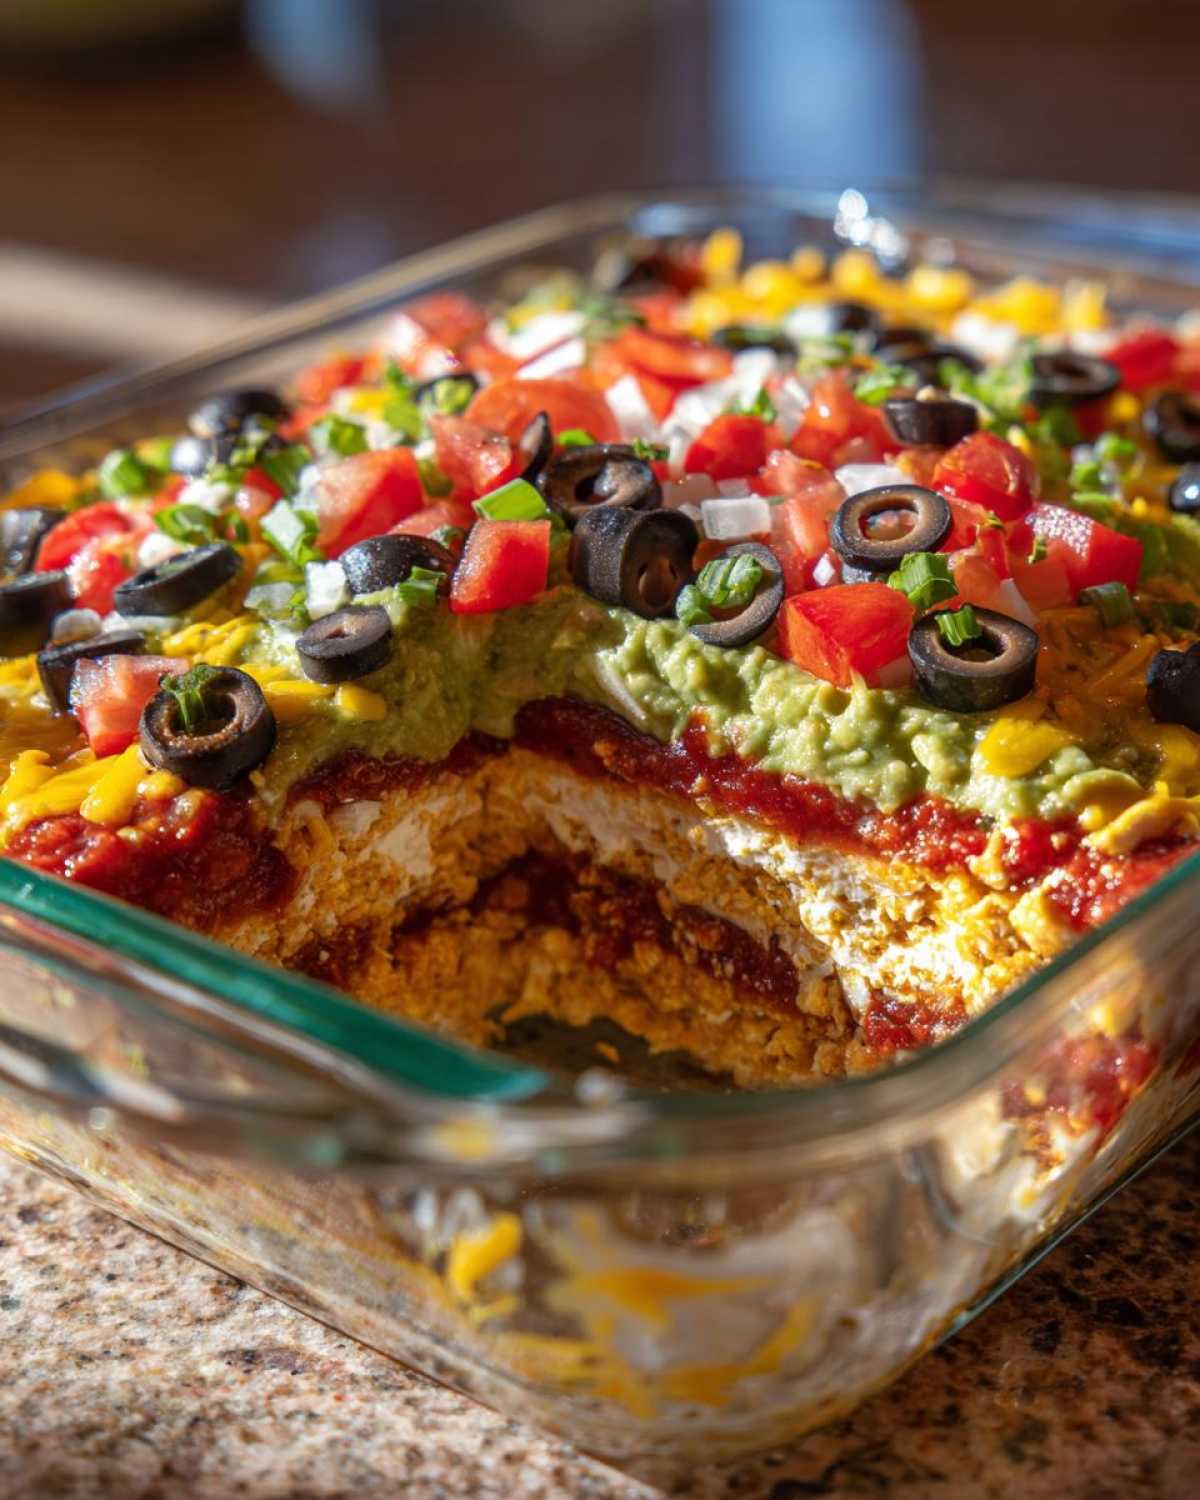
This is where the performance starts! With the seven layer dip, gravity and careful spreading are your best friends. You absolutely cannot stir these layers together, or you’ll end up with murky brown mush instead of a beautiful cross-section. We need distinct, happy layers!
First up, those refried beans. Spread them out super flat across the bottom of your clear dish—really press them down gently so they form a solid base. Next, take your taco-seasoned sour cream. I like to use a small offset spatula to carefully float this mixture right over the beans so they don’t mix at all. Next is the guacamole. Spread that out ever so gently.
After that, we move to the salsa. Just spoon it right on top of the guac. Don’t worry if it looks a little messy at first; the cheese layer will smooth things out! Sprinkle on your Mexican cheese blend, then dot it with the black olives, and finish with the fresh chopped tomatoes right on top. This whole construction process takes maybe 10 minutes if you’re moving fast. Don’t forget the essential step: you must chill this seven layer dip for at least 30 minutes. It lets everything settle so the chips don’t cause an avalanche!
Expert Tip: Preventing Browning on Your Seven Layer Dip Guacamole
If you’re making this way ahead of your party—maybe the night before—we have a trick for that beautiful green layer. Once the guacamole is spread, I quickly brush the very top surface with a tiny bit of lime juice. It seems like a small thing, but that layer of acid just protects the avocado from turning sad and brown while it chills. It’s one of those little secrets Liam picked up that keeps my appetizers looking camera-ready. If you’re planning on serving it right away, of course, you can skip this step, but I always keep some citrus handy when I make this spinach-artichoke dip inspiration, too!
Tips for Serving the Perfect Party Layered Dip
So you’ve built your masterpiece! Now comes the best part: watching people devour the seven layer dip. Seriously, when we took this to a neighborhood barbecue last summer, Liam was so proud of how perfectly defined every single layer was in the clear dish. Then, five minutes later, it looked like a demolition zone, but in the best possible way! That’s how you know you’ve made a winner.
Here’s one non-negotiable tip: you have to serve this with sturdy chips. Thin, delicate chips are just going to snap off right in the bean layer, and nobody wants that frustration. Grab those thick, restaurant-style tortilla chips or even scoop sticks to make sure your guests can get down through all seven layers cleanly. If you’re looking for other elegant, yet easy, finger foods, check out these smoked salmon cucumber bites—they disappear just as fast!
Variations: Customizing Your Tex-Mex Appetizer
While the classic structure of the seven layer dip is perfect, I always encourage you to think of it as a wonderful base for more fun! Sometimes, especially if dinner is running late, Liam and I need something a little heartier layered in there. If you want to transform this from a snack to a real centerpiece, you absolutely can add an extra layer!
My favorite addition is cooked, seasoned ground beef—make sure it’s crumbly and not greasy! You just spread that right over the refried beans before anything else goes on top. Alternatively, if you’re keeping it vegetarian, just drain a can of black beans really well and spread them on! It adds incredible texture and bulk. It’s those little improvisations that make our recipes feel like your own, just like we did with these loaded cranberry turkey nachos—a totally unexpected flavor combo that just works!
Storage and Make-Ahead Instructions for Seven Layer Dip
If you’re planning a huge bash, you might wonder about making this seven layer dip ahead of time, and that’s smart thinking! This layered dip is actually great for prepping a day in advance, but you have to think about that guacamole layer. I highly recommend assembling everything *except* the guacamole layer, wrapping that dish tightly in plastic wrap, and getting it into the fridge overnight.
Then, right before everyone arrives, go ahead and spread that guacamole on top, finish with your olives and tomatoes, and let it chill for those crucial 30 minutes. Even if you just make it four hours ahead, make sure it’s covered tightly. This dip generally stays fresh and amazing for up to 24 hours in the refrigerator, but honestly, with how great it tastes, you’ll be lucky if there are any leftovers!
Troubleshooting Common Issues with Layered Dips
We’ve all been there! You spend all that time arranging things perfectly, and then when you serve it, it looks like a messy landslide instead of a neat stack. Don’t panic! These are just texture problems, and we can fix them with a little bit of patience. Liam and I have certainly had our share of messy kitchen failures, but these dips are easy to save once you know the trick.
The number one complaint I hear about a party layered dip is that the layers start sliding around when people dig in. This almost always means the dip hasn’t chilled long enough! Those layers need time to firm up and adhere to each other, especially the creamy ones. You must get that dip into the fridge for at least 30 minutes—I honestly push for an hour if I can—to let everything settle nicely before you bring it out to the buffet table.
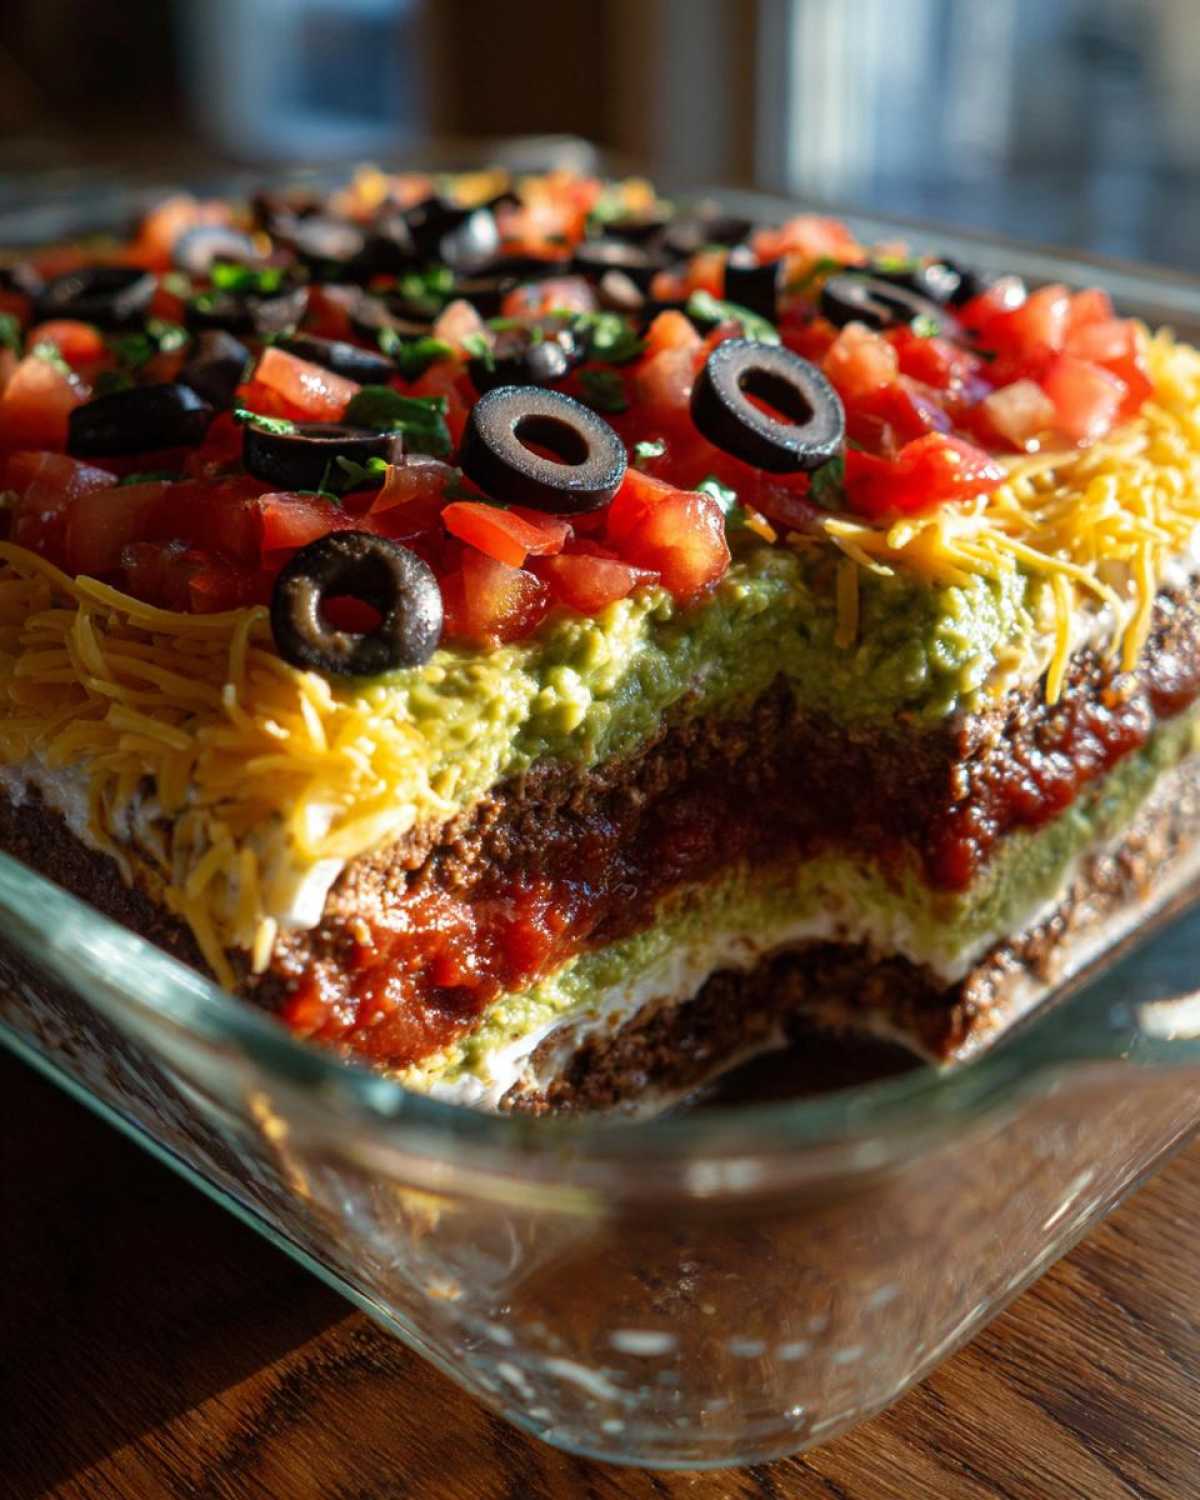
Another texture worry is when your beautiful salsa layer seems to melt right into the seasoned sour cream. Oops! That usually happens when the sour cream layer isn’t thick enough or spread completely edge-to-edge. Make sure you are using full-fat sour cream if you can swing it, and use a spatula to cover every inch of the beans before you even think about adding the next component. A robust sour cream layer acts like a necessary shield between the beans and the salsa!
If you’re still worried about things shifting, when you spread the guacamole or sour cream, don’t press down heavily. Just gently lay the substance over the layer beneath it. Think of it like placing soft pillows on top of each other rather than stacking bricks. It takes a gentle touch!
Frequently Asked Questions About Making Seven Layer Dip
Whenever I share this seven layer dip at a party, people instantly swarm my kitchen asking questions! It’s become famous for a reason, and I’m happy to jump in and answer the most common concerns I hear about making the best 7-layer dip. Let’s clear up any last-minute hosting jitters so you can relax and enjoy the party!
Can I use Greek yogurt instead of sour cream in this party layered dip?
Oh, that’s a great question about how to make this easy seven layer dip a little lighter! You absolutely can substitute plain Greek yogurt for the sour cream. Just know that Greek yogurt is much thicker, so you might need to thin it out slightly. Mix your taco seasoning in first, and then add milk or lime juice, a teaspoon at a time, until it reaches a nice, spreadable consistency similar to regular sour cream. Don’t make it too watery, or you risk a runny layer!
What is the best size dish to use for this recipe?
For the standard ingredients listed, I always grab a clear 9×13 inch dish. This size gives you enough surface area so that the layers are relatively thin—remember, we want *seven* distinct layers, not seven inches of guacamole! A large, shallow dish is key to showing off the beautiful cross-section of our Tex-Mex appetizer. If you use a deeper square dish, your layers might end up too thick to scoop nicely.
How do I get that perfect olive and tomato topping distribution?
This is where you can channel your inner artist! We want even coverage without glopping everything onto one side. Instead of just dumping the olives and tomatoes on, try sprinkling them slowly while you circle the dish. It sounds silly, but it helps spread the weight evenly. This topping combination always reminds me of our bubbly street corn dip; the fresh toppings really make the difference!
Is this dip good for picnics or events where it can’t stay chilled?
Listen, this is a creamy dip, right? So, if you’re taking it outside on a hot summer day, you have to be super careful. For best results and safety, I always pack the chilled dip surrounded by ice packs in its cooler. Because we chill it for at least 30 minutes before serving, it holds its cold temperature for a while, but don’t let it sit un-chilled for more than two hours max. My advice to make your next seven layer dip successful is to bring it out just as people are ready to eat!
Nutritional Snapshot of This Party Layered Dip
Now, I’m not a nutritionist, Liam is the one who obsesses over the details, but when I make this party layered dip, I know I’m serving up something satisfying! Since this is mostly beans, cream, cheese, and avocado, it definitely leans towards being a richer appetizer. Remember, these numbers are just estimates based on standard, full-fat ingredients—if you start swapping in light sour cream or skip the olives, the numbers change!
For those of you tracking things, here’s what we’re generally looking at per serving (which is about 1/10th of the whole dish):
- Calories: Around 180
- Fat: About 12g (With 6g of that being saturated fat—you gotta have the cheese and cream!)
- Carbohydrates: Roughly 12g, with 3g of that being filling fiber.
- Protein: A nice boost of about 7g to keep everyone happy before the main course.
It’s got a little bit of everything, which is why it pairs so perfectly with those crunchy tortilla chips. If you want to read more about how we handle data privacy for all our recipes and user information, you can check out our privacy policy here. But don’t let numbers stop you from enjoying this, okay? It’s called ‘party food’ for a reason—it’s meant to be shared and enjoyed!
Print
The Best 7-Layer Dip for Your Next Gathering
- Total Time: 15 min
- Yield: 10 servings 1x
- Diet: Vegetarian
Description
Make this classic Tex-Mex appetizer, the easy seven layer dip, for your next party. It is a crowd-pleasing, layered dip that looks great and tastes even better.
Ingredients
- 1 (16 ounce) can refried beans
- 1 cup guacamole (store-bought or homemade)
- 1 cup sour cream
- 1 teaspoon taco seasoning mix
- 1 cup salsa (medium heat recommended)
- 1 cup shredded Mexican cheese blend
- 1/2 cup chopped black olives, drained
- 1/2 cup chopped fresh tomatoes
Instructions
- Spread the refried beans evenly across the bottom of a clear 9×13 inch serving dish. Press them down gently.
- In a small bowl, mix the sour cream and taco seasoning until combined. Spread this seasoned sour cream mixture over the bean layer.
- Carefully spread the guacamole layer over the sour cream. To keep it fresh, you can brush a thin layer of lime juice over the top if you are making this ahead of time.
- Spoon the salsa evenly over the guacamole layer. Do not stir the layers.
- Sprinkle the shredded cheese blend over the salsa.
- Top the cheese with the chopped black olives.
- Finish the dip by sprinkling the chopped fresh tomatoes over the top layer.
- Chill the party layered dip for at least 30 minutes before serving to allow the flavors to meld. Serve with tortilla chips.
Notes
- Use a clear glass dish so your guests can see all seven layers.
- If you are worried about the guacamole browning, assemble the dip just before the guests arrive.
- For an extra layer of flavor, you can add a layer of seasoned ground beef or black beans between the refried beans and the guacamole.
- Prep Time: 15 min
- Cook Time: 0 min
- Category: Appetizer
- Method: Layering
- Cuisine: Tex-Mex
Nutrition
- Serving Size: 1/10 of dip
- Calories: 180
- Sugar: 4
- Sodium: 350
- Fat: 12
- Saturated Fat: 6
- Unsaturated Fat: 6
- Trans Fat: 0
- Carbohydrates: 12
- Fiber: 3
- Protein: 7
- Cholesterol: 25