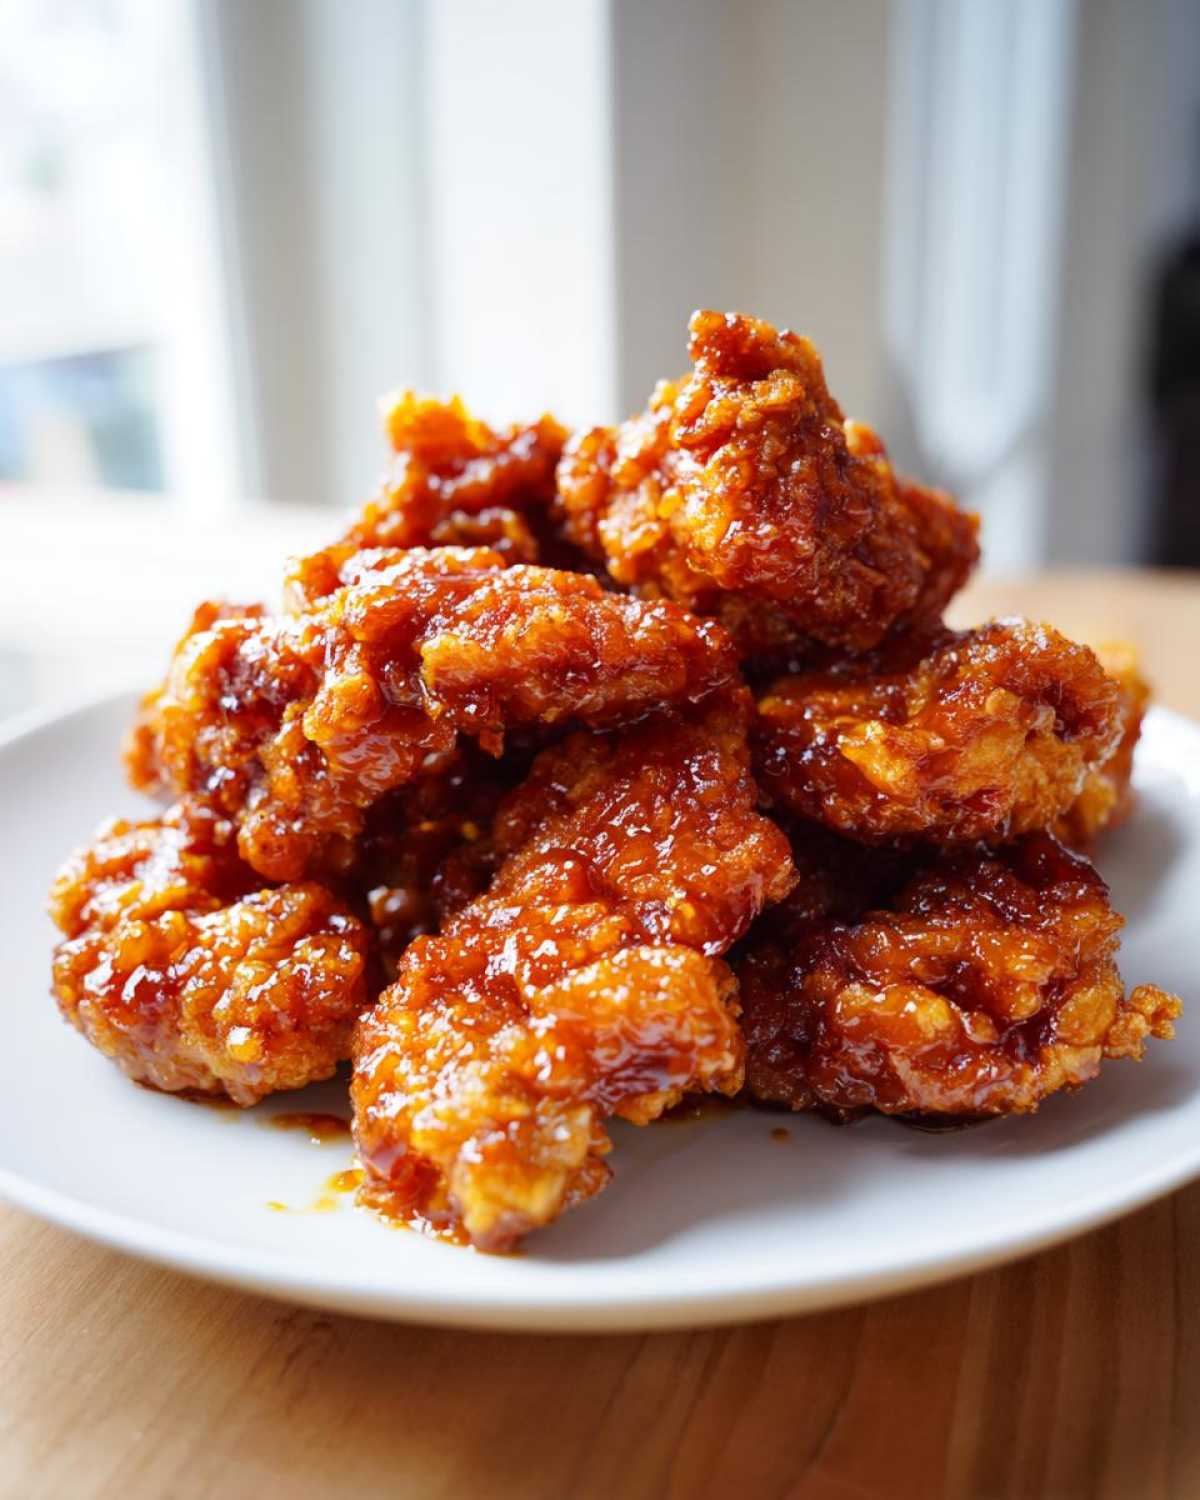
Oh, you know that craving, right? That moment when you just absolutely *need* that sticky, sweet, slightly tangy flavor that only the best Chinese-American takeout spots deliver? Well, stop dialing! I spent way too many weeks messing up my kitchen just to prove that homemade is better, faster, and tastes fresher.
This isn’t just *any* recipe; this is my ultimate, tested-on-my-pickiest-eater **orange chicken recipe** that gets those gorgeous, crispy bites and that perfectly glossy glaze every single time, all in about 30 minutes. Trust me—once you nail the coating technique and balance that sauce just right, you’ll never order delivery again. Get ready for the crispiest, juiciest chicken!
Why This 30-Minute Orange Chicken Recipe Works (Better Than Takeout)
I always hated how takeout orange chicken would get soggy if you looked at it wrong five minutes after you opened the container. We fixed that problem right up front! This recipe is all about speed and texture working together. You get restaurant quality, but done before the delivery driver could even find our driveway. It’s amazing what science—and a good coating—can do.
The quality of this **orange chicken recipe** absolutely crushes the delivery versions because we pay attention to two critical things: getting the chicken super crisp and mastering that beautiful, glossy sauce.
Achieving Ultimate Crispiness for Your Orange Chicken Recipe
The secret weapon here is the breading blend. We use a mix of flour and cornstarch—that cornstarch is pure magic for holding a crunch! It helps keep the bite light, so you’re not chewing through a heavy crust. Whether you decide to quickly pan-fry it in just a little oil, or you try out my healthier crispy Korean chicken hack suggestion using the air fryer, this coating guarantees you get that satisfying crackle instead of mush. Seriously, we love crunch here!
The Perfect Sweet Tangy Orange Sauce
If the coating is the body of the dish, the sauce is its soul! Takeout spots often load theirs up with sugar, but we balance it out. We’re using fresh juice and zest, which brings vibrant acidity to cut through the sweetness. The final secret is the cornstarch slurry; pouring that in at the end turns the thin juice into that thick, beautiful, sticky orange glaze that clings perfectly to every single piece of chicken. It’s sweet, tart, and oh-so-sticky—the way it should be!
Ingredients for the Ultimate Crispy Orange Chicken Recipe
Okay, getting the right stuff together is half the battle, but don’t panic! You probably have most of this sitting around already, which makes this such a great quick chicken dinner. We keep the ingredient list clean so you can put this together super fast. I’ve broken it down into two main groups so you don’t mix up your dredge ingredients with your sauce components. Remember, that fresh orange really makes all the difference here!
Chicken and Coating Components
- 1 pound boneless, skinless chicken breasts or thighs, cut into 1-inch pieces
- 1 large egg, lightly beaten
- 1/2 cup all-purpose flour
- 1/4 cup cornstarch (this is key for crispiness, don’t skip it!)
- 1/2 teaspoon salt
- 1/4 teaspoon black pepper
- 2 tablespoons vegetable oil (for pan-frying, but use less if air frying!)
Components for the Sweet Tangy Orange Sauce
- 1 cup fresh orange juice (seriously, fresh is best)
- 1/2 cup granulated sugar
- 1/4 cup rice vinegar (for that necessary tang)
- 2 tablespoons soy sauce
- 1 tablespoon grated fresh ginger
- 2 cloves garlic, minced
- 1 teaspoon sesame oil
- 1 tablespoon cornstarch mixed with 2 tablespoons cold water (this is the slurry for thickening)
- Zest of 1 orange
Step-by-Step Instructions for Your Orange Chicken Recipe
Okay, here’s where the magic happens! Since we’re aiming for that sub-30-minute mark, timing is everything. I find it best to start the sauce first—while it’s simmering gently—you can get all your chicken dredged and ready to cook. That way, the whole process flows beautifully, and we don’t compromise on that fresh, crispy texture!
Preparing and Coating the Juicy Chicken Bites
First things first: make sure your chicken pieces (one-inch sizing is perfect!) are patted completely dry. Moisture is the enemy of crispiness! Toss them gently in that lightly beaten egg until they’re just coated. Then, move them over to your flour/cornstarch mixture. Here’s my trick: dredge them quickly and shake off any excess. You want a light, dusty coating, not a thick, heavy clump. A light coating cooks faster and stays crispier underneath that yummy sauce.
Cooking the Chicken to Golden Perfection
Get your large skillet over medium-high heat and add your oil. It should shimmer slightly before the chicken goes in. Don’t overcrowd the pan! Seriously, working in batches is non-negotiable. If you dump it all in, the temperature drops instantly, and you end up steaming the chicken instead of frying it. Cook each batch for about 3 to 4 minutes per side until they are beautifully golden brown. For safety, always make sure the internal temperature hits 165°F, but visually, you’re looking for that deep, beautiful gold color before moving them to a paper towel-lined plate.
Making the Sticky Orange Glaze
This part is fun! While your crispy chicken is resting, throw all your juice, sugar, vinegar, soy sauce, ginger, garlic, zest, and sesame oil into a small saucepan. Bring that mixture to a simmer, just nice and bubbly. Once it’s simmering, quickly whisk up your cornstarch slurry—that’s the cornstarch mixed with cold water—and slowly whisk it into the sauce. Keep stirring! It’ll go from liquidy juice to a thick, glossy, beautiful glaze in seriously under a minute. That gloss means it’s ready!
Tossing and Finishing the Orange Chicken Recipe
Now, bring back all those lovely, juicy chicken bites! Put them in a clean, cool bowl (or back in the skillet if you wiped it clean) and immediately pour that hot, sticky glaze over the top. Use a rubber spatula and toss gently—don’t stir vigorously! We want every piece covered in that amazing sweet and tangy coating, but we definitely don’t want to smash the crispy edges we worked so hard to create. It should be perfectly coated and ready to rock!
Tips for the Crispiest Orange Chicken Recipe Variations
I know not everyone wants to drag out the skillet and deal with oil splatter, and trust me, I totally get it! This recipe is super adaptable. We worked hard on the coating for a reason—it holds up perfectly whether you pan-fry it, bake it, or toss it in the air fryer. You get that crackly exterior without the mess when you use our suggestions!
Air Fryer Orange Chicken Recipe Instructions
If you have an air fryer, this is my favorite alternative for an unbelievably crispy result with almost no added fat. After you dredge your chicken pieces, spray them lightly all over with cooking oil—you want a fine mist, not a pour. Toss them into your air fryer basket in a single layer (remember, no overcrowding!). Set your temperature to 380°F (195°C) and cook them for about 10 to 12 minutes total. You must flip them halfway through so both sides get that golden color. They come out surprisingly crunchy!
Baked Orange Chicken Recipe Alternative
For a truly hands-off method, baking works great too, especially if you’re making a huge batch of this Family Favorite Chicken. You’ll want to arrange those coated pieces on a baking sheet lined with parchment paper—this keeps the bottoms from getting slick. Slide them into a hot oven set to 400°F (200°C). Bake them for about 15 minutes. They won’t be quite as shatteringly crisp as the fried version, but they will be cooked through and perfectly ready to absorb that amazing sticky glaze!
Serving Suggestions for Your Homemade Orange Chicken
Okay, now the fun part—getting this glorious, glossy chicken onto a plate! This is a main event dish, so you need the right supporting cast. Of course, classic steamed white rice is absolutely mandatory; it’s the perfect fluffy base to soak up every single drop of that leftover sweet and tangy sauce. I usually serve mine alongside some bright green, lightly steamed broccoli to make it a complete meal. My kids also absolutely love having a side of my cauliflower fried rice when we make this **orange chicken recipe** because it feels super authentic!
Storage and Reheating the Orange Chicken Recipe Leftovers
If you’re lucky enough to have any leftovers of this fantastic **orange chicken recipe**, you’ll want to store them correctly to maximize their flavor for the next day. Pop any remaining coated chicken and sauce into an airtight container as soon as it cools slightly. Now, here’s the harsh truth: that perfect crispiness you achieved won’t survive the fridge overnight; it gets a little soft, which is totally normal when saucy chicken sits!
But don’t toss it! To bring it back to life, skip the microwave entirely—it just steams the coating. I swear by reheating leftovers in a 375°F oven for about 5 to 7 minutes, or you can put them in the air fryer for 4 minutes. This little burst of dry heat really helps revive some of that essential texture!
Troubleshooting Common Issues with This Orange Chicken Recipe
Sometimes, even with the best **orange chicken recipe** in hand, things don’t look quite perfect right away! Don’t stress if your results aren’t instantly restaurant-caliber. The kitchen is all about learning curves, and I’ve figured out the fixes for the two main issues people run into.
The most common problem? Your sauce is too thin! If you didn’t reach that glossy, sticky stage when adding the slurry, just mix up a tiny bit more slurry—maybe half a teaspoon of cornstarch mixed with a tablespoon of cold water—and whisk it into the simmering sauce slowly. Give it a full minute of stirring to activate; it should tighten right up! If your chicken didn’t get crispy, it usually means your oil wasn’t hot enough when you started frying, or you overcrowded the pan. Next time, make sure your skillet is shimmering hot before the chicken hits it!
Frequently Asked Questions About Homemade Orange Chicken
I get asked the same handful of questions every time someone tries this recipe, so let’s clear them up right here! Knowing these little details ensures you get that fantastic, Better Than Panda Express vibe right out of your own kitchen. I promise, once you master this **orange chicken recipe**, it becomes a staple for busy nights!
Can I use bottled orange juice instead of fresh for this recipe?
You absolutely *can*, and I’ve done it in a pinch! Using bottled juice will still give you that familiar orange flavor, but honestly, it loses that bright, zesty punch you get from fresh-squeezed juice and zest. Fresh juice really elevates the flavor profile from good to amazing. For the very best flavor outcome, especially for that Sweet Tangy Orange Sauce, spend the extra minute squeezing that orange!
How can I make this Easy Takeout Orange Chicken spicier?
That’s an easy fix if you like a little heat! The base recipe aims for that classic, mild flavor profile, but you can certainly kick it up. The easiest way is to add a teaspoon of Sriracha right along with your soy sauce when you are simmering the sauce ingredients. Alternatively, if you like lingering heat, sprinkle in a pinch of crushed red pepper flakes when you dredge the chicken for a little hidden spice in the crispy coating!
Is thigh meat better than breast meat for this Quick Chicken Dinner?
This is my favorite question! Both work, but I have a preference. If you have the choice, I always recommend boneless, skinless chicken thighs. Thigh meat has a little more fat, which makes it incredibly forgiving. It stays juicier and much more tender, even if you accidentally leave it in the pan for an extra minute while preparing the glaze. Breast meat is fine if you’re watching fat content, but thighs guarantee moist bites every single time. For more inspiration on coating chicken well, check out my homemade chicken katsu recipe!
Nutritional Estimates for This Family Favorite Chicken
I always try to keep things reasonable, but remember, when you’re frying chicken even lightly, the oil adds up! These numbers are my best guess based on using the proportions listed in the recipe details above. Since we are pan-frying and using sugar in the sauce, it isn’t our lowest-calorie meal, but it’s absolutely worth it for the flavor difference compared to takeout versions! This estimate is for one serving, assuming the recipe makes four servings.
If you opt for the air fryer chicken option, you can definitely lower the total fat and calorie count, but here is the breakdown based on the primary pan-fried method:
- Serving Size: 1 serving (approx 1/4 of recipe)
- Calories: 450
- Sugar: 35g (Yes, sugar is high because of that sticky sauce!)
- Sodium: 550mg
- Fat: 10g
- Saturated Fat: 2g
- Unsaturated Fat: 8g
- Trans Fat: 0g
- Carbohydrates: 55g
- Fiber: 2g
- Protein: 32g
- Cholesterol: 90mg
Just a quick note: these are just estimates I calculated based on standard ingredient weights. If you load up on extra rice or use a ton more oil than recommended, those numbers will shift! Enjoy this amazing **orange chicken recipe**!
Print
30-Minute Crispy Homemade Orange Chicken
- Total Time: 30 min
- Yield: 4 servings 1x
- Diet: Low Fat
Description
Make better than takeout orange chicken at home in under 30 minutes. This recipe delivers crispy chicken pieces coated in a sweet, tangy, and sticky orange sauce.
Ingredients
- 1 pound boneless, skinless chicken breasts or thighs, cut into 1-inch pieces
- 1 large egg, lightly beaten
- 1/2 cup all-purpose flour
- 1/4 cup cornstarch
- 1/2 teaspoon salt
- 1/4 teaspoon black pepper
- 2 tablespoons vegetable oil (for pan-frying)
- 1 cup fresh orange juice
- 1/2 cup granulated sugar
- 1/4 cup rice vinegar
- 2 tablespoons soy sauce
- 1 tablespoon grated fresh ginger
- 2 cloves garlic, minced
- 1 teaspoon sesame oil
- 1 tablespoon cornstarch mixed with 2 tablespoons cold water (slurry)
- Zest of 1 orange
- Cooked white rice and steamed broccoli, for serving
Instructions
- In a medium bowl, toss the cut chicken pieces with the beaten egg.
- In a separate shallow dish, combine the flour, 1/4 cup cornstarch, salt, and pepper. Dredge the egg-coated chicken pieces in the flour mixture until lightly coated.
- Heat the vegetable oil in a large skillet over medium-high heat. Add the chicken in a single layer, working in batches if necessary, and cook for 3 to 4 minutes per side until golden brown and cooked through. Remove the chicken and set it aside on a plate lined with paper towels.
- While the chicken cooks, prepare the sauce. In a small saucepan, combine the orange juice, sugar, rice vinegar, soy sauce, ginger, garlic, sesame oil, and orange zest. Bring the mixture to a simmer over medium heat, stirring until the sugar dissolves.
- Whisk the cornstarch slurry and pour it slowly into the simmering sauce, stirring constantly until the sauce thickens and becomes glossy, about 1 minute.
- Return the crispy chicken pieces to the skillet or a clean large bowl. Pour the orange sauce over the chicken and toss gently until every piece is evenly coated and sticky.
- Serve immediately over white rice with steamed broccoli on the side.
Notes
- For extra crispy chicken, you can bake the coated pieces at 400°F (200°C) for 15 minutes instead of pan-frying.
- For an air fryer method, spray the coated chicken lightly with oil and cook at 380°F (195°C) for 10 to 12 minutes, flipping halfway.
- If you prefer a less sweet sauce, reduce the sugar by 1 to 2 tablespoons.
- Prep Time: 10 min
- Cook Time: 20 min
- Category: Dinner
- Method: Pan-Frying
- Cuisine: Chinese American
Nutrition
- Serving Size: 1 serving (approx 1/4 of recipe)
- Calories: 450
- Sugar: 35
- Sodium: 550
- Fat: 10
- Saturated Fat: 2
- Unsaturated Fat: 8
- Trans Fat: 0
- Carbohydrates: 55
- Fiber: 2
- Protein: 32
- Cholesterol: 90