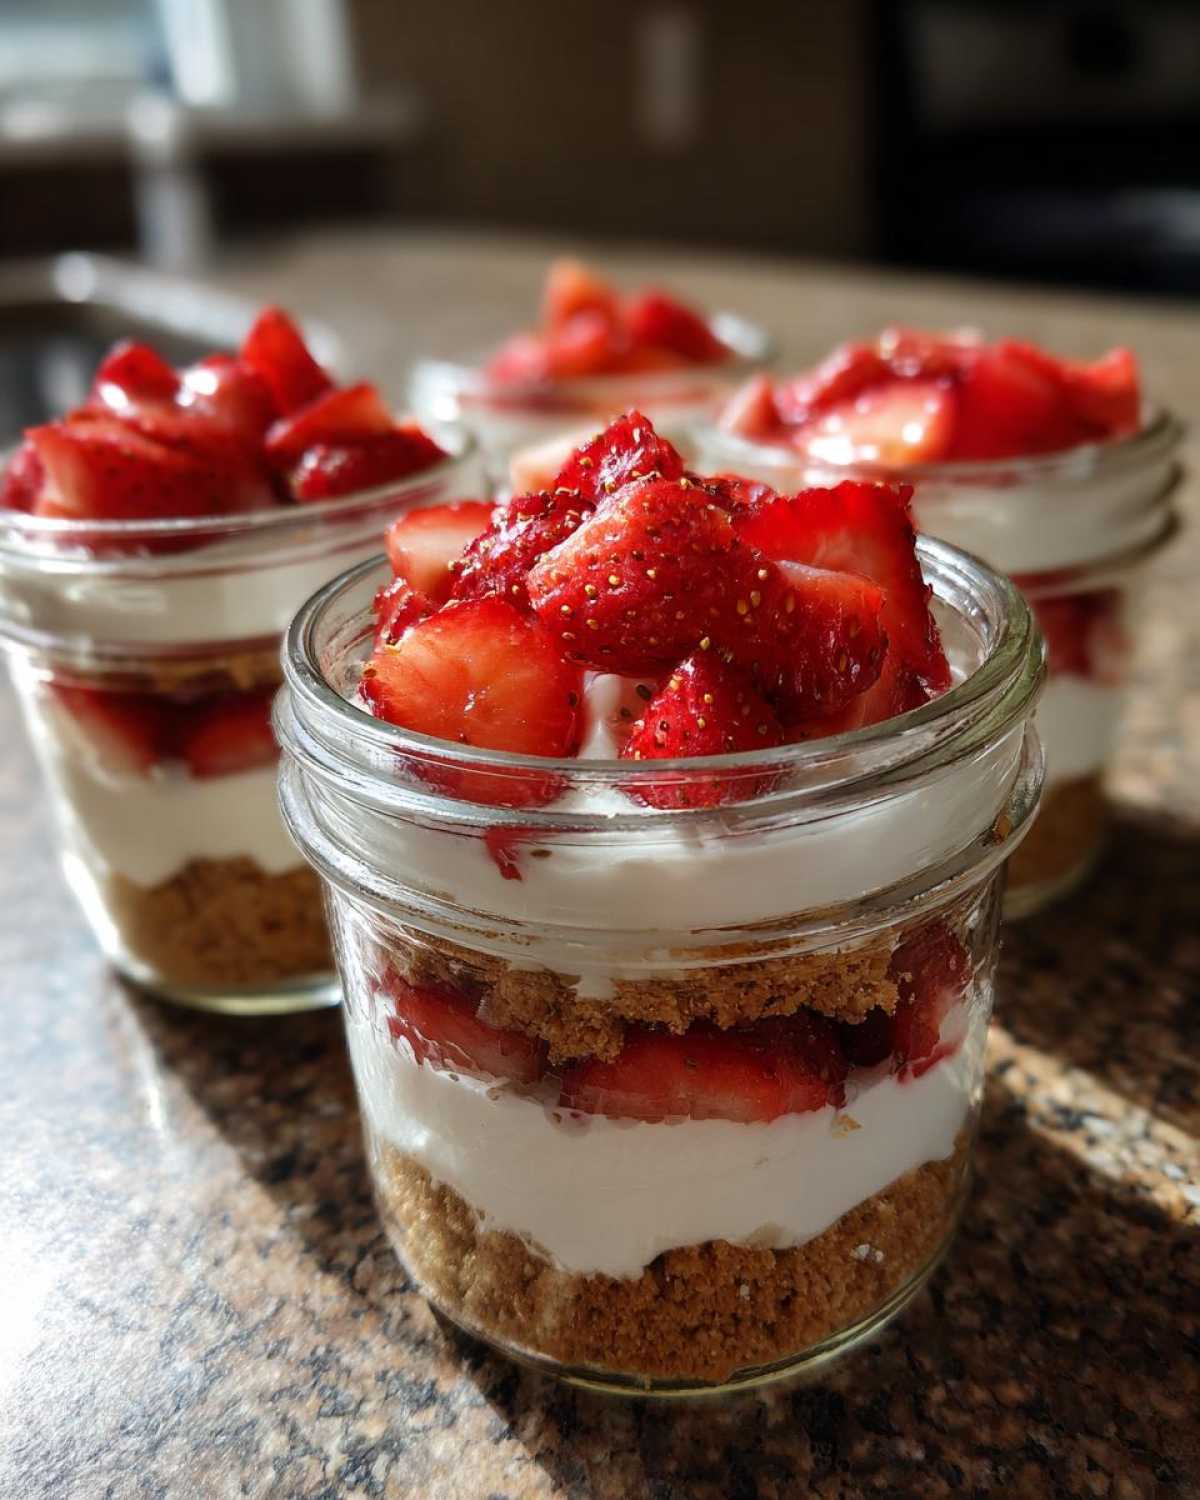
Oh my gosh, you guys, if you need a dessert that screams “summer afternoon” but requires zero sweat equity in the kitchen, I have finally cracked the code. Forget fiddling with pie dough or waiting hours for an oven to cool down. We are going straight for convenience, portability, and maximum flavor with these No-Bake Strawberry Cream Pie Jars! Honestly, these little jars have saved me so many times when unexpected guests pop over, or when I just need a quick, portion-controlled treat after dinner. They are everything you love about a rich, creamy strawberry pie, but packed perfectly so you can eat them on the patio—no forks necessary!
Why You Will Love These No-Bake Strawberry Cream Pie Jars
Seriously, you have to try these! They tick every single box when it comes to easy, feel-good desserts. I know so many of you are looking for something fuss-free, especially when the weather heats up. These jars deliver that gorgeous creamy texture without ever needing to heat up the kitchen. That’s why I consider them my favorite quick summer dessert go-to.
-
Effortless No-Bake Strawberry Dessert
The best part? We skip the oven entirely! This recipe is pure assembly; just mix, layer, and chill. It’s practically foolproof, which means more time relaxing and less time worrying about your pie cracking while cooling.
-
Perfectly Portioned Cream Pie
Since these are served in individual jars, you get built-in portion control—which is both good and bad for me! 😉 They look gorgeous lined up on a tray, making them fantastic for any gathering. Forget slicing and messy plates; this is the ultimate grab-and-go portioned cream pie. Plus, since they are fantastic make ahead desserts, you can prepare them the day before!
If you’re looking for other quick, fun treats, you have to check out my recipe for No-Bake Strawberry Cheesecake Bites for Kids—they have a similar vibe!
Essential Ingredients for Your No-Bake Strawberry Cream Pie Jars
The magic of these pies truly relies on using the right components for that perfect creamy strawberry filling. Since there is no baking involved, the quality of your raw components really shines through. Everything blends together beautifully, but you do need to pay attention to temperatures—things like cream cheese needs to be soft, and heavy cream needs to be ice cold! Don’t let that scare you off, though; it’s simple stuff!
For the best results, I always recommend pulling out your cream cheese about an hour before you start assembling. If you need an alternative no-bake inspiration, my recipe for No-Bake Peanut Butter Oat Bars uses similar pantry staples!
-
Crust Components for Individual Strawberry Pies
We’re keeping the crust super simple because we want it to be sturdy enough for the jar but still buttery and sweet. You’ll need graham cracker crumbs, a little granulated sugar to sweeten them up, and six tablespoons of melted unsalted butter to bind it all together. Now, here’s a little trick: If you don’t have graham crackers, vanilla wafers or even plain shortbread cookies work fabulously crushed up for the crust! It’s all about the texture down there.
-
Crafting the Creamy Strawberry Filling
The filling is where the richness comes from. We start with an 8-ounce package of softened cream cheese, powdered sugar for sweetness, and a splash of vanilla extract. Then comes the cloud factor: one cup of heavy whipping cream that *must* be cold, whipped up separately with another 1/4 cup of sugar until stiff peaks form. Folding that fluffy cream into the thick cream cheese base is what develops that irresistible texture. And of course, two cups of beautiful, fresh sliced strawberries for that signature flavor!
Step-by-Step Instructions for No-Bake Layered Dessert in Jars
Okay, this is where the fun really begins! We are building this beautiful, delicious no bake layered dessert right inside the glass so you can see every single stripe of flavor. Because we aren’t baking, our main focus is on texture—we want a firm base, a light and airy filling, and fresh fruit distributed evenly. Don’t rush the chilling phases, though; that’s critical for success!
If you want another idea for layering treats in glass containers, check out my recipe for No-Bake Strawberry Cheesecake Parfaits. It follows a similar assembly style!
-
Preparing the No Bake Crust Recipe for Jars
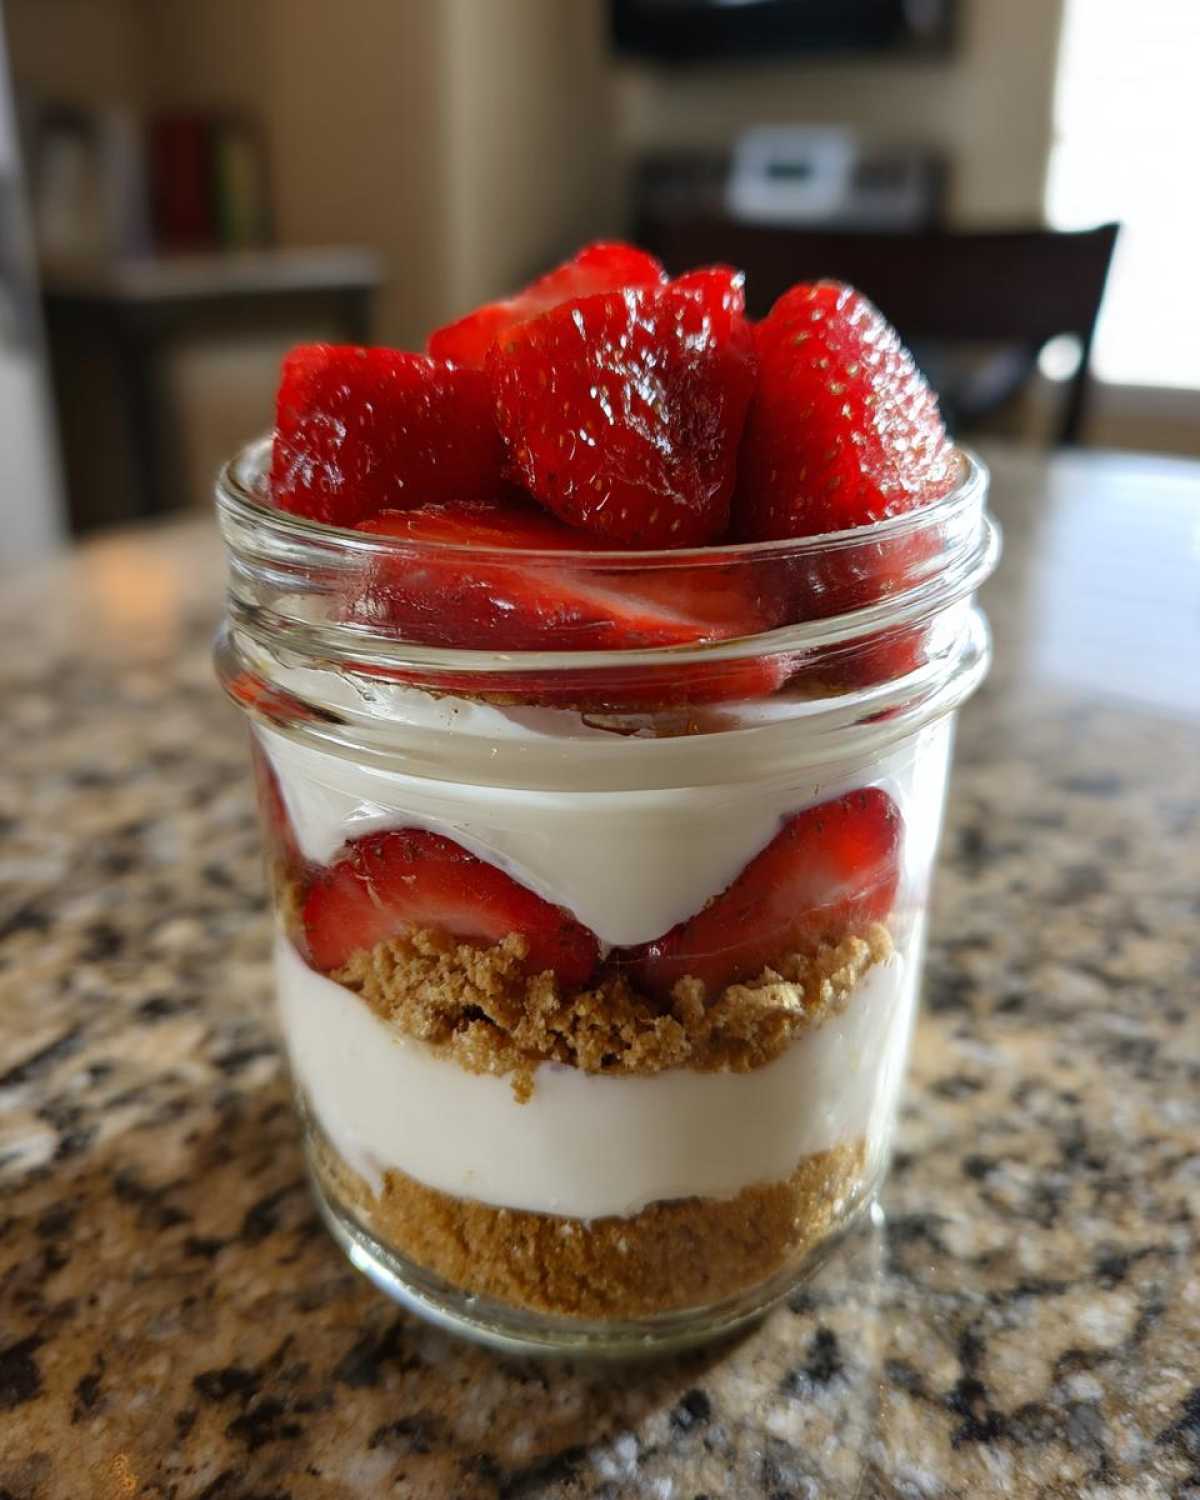
First things first: the crust needs to be nestled in securely! In a bowl, just mix up your graham cracker crumbs, that small bit of granulated sugar, and the melted butter. Mix it up with a fork until it looks like wet sand—you know, the kind that holds its shape when you squeeze it. Now, take about a quarter of that mixture and press it down firmly into the bottom of each jar. You really need to pat it in there so it doesn’t crumble when you eat it later. Once the crusts are set in their little jars, pop them straight into the fridge while you focus on that dreamy filling.
-
Assembling the Creamy Strawberry Filling
This takes two quick steps, so pay attention! In one bowl, beat that softened cream cheese with the powdered sugar and vanilla until it is totally smooth—no lumps allowed! In a totally separate, cold bowl, whip that cold heavy cream with the remaining sugar until you reach stiff peaks. This is important! When you have those beautiful stiff peaks, you need to gently fold the whipped cream into the cream cheese mixture. Use a spatula and fold, don’t stir! We want to keep all that lovely air we just whipped into the cream. This light folding technique builds the airy structure for our creamy strawberry filling.
-
Layering and Chilling Your No-Bake Strawberry Cream Pie Jars
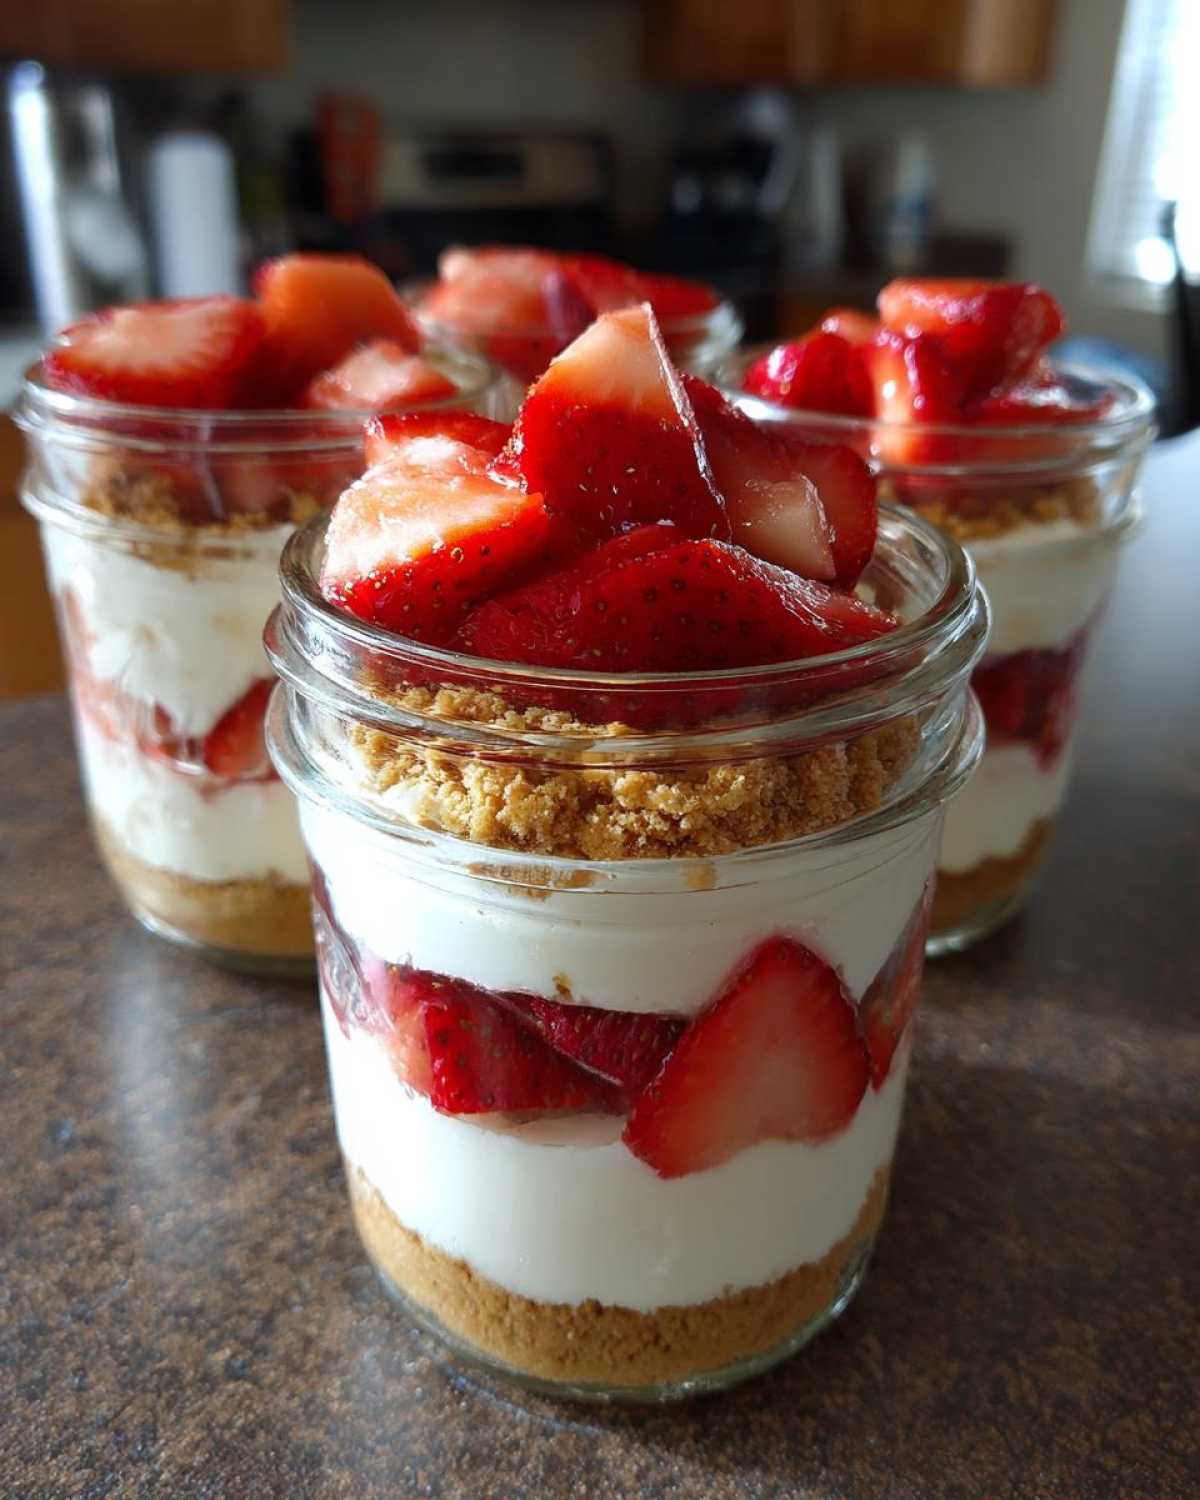
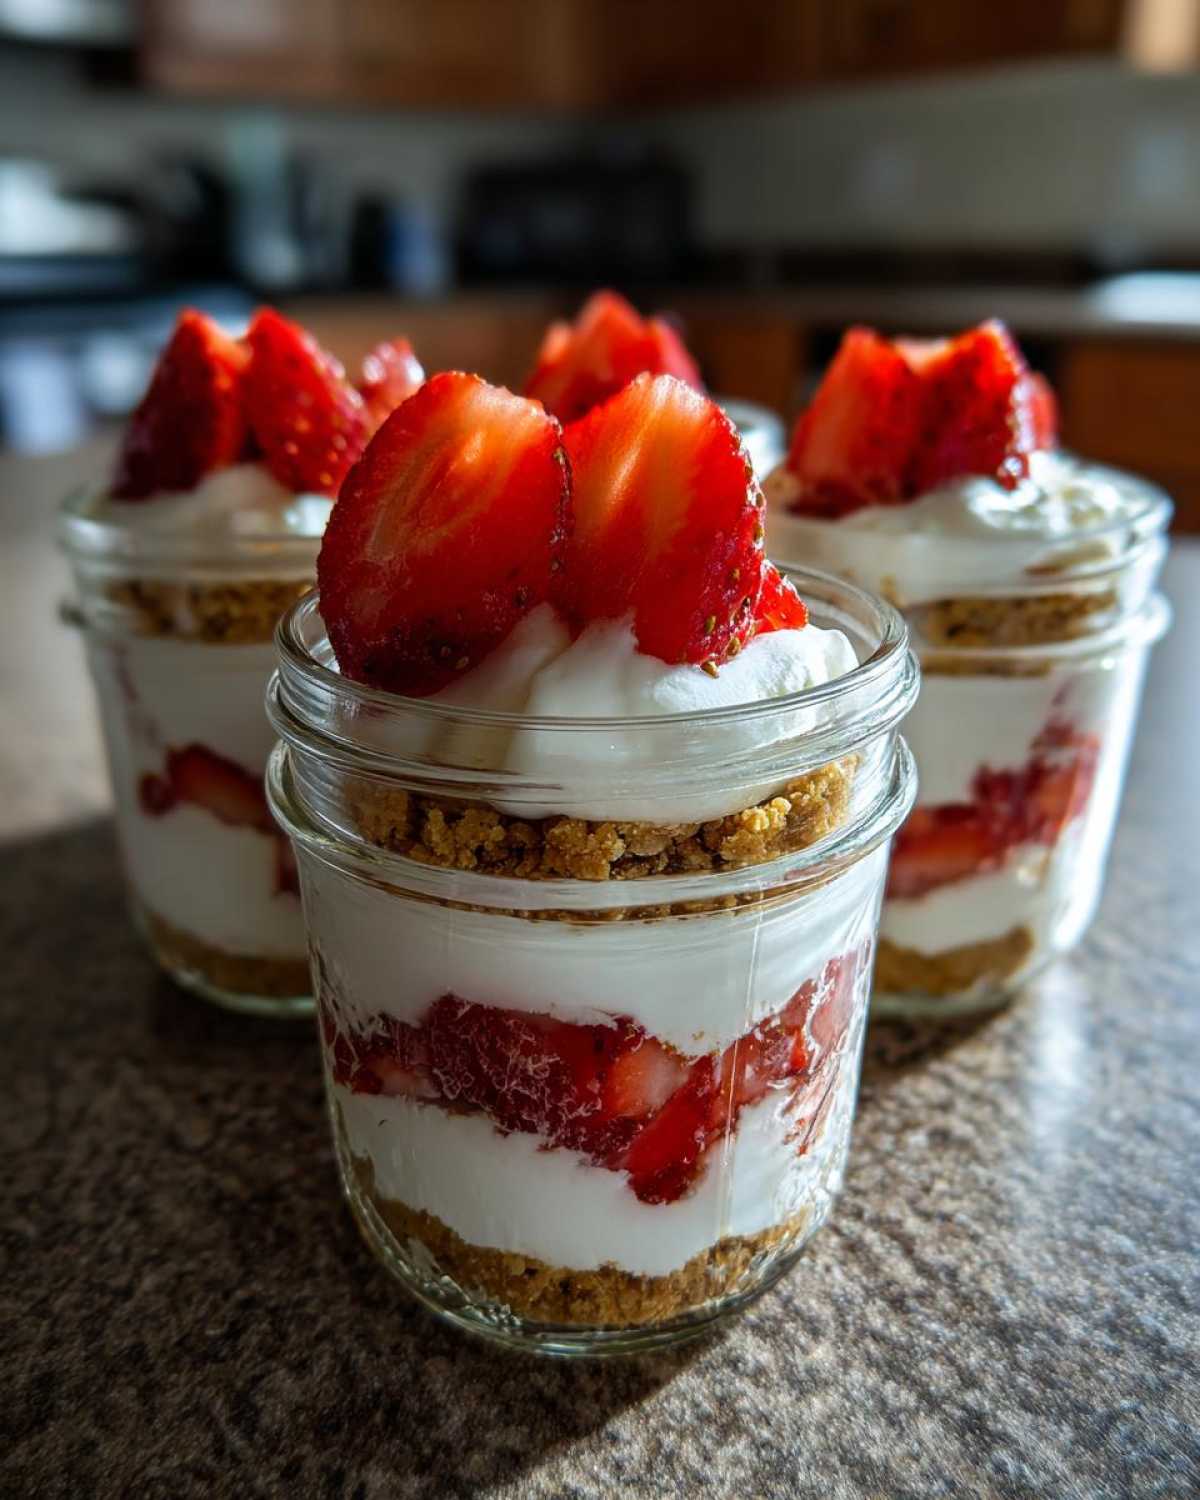
Time to assemble! Take your jars out of the fridge. Start by scattering a nice layer of your sliced fresh strawberries right over that crust layer. Next, scoop or pipe in a generous layer of that fluffy cream filling. Repeat the strawberry layer, and then top it all off with a final swoosh of the cream filling. Garnish the top with a few extra strawberry slices for looks. Now, this is non-negotiable: cover them up (plastic wrap works great!) and get them back into the refrigerator for a minimum of two hours. That chill time lets the filling firm up just enough so it doesn’t run everywhere when you dig in!
Tips for Success Making No-Bake Strawberry Cream Pie Jars
Listen, even the simplest recipes can hit a snag if you miss one tiny little thing! Since we aren’t baking these babies, the texture relies entirely on your prep work, especially when dealing with the dairy components in our whipped cream strawberry recipe blend. I’ve learned a few tricks over the years to make sure these jars set up perfectly and don’t end up watery or slouchy.
First and foremost: temperature is everything! If your heavy cream isn’t straight-from-the-fridge cold, it will never whip up into those stiff, beautiful peaks we need to give the filling structure. Make sure your bowl and whisk attachments are cold too—I sometimes even toss mine in the freezer for ten minutes beforehand. It really helps!
Now, sometimes—especially if you live somewhere super humid like I do sometimes—that cream filling can still be a little too soft, even after two hours in the fridge. If you want a filling that really holds its shape, almost like a traditional set pie filling, I have a little secret weapon for you, borrowed from a friend who makes amazing chilled pies. You can add structural integrity by dissolving one teaspoon of unflavored gelatin into just two tablespoons of very hot water until it’s completely clear. Then, whisk that liquid right into your cream cheese mixture *before* you fold in the whipped cream. Trust me, this little step makes the filling wonderfully firm, perfect for taking on the go. You can read more about making fantastic pie fillings (even baked ones!) over at my post on Easy Homemade Classic Banana Cream Pie Recipe for more stabilizer tips!
Another thing I always remind people about when layering: try not to overmix the cream cheese and the whipped cream. That folding motion is key! Stirring vigorously will deflate the air you just worked so hard to whip into that cream, leaving you with a dense, heavy texture instead of that light, airy cream cloud we are aiming for.
Storage and Make Ahead Desserts in a Jar
One of the biggest advantages of making these No-Bake Strawberry Cream Pie Jars is their superb make-ahead potential! Seriously, these are a sanity-saver when planning for a busy weekend or a big gathering. Because there are no eggs that need to be baked into the structure, these are fantastic make ahead desserts.
You can mix up the crusts and the filling completely, layer everything in the jars, and then tuck them away in the refrigerator. I always cover the tops of my jars tightly with plastic wrap—you can even use small pieces of aluminum foil if you want to be extra secure. This stops them from picking up any weird fridge smells, which nobody wants when they are expecting sweet strawberry pie!
They are best consumed within 24 hours for the freshest texture, especially because we are using fresh strawberries. If you let them sit longer than that, the strawberries might start to bleed their juice into the cream filling, turning it pale pink, which is still tasty, but maybe not the crisp white and red layers we aimed for. Planning ahead means you can tackle everything the day before your party, leaving you totally free to handle grilling or appetizers on the big day. If you’re looking for other great recipes you can prep ahead, check out my ideas for Make Ahead Cheesy Egg Cups for Kids—they require minimal effort on the morning of!
Variations for Your Simple Strawberry Dessert Recipe
Part of the fun in the kitchen, especially when you’re working with a base like this that’s already so great, is getting creative! While this recipe is definitely my favorite streamlined simple strawberry dessert recipe, you absolutely don’t have to stick to just graham crackers and strawberries if you don’t want to. We can change up the texture or swap in other amazing summer fruits to keep things exciting every time you make these desserts in a jar. It’s all about experimenting within the no-bake framework!
If you loved the idea of using seasonal fruit, check out how I put together a gorgeous Mixed Berry Summer Cobbler Recipe—it uses similar fresh flavors, just cooked!
-
Alternative Crust Ideas for Easy Jar Desserts
We already touched on swapping graham crackers, but let’s dive deeper into those fun alternatives for the crust layer. If you want something richer and buttery, grab some shortbread cookies—the buttery flavor is amazing next to the cream cheese! Vanilla wafers offer a classic, almost Nilla Cream Pie flavor boost; crush those up the same way you did the graham crackers. But if you really want to shock your guests (in a good way!), try using crushed pretzels! A little salty mixed with all that sweet cream and strawberries is just incredible. The contrast really makes the flavors pop, and it adds a totally different texture to these otherwise soft easy jar desserts.
-
Transforming to a Parfait Style Pie
If you love layers and texture—and who doesn’t?—you can easily nudge this recipe toward a full-on *parfait style pie*. You already have your crust, cream, and fruit, but why not add another dimension? Try sprinkling a little bit of store-bought toasted granola over your strawberry layer for an extra crunch that stands up well against the cream. Another fun trick is to lighten up the cream base slightly by mixing in a tiny bit of fresh lemon zest—about half a teaspoon—into the cream cheese mixture. That little bit of tartness cuts through the richness and makes it feel even brighter and fresher, leaning into that parfait vibe beautifully.
Serving Suggestions for Individual Strawberry Pies
These jars are practically begging to be taken outside! Because they are self-contained, they immediately become one of the best portable desserts you can make. Instead of wrestling with slicing a whole pie outside, you just hand someone a jar and a cute little long spoon.
I love serving these for casual summer BBQs or setting them up buffet style for picnics. They look so elegant, even though they take about twenty minutes to pull together. For an extra fancy touch, tie a small piece of gingham ribbon around the neck of the jar! If you need some easy savory ideas to serve alongside these sweet treats, you should definitely check out my recipe for Caprese Skewers—they are always a huge hit!
Frequently Asked Questions About No-Bake Strawberry Cream Pie Jars
I know you’ve got questions! Putting together desserts in a jar always seems so simple, but sometimes the little details can trip you up. Because we aren’t using the oven, there are a few textural things we need to watch out for. Don’t stress, though—I’ve run into all these issues so you don’t have to! These answers cover everything from substituting fruit to making sure the filling sets just right, making this one of the best no oven dessert ideas out there.
If you ever need quick answers for other recipes, I always try to keep things straightforward! For example, check out the science behind my Easy Grinch Punch—it’s all about timing things right!
-
Can I substitute the strawberries in this recipe?
Yes, you absolutely can! While fresh strawberries are my first choice because they give that classic pie flavor and hold their shape nicely against the cream, this recipe is really flexible. Blueberries work brilliantly, and if you mix blueberries and raspberries, you get a gorgeous mixed berry effect. If you use frozen fruit, you *must* thaw it completely and pat it very dry with paper towels first, otherwise, you introduce too much extra liquid, and that will mess with your beautiful layers!
-
How long do I need to chill the No-Bake Strawberry Cream Pie Jars?
The absolute bare minimum chilling time you need is two hours. That gives the cream cheese filling just enough time to firm up slightly and meld the flavors with that buttery crust. However, if you can manage it, letting these chill for four hours or even overnight is even better. The longer they chill, the more stable the filling becomes, and the crust gets nicely softened just like a real pie crust should be!
-
Are these easy jar desserts suitable for a large party?
Oh, they are the ULTIMATE party dessert! That’s one of the main reasons I developed them in this format. They are so simple to scale up because you are just multiplying ingredients and making layers in separate jars. They look fantastic lined up on a dessert table and mean zero cutting or serving fuss when the guests arrive. They are truly my go-to solution for a big crowd or any kind of no bake dessert for parties.
Sharing Your Delicious No-Bake Strawberry Cream Pie Jars
I really hope you get to make these jars soon! They taste like sunshine and minimal effort, which is the perfect combination in my book. When you whip these up, please come back and leave me a comment below telling me what you thought. Did you stick with graham crackers, or did you try the pretzel crust variation? I love hearing how you tweak my recipes! If you snap a picture, tag me on social media—I always love seeing these beautiful individual strawberry pies showing up in your kitchens. Happy layering!
Sharing Your Delicious No-Bake Strawberry Cream Pie Jars
I really hope you get to make these jars soon! They taste like sunshine and minimal effort, which is the perfect combination in my book. When you whip these up, please come back and leave me a comment below telling me what you thought. Did you stick with graham crackers, or did you try the pretzel crust variation? I love hearing how you tweak my recipes! If you snap a picture, tag me on social media—I always love seeing these beautiful individual strawberry pies showing up in your kitchens. If you need to reach out with other recipe questions, feel free to use my contact page! Happy layering!
Print
No-Bake Strawberry Cream Pie Jars
- Total Time: 20 min
- Yield: 4 servings 1x
- Diet: Vegetarian
Description
Make individual portions of creamy strawberry pie without turning on your oven. This recipe uses layers of graham cracker crust, sweet cream filling, and fresh strawberries, served directly in jars.
Ingredients
- 1 1/2 cups graham cracker crumbs
- 1/4 cup granulated sugar (for crust)
- 6 tablespoons unsalted butter, melted
- 1 (8 ounce) package cream cheese, softened
- 1 cup powdered sugar
- 1 teaspoon vanilla extract
- 1 cup heavy whipping cream, cold
- 1/4 cup granulated sugar (for whipped cream)
- 2 cups fresh strawberries, sliced
Instructions
- Combine graham cracker crumbs, 1/4 cup sugar, and melted butter in a bowl. Mix until the crumbs are evenly moistened.
- Divide the crumb mixture evenly among four small jars (about 8 ounces each). Press the mixture down lightly to form the crust layer. Place the jars in the refrigerator while you prepare the filling.
- In a separate bowl, beat the softened cream cheese with powdered sugar and vanilla extract until smooth. Set aside.
- In a clean, cold bowl, whip the heavy cream and 1/4 cup sugar until stiff peaks form.
- Gently fold the whipped cream into the cream cheese mixture until just combined. This is your strawberry cream filling.
- Layer the ingredients in the jars over the crust: place a layer of sliced strawberries, followed by a layer of the cream filling. Repeat the layers until the jars are full, ending with cream filling on top.
- Top each jar with a few extra strawberry slices for garnish.
- Chill the jars for at least 2 hours before serving to allow the filling to set slightly.
Notes
- You can use vanilla wafers or shortbread cookies instead of graham crackers for the crust.
- For a firmer filling, you can add 1 teaspoon of unflavored gelatin dissolved in 2 tablespoons of hot water to the cream cheese mixture before folding in the whipped cream.
- Prepare these jars up to one day ahead of time; store them covered in the refrigerator.
- Prep Time: 20 min
- Cook Time: 0 min
- Category: Dessert
- Method: No Bake
- Cuisine: American
Nutrition
- Serving Size: 1 jar
- Calories: 450
- Sugar: 35
- Sodium: 210
- Fat: 28
- Saturated Fat: 16
- Unsaturated Fat: 12
- Trans Fat: 0
- Carbohydrates: 45
- Fiber: 2
- Protein: 5
- Cholesterol: 75