Oh my gosh, if you’re anything like me, sometimes you just need that decadent hit of chocolate AND peanut butter, but you absolutely cannot turn on the oven. Seriously, who wants a hot kitchen in the middle of summer for a proper pie? That’s why I perfected this recipe. It’s my secret weapon for an instant treat that looks beautiful but takes maybe twenty minutes of actual work. The best part? Serving them right in the jar makes cleanup a breeze and keeps me honest with portion sizes!
We are diving headfirst into the world of **No-Bake Chocolate Peanut Butter Pie Jars** today, and trust me, these little beauties check every single box. I whipped up a batch last week when my cousin dropped by unexpectedly, and they were ready to eat before she even finished telling me about her day. They’re rich, they’re creamy, and they are so unbelievably easy. You are going to love how fast these come together!
Why You Will Love These No-Bake Chocolate Peanut Butter Pie Jars
When you need a dessert *now*, these jars are the answer. They don’t just taste amazing; they solve all those typical pie problems! We’re talking speed, convenience, and the perfect flavor combo every time. I keep telling everyone these are my go-to summer treats!
- No oven time whatsoever—seriously!
- Rich, creamy layers that set up fast in the fridge.
- They look elegant but are ridiculously simple to assemble.
Perfect Portion Controlled Desserts
I love that I can just grab a jar and I’m done. No messy slicing or worrying about who gets the bigger piece! These Individual Dessert Cups mean you only serve what you need, and because they are already dressed up, they look fantastic on any dessert table. No stress at all!
The Ultimate No-Bake Chocolate Peanut Butter Pie Jars Experience
The beauty of the **No-Bake Chocolate Peanut Butter Pie Jars** is that they are the definition of No Oven Chocolate Treats. If it’s ninety degrees outside, the last thing you want is to heat up your kitchen. These set up perfectly just chilling out on the counter while you make the layers, and then a quick nap in the fridge finishes the job!
Essential Ingredients for No-Bake Chocolate Peanut Butter Pie Jars
Listing out what you need is where we build trust, right? You want to know exactly what hits the jar, and I promise, these ingredients are simple. No weird stuff required! Everything you need should be easy to find at your local grocery store. We are building these layers on fantastic flavor foundations, and precision matters, especially when working with cream cheese!
We need everything ready to go before we start assembling the **No-Bake Chocolate Peanut Butter Pie Jars**. Make sure that cream cheese has been out on the counter for at least an hour so it’s perfectly soft—that’s my little trick!
Crust Ingredients: Quick Cookie Crust Desserts Base
This crust is classic and so fast. You just need a couple of minutes to mix it up and get it chilling. Don’t skimp on the butter here because that’s what makes it stick together so nicely in the bottom of the jar. We’re using 1 1/2 cups of graham cracker crumbs mixed with 1/4 cup of granulated sugar, bound together with 6 tablespoons of **melted** unsalted butter. Mix it until it looks like wet sand!
Creamy Filling and Simple Chocolate Fillings for No-Bake Chocolate Peanut Butter Pie Jars
For that amazing peanut butter layer that melts in your mouth, you have to use softened cream cheese, period. We are whipping these together: 1 (8 ounce) package of **softened** cream cheese, a full cup of **creamy** peanut butter, 1/2 cup powdered sugar, and 1 teaspoon of vanilla extract. Separately, you have to whip 1 cup of heavy whipping cream until it holds **stiff peaks**—this makes the filling so light!
Then comes the decadent topping layer for your **No-Bake Chocolate Peanut Butter Pie Jars**! You’ll only need 1/2 cup of semi-sweet chocolate chips melted with 2 tablespoons of milk until it’s smooth and glossy. If you want more ideas on using peanut butter in other no-bake recipes, check out my bites recipe!

Step-by-Step Instructions for No-Bake Chocolate Peanut Butter Pie Jars
Okay, here’s the game plan! This recipe moves fast once you get started, but it’s totally linear. Think of it like building a tiny, delicious layer cake in a jar. Set out all your ingredients first so you aren’t scrambling when you need to move quickly. Seriously, the whole assembly is fun, kind of like making a parfait, but way better. If you love easy layering, you might also enjoy my step-by-step guide for Oreo Dirt Cake recipes!
Preparing the Peanut Butter Graham Cracker Crust Layer
First things first, we build that base. Mix your graham crumbs, sugar, and melted butter until they look evenly damp. Then, grab your four 8-ounce jars. Divide that crumb mixture evenly and press it down firmly into the bottom of each jar—you want a nice, stable crust. I use the back of a small spoon for this. Pop these jars straight into the freezer. Pressing them in the freezer keeps them from getting mushy when we add the wet filling next.
Making the Creamy Peanut Butter Desserts Filling
While your crusts are chilling, tackle the peanut butter magic. Beat the softened cream cheese, peanut butter, powdered sugar, and vanilla until it’s absolutely cloud-like and smooth. Don’t rush this part; you want all the lumps gone! In a separate bowl, whip your heavy cream until you get those beautiful **stiff peaks**. This is key! Now, the important part: take a spatula and **gently fold** that whipped cream into the peanut butter mixture. You’re incorporating air, so fold slowly until it’s just combined. Too much stirring knocks all the lovely fluffiness right out!
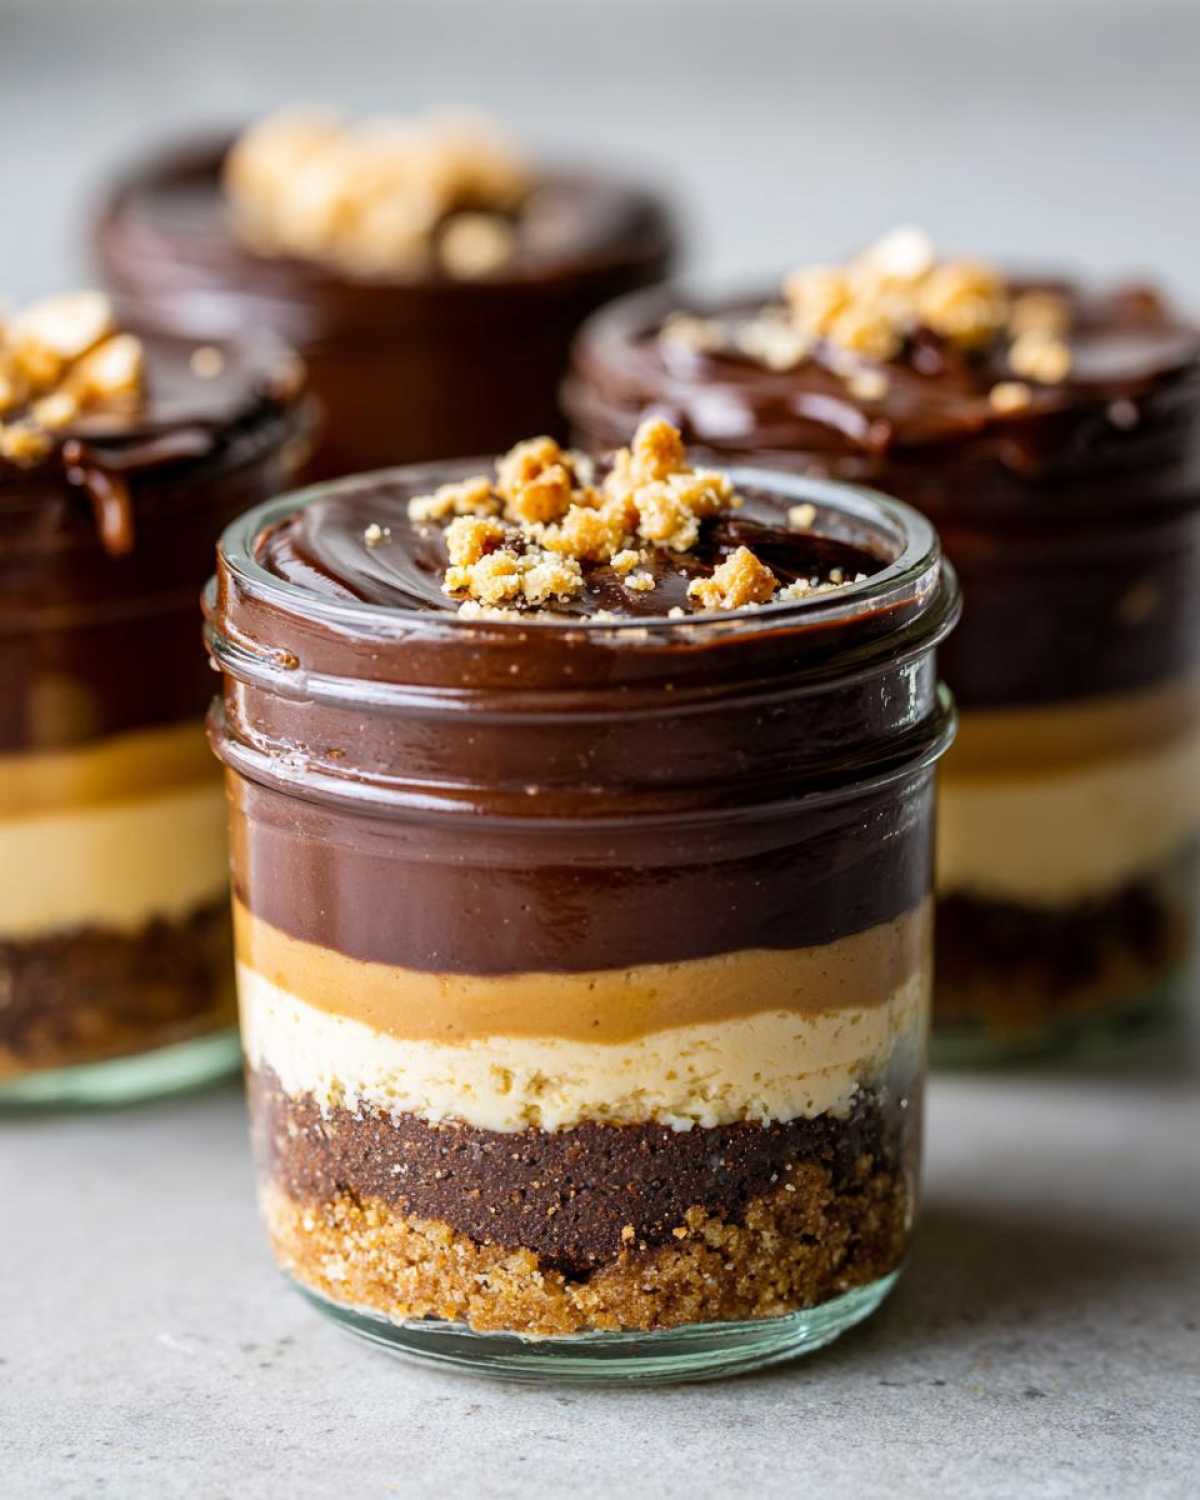
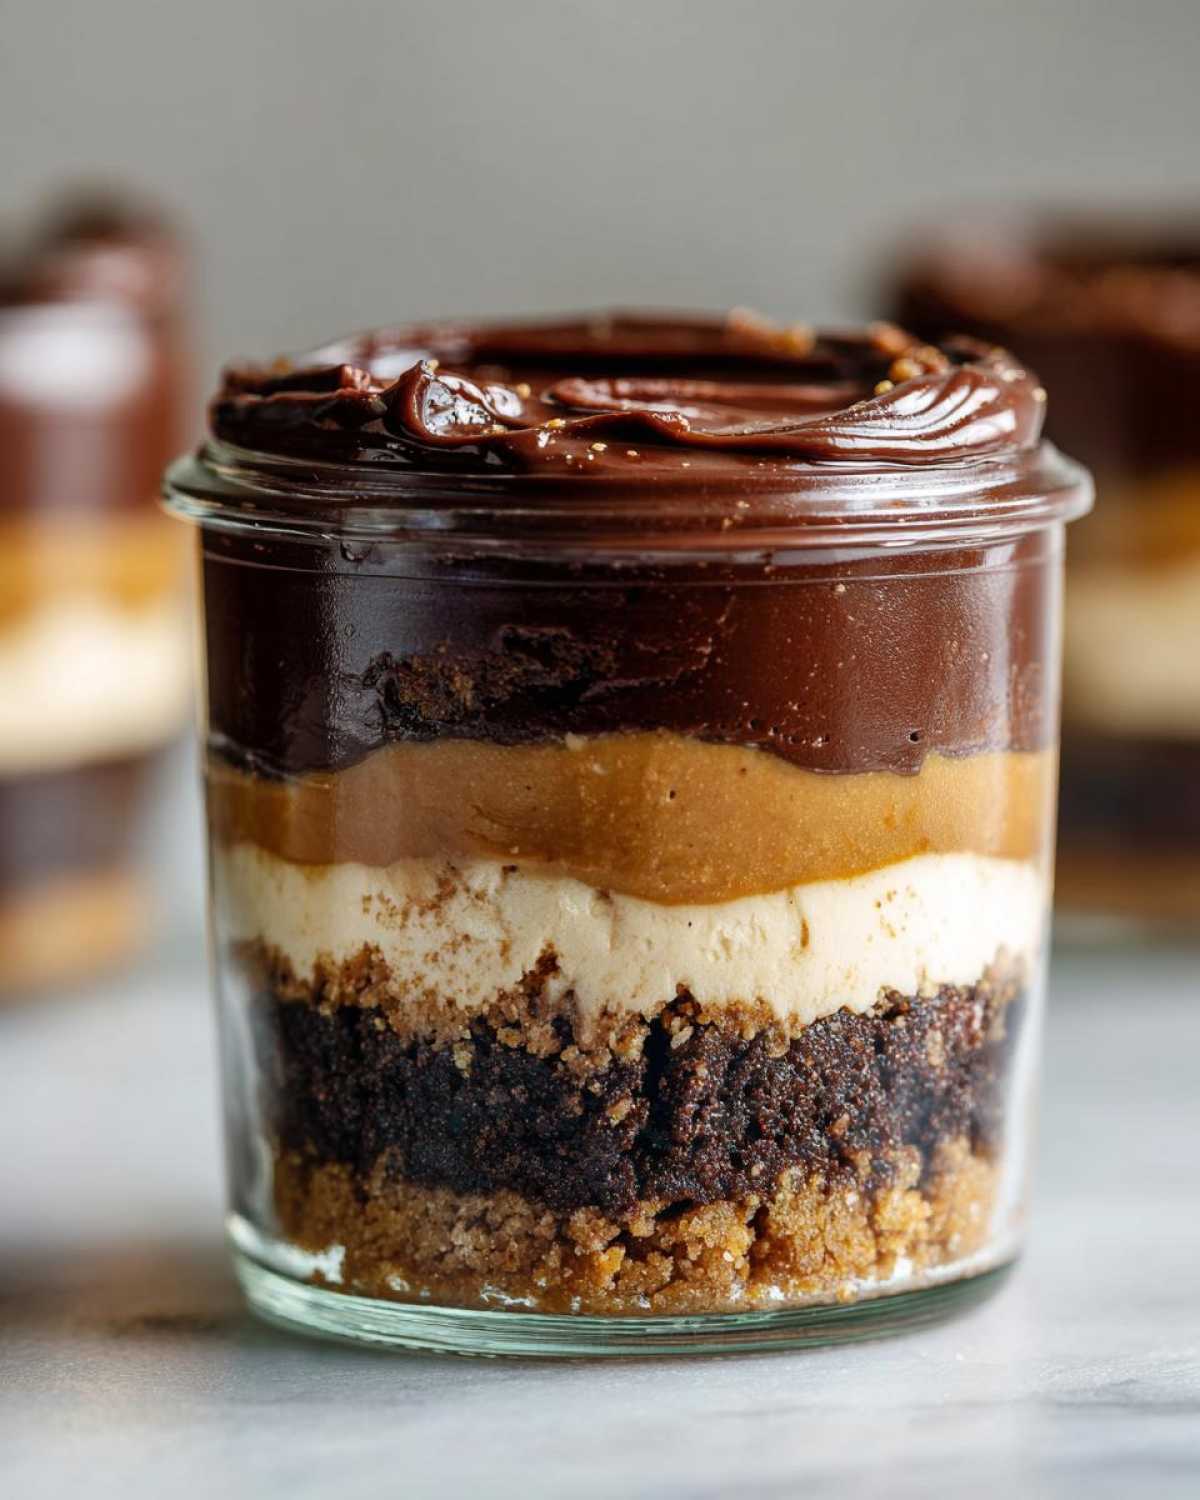
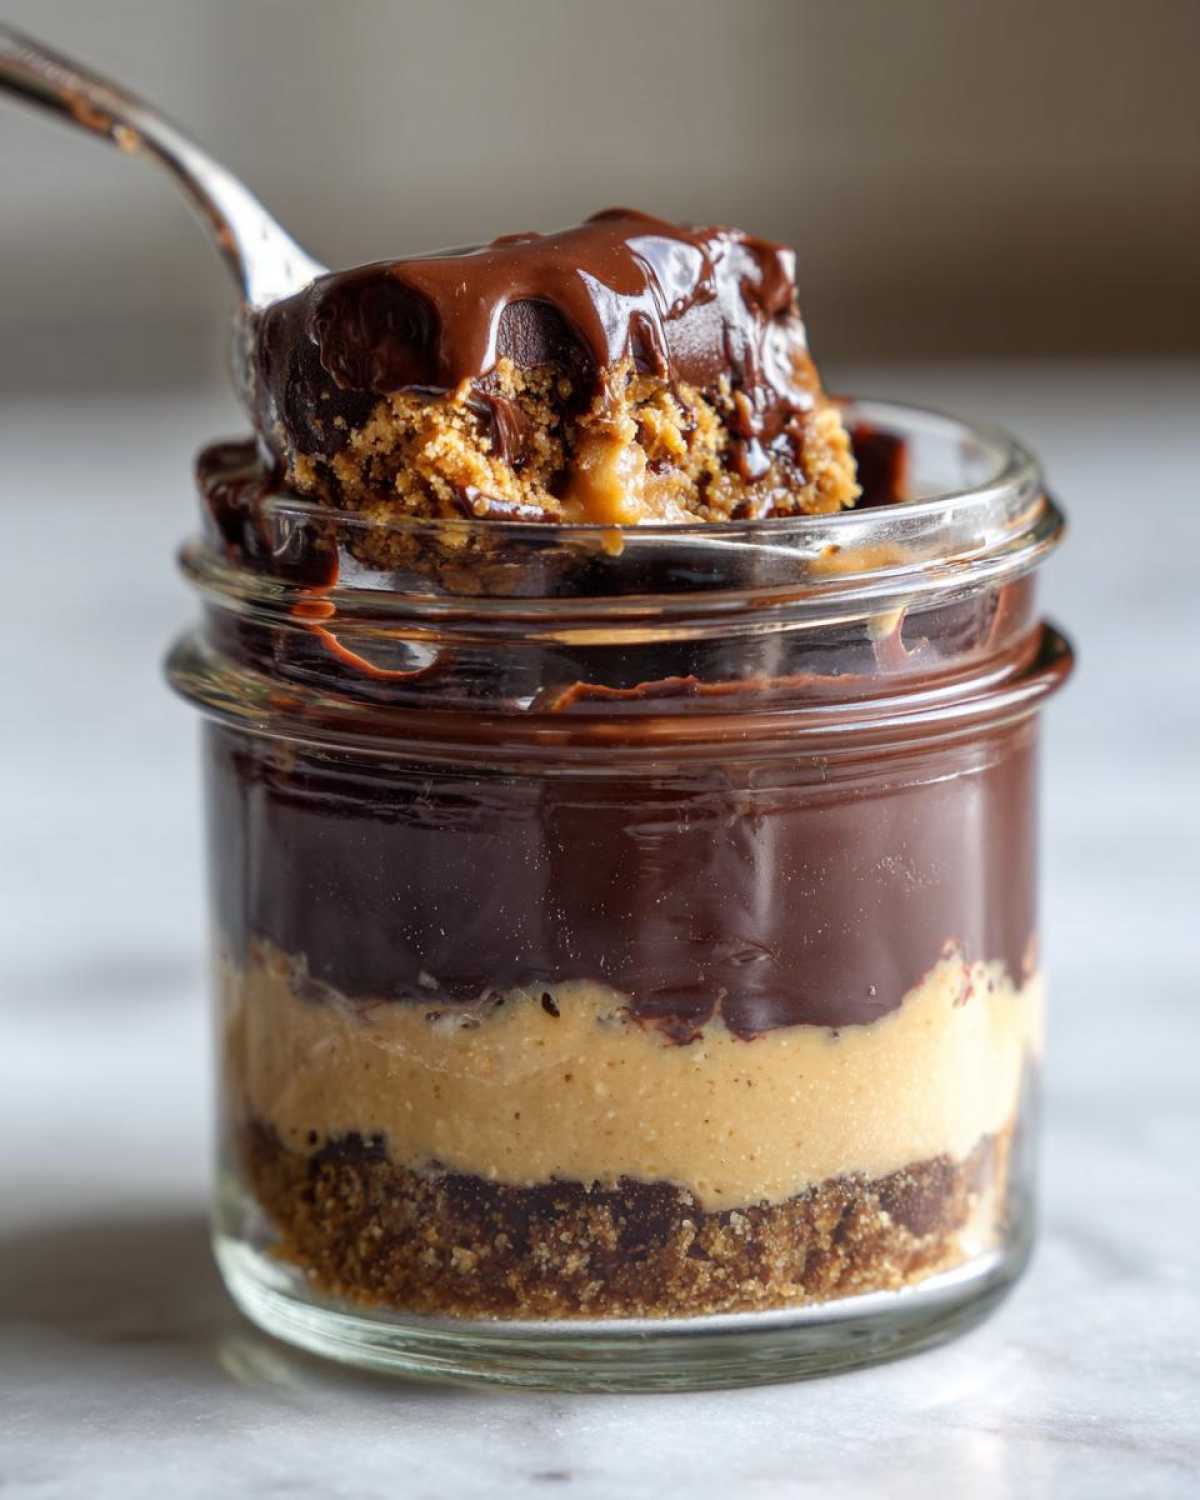
Layering and Setting Your No-Bake Chocolate Peanut Butter Pie Jars
Time for assembly! Pull those chilled jars out. First, drop half of the creamy peanut butter filling right over the crust in each jar. Next comes that gorgeous chocolate topping we melted—pour or spoon that thin chocolate layer over the peanut butter layer. Finish by scooping the remaining peanut butter filling on top. Since these are **No-Bake Chocolate Peanut Butter Pie Jars**, the final step is patience. Cover them gently and make sure they chill for a **minimum of 2 hours** before you dig in!
Tips for Perfect No-Bake Chocolate Peanut Butter Pie Jars
Even though this recipe is gloriously simple, a few little tips can take your **No-Bake Chocolate Peanut Butter Pie Jars** from good to absolutely unforgettable. Nobody wants a runny bottom layer or a totally soft chocolate topping, right? I always follow these rules to make sure the texture is perfect every single time I make them for guests.
Ingredient Notes and Substitutions for Your No-Bake Chocolate Peanut Butter Pie Jars
Let’s talk about swapping ingredients, because I know sometimes you need to work with what you have! If you run out of graham crackers, it’s no big deal at all. You can totally use chocolate wafer cookies—that just makes an already rich pie even more intense, which I love! Honestly, vanilla wafers work fine too if you want to lean purely into the peanut butter.
Now, about that chocolate layer in the middle. The milk makes it soft and almost fudgy when chilled, which is divine if you like that melt-in-your-mouth texture. But if you want it *firmer*, maybe you’re traveling with these jars? You can use 4 ounces of semi-sweet chocolate melted down by itself, or with just a tiny splash of coconut oil instead of milk. That will give you a slightly harder, richer chocolate shell within the layers. Either way, these no-bake cheesecake bites inspired me to always consider how the chocolate sets!
Storage and Make Ahead Dessert Jars Options
Listen, one of the BEST things about these delicious little portions is you don’t have to eat them all right away! Seriously, being able to plan ahead for busy weeks or parties is a lifesaver. These definitely count as my favorite Make Ahead Dessert Jars because they actually taste better the next day!
If you are making these for a party spread or just want to have snacks ready for the whole week, you’re in luck! They keep wonderfully in the refrigerator—I always cover my jars loosely with plastic wrap or just put the lid on tight. You can safely enjoy these for up to three days in the fridge. The crust stays crisp enough, and the chocolate layer stays nice and chilled.
I have noticed that if you keep them sealed up tight, the flavors actually meld together even more by day two. It’s almost like the crust absorbs a tiny bit of the peanut butter filling flavor, and wow, is that good! There’s no reheating needed here; they are designed to be eaten cold straight from the fridge. Just make sure they are completely set before covering them up, usually after that 2-hour chill time!
Serving Suggestions for Layered Dessert Jars
So, your jars are perfectly chilled and set—yay! Now, presentation time. While my family usually dives straight into the rich dark chocolate and peanut butter goodness without batting an eye, sometimes you want that little extra something on top, especially if you’re serving them at a gathering. You don’t need much fuss here; these jars are already superstars on their own, but a tiny garnish goes a long way.
Since we are dealing with such rich, deep flavors, I love pulling in something bright or textural to cut through it a little bit. My philosophy is that if you’re making something that delicious, you might as well make it look like it took three hours!
Here are a few simple things I often keep stocked for topping these Layered Dessert Jars:
- A dusting of cocoa: Right before serving, I grab a tiny mesh sieve and dust the very top layer of peanut butter filling with unsweetened cocoa powder. It looks so sophisticated!
- Fresh Raspberries or Strawberries: The tartness of fresh red berries is the absolute best counterpoint to the sweet peanut butter. Just one or two berries perched right on top makes the colors pop.
- Mini Chocolate Chips: A light sprinkle of a few extra mini chips gives people a heads-up about what flavor explosion they are about to enjoy inside.
- A drizzle of extra peanut butter: If you have any peanut butter left over that didn’t make it into the main filling (or just melt a spoonful!), a quick, thin drizzle right on top just screams “Peanut Butter Lovers Recipes!”
If you are looking for other recipes that use that fantastic chocolate combination, you should check out my recipe for Chocolate Chip Zucchini Bread. It pairs wonderfully with a scoop of vanilla ice cream on the side, though these jars are perfectly self-contained!
Frequently Asked Questions About No-Bake Chocolate Peanut Butter Pie Jars
I totally get it; sometimes you have questions that don’t quite fit into the main instructions! When I first started making these, I had a million queries about how long they really needed to set up and what happens if I use the wrong kind of peanut butter. Don’t worry, I’ve gathered the most common things people ask about these delicious **No-Bake Chocolate Peanut Butter Pie Jars** right here for you. It’s much easier than trying to figure out how to store leftover slices of pie!
Can I make these No-Bake Chocolate Peanut Butter Pie Jars ahead of time?
Yes, you absolutely can! In fact, I highly recommend it. These are fantastic as Make Ahead Dessert Jars because they need that chilling time for all the layers to firm up nicely. I usually make them the morning before a party, but honestly, they hold up perfectly in the refrigerator for up to three days sealed tightly! They are perfect for planning ahead, just like those cheesecake bites I shared recently.
What size jars work best for these Single Serve Pies?
This recipe is perfectly designed for four servings, which means we used standard 8-ounce **mason jars**! The ingredient amounts fit that size beautifully with enough room left over at the top for a little topping garnish, if you choose to add one. If you only have smaller jars, say 4-ounce ones, you’ll get eight little servings instead. Just try to keep the layers proportionate!
Are these considered Portion Controlled Desserts?
That’s one of the main reasons I developed this recipe in a jar format! They are absolutely considered **Portion Controlled Desserts**. Because each person gets their own jar, it stops that temptation to cut *just one more sliver* off a big pie plate. They’re ready to serve, individually wrapped by glass, and usually satisfy that intense chocolate peanut butter craving instantly!
Estimated Nutritional Data for No-Bake Chocolate Peanut Butter Pie Jars
Okay, I always feel a little iffy putting numbers down here because I’m not a nutritionist, and what kind of peanut butter you use or how thick you swirl that chocolate layer can totally change things! So, take this information with a big grain of salt. This breakdown is based on the ingredients listed, assuming standard commercial brands and that you got exactly four even servings out of the batch. If you want to check out some other lighter, mousse-style desserts, I found a neat cottage cheese chocolate mousse cup recipe that tends to run lighter!
But for our decadent **No-Bake Chocolate Peanut Butter Pie Jars**, here is the general estimate per jar, based on dividing the totals by four:
- Calories: Around 650 (Yeah, they’re rich, but we earned those calories!)
- Fat: About 45 grams total, with 18 grams of that being saturated fat.
- Carbohydrates: Roughly 55 grams.
- Protein: A solid 15 grams, thanks to all that peanut butter and cream cheese goodness.
- Sugar: About 45 grams—it is dessert, after all!
Remember, since we aren’t baking these, there’s zero cholesterol risk from baking temperatures, but we do have a bit from the dairy and eggs that are in the cream cheese and cream. Just enjoy it for what it is: a fantastic, easy, no-bake indulgence!
Share Your No-Bake Chocolate Peanut Butter Pie Jars Creations
Now that you’ve seen how simple it is to make these incredible **No-Bake Chocolate Peanut Butter Pie Jars**, I really, really want to hear about them! Did you stick to the classic graham cracker crust, or did you go wild with chocolate wafers? Did you top them with berries?
This recipe is one of those fun ones that guests always rave about, and I love seeing how you all present your individual dessert cups! Please, please, please take a picture of your finished jars—especially if you manage to keep them in the fridge long enough to try storing them for a few days!
Drop a comment down below and let me know how it went. How long did it take you before you dug in? If you had any issues, or if you perfected a topping I didn’t mention, share that wisdom too! I read every single comment you send, and I always appreciate the feedback. If you’re a master at taking pictures of food, tag me on social media so I can share your beautiful creations!
If you need to get in touch with me directly or have a specific question that I missed in the FAQs, you can always head over to my contact page. Happy layering, everyone!
Print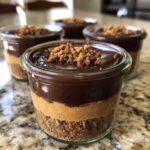
Individual No-Bake Chocolate Peanut Butter Pie Jars: Quick & Easy Dessert Portions
- Total Time: 140 min
- Yield: 4 servings 1x
- Diet: Vegetarian
Description
Make individual servings of rich chocolate and peanut butter pie directly in jars. This no-bake recipe requires minimal effort and sets quickly in the refrigerator.
Ingredients
- 1 1/2 cups graham cracker crumbs
- 1/4 cup granulated sugar (for crust)
- 6 tablespoons unsalted butter, melted
- 1 (8 ounce) package cream cheese, softened
- 1 cup creamy peanut butter
- 1/2 cup powdered sugar
- 1 teaspoon vanilla extract
- 1 cup heavy whipping cream
- 1/2 cup semi-sweet chocolate chips
- 2 tablespoons milk
Instructions
- Combine graham cracker crumbs and 1/4 cup granulated sugar in a bowl. Pour in melted butter and mix until the crumbs are evenly moistened.
- Divide the crumb mixture evenly among 4 small (8-ounce) mason jars, pressing the mixture down to form the crust layer. Place the jars in the freezer while you prepare the filling.
- In a large bowl, beat the softened cream cheese, peanut butter, powdered sugar, and vanilla extract until smooth and creamy.
- In a separate bowl, whip the heavy whipping cream until stiff peaks form. Gently fold the whipped cream into the peanut butter mixture until just combined.
- Spoon or pipe half of the peanut butter filling evenly over the crusts in the four jars. Return the jars to the refrigerator.
- In a small microwave-safe bowl, combine the chocolate chips and milk. Microwave in 30-second intervals, stirring between each, until smooth. Let cool slightly.
- Pour or spoon the chocolate mixture over the peanut butter layer in each jar.
- Top with the remaining peanut butter filling. Chill the jars for at least 2 hours before serving.
Notes
- You can substitute chocolate wafers or vanilla wafers for graham crackers in the crust.
- For a firmer chocolate layer, use 4 ounces of melted semi-sweet chocolate instead of chips and milk.
- These jars keep well in the refrigerator for up to 3 days.
- Prep Time: 20 min
- Cook Time: 0 min
- Category: Dessert
- Method: No-Bake/Chilling
- Cuisine: American
Nutrition
- Serving Size: 1 jar
- Calories: 650
- Sugar: 45
- Sodium: 320
- Fat: 45
- Saturated Fat: 18
- Unsaturated Fat: 27
- Trans Fat: 0
- Carbohydrates: 55
- Fiber: 3
- Protein: 15
- Cholesterol: 75