Oh my gosh, I have to tell you about the latest little obsession taking over my kitchen! You know those days when you desperately need a dessert, but the thought of firing up the oven just makes you sweat? Me too! That’s why I live for my no-bake treats, especially when they look totally fancy but take literally minutes of actual work. Seriously, these **No-Bake Blueberry Cheesecake Oat Cups** are going to be your new best friend for impromptu gatherings or when you just need a little portion-controlled sweet fix.
I actually perfected this recipe last summer when my neighbor showed up with no notice needing a dessert for a last-minute potluck—crisis averted! I’ve been making no-bake desserts forever, learning the tricks to getting that perfect solid texture without turning on a single burner. These cups nail that creamy cheesecake flavor, sit on the easiest oat crust ever, and get that gorgeous pop of color from the blueberries. Trust me, these little miracles set up perfectly in the fridge, and nobody will ever guess how simple they are!
Why You Will Love These No-Bake Blueberry Cheesecake Oat Cups
Honestly, you need these in your life, like, yesterday. They solve so many dessert dilemmas! Below are the reasons why I keep making big batches of these things—they’re just that good and that easy. You can throw them together when you’re busy!
- Absolutely No Oven Required: Seriously, zero baking! This is perfect for those sweltering summer days or when your oven is already full of dinner.
- Perfect Portion Control: Since they are made right in the muffin tin, you get built-in serving sizes. No slicing, no messy plates—just grab a liner!
- Instant Crowd-Pleaser: They look like something you spent hours assembling, what with the creamy filling and that beautiful blueberry swirl. Total show-off factor with minimal effort!
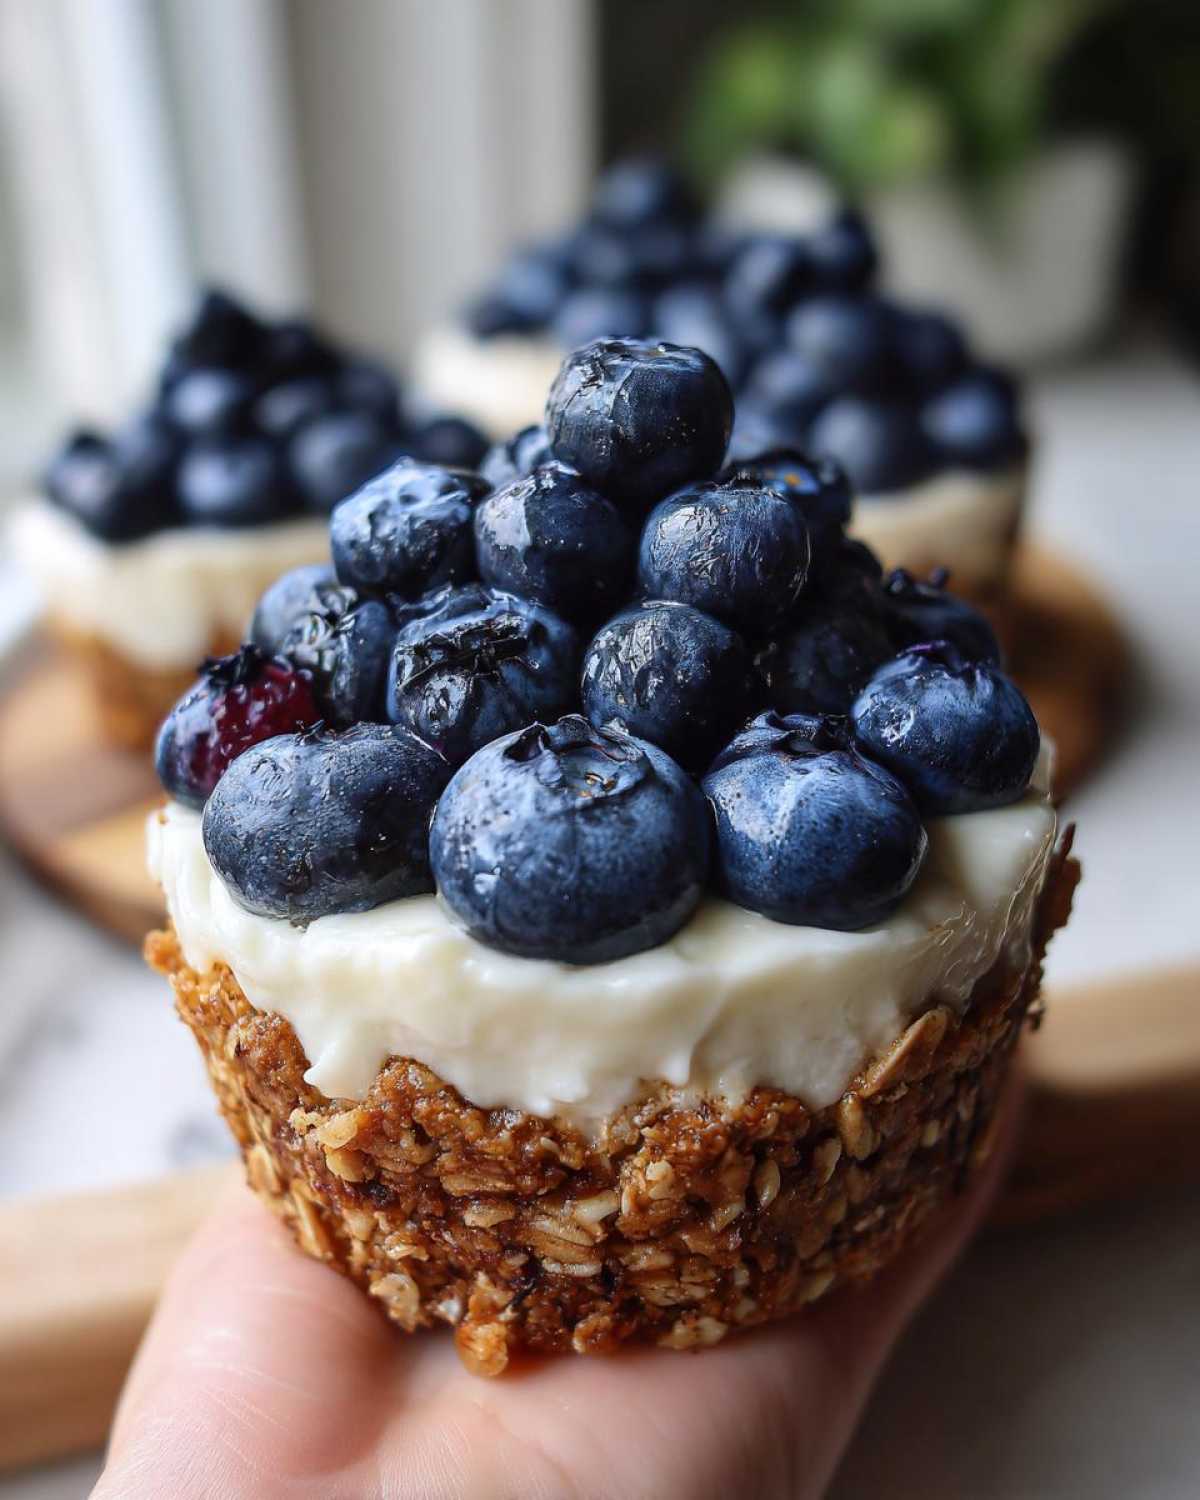
- The Oat Crust is Killer: Forget graham crackers! Baking with oats gives this crust a lovely, slightly chewy texture and a more rustic, slightly healthier feel. You’ll want to nibble on the crust mix straight from the bowl, I warn you!
- Quick Prep Time: We’re talking under 20 minutes of hands-on mixing before they go into the freezer to chill. Talk about fast gratification!
- Make Ahead Magic: These are fantastic for meal prepping desserts. They firm up beautifully in the fridge and are ready when you need them. If you want to see another great make-ahead treat that doesn’t need heat, check out my No-Bake Strawberry Cheesecake Parfaits—similar vibe, totally different delivery!
Gathering Ingredients for Your No-Bake Blueberry Cheesecake Oat Cups
Okay, friend, the trick to any great no-bake recipe is starting with the right stuff, because we don’t have the oven to bake away any imperfections! Since there’s no heat involved, the quality of your ingredients really shines through, especially in that creamy filling. For the absolute best texture—that rich, dense, creamy bite—you MUST use full-fat cream cheese that’s been sitting out long enough to get totally soft. Don’t rush that step!
Here is everything you’ll need to line up before you start mixing. Keep everything measured and ready to go! If you love cheesecake that really sings, you should absolutely check out my recipe for White Chocolate Cranberry Cheesecake sometime, just so you can see what a baked version looks like!
- 1 cup rolled oats (The standard ones are perfect for the crust!)
- 1/4 cup melted coconut oil (This is what helps everything set up firm!)
- 2 tablespoons maple syrup (For just a touch of sweetness in the base)
- 8 ounces cream cheese, softened (I told you, make sure it’s soft!)
- 1/2 cup Greek yogurt, plain (This lightens things up beautifully)
- 1/4 cup powdered sugar
- 1 teaspoon vanilla extract
- 1 cup fresh or frozen blueberries
- 1 tablespoon lemon juice (Just a tiny bit to brighten up those berries!)
Step-by-Step Instructions for Perfect No-Bake Blueberry Cheesecake Oat Cups
This is where the magic happens, and I mean that literally because we’re skipping the whole oven situation! The process is super logical: crust first, chill it so it sets hard, mix the filling while it chills, and then bring it all together. Stick with the chilling times, though—that’s the secret handshake for no-bake stuff to firm up right!
If you mess up and overmix the filling past the point of being ‘just combined,’ don’t panic! Sometimes you just need a little more chill time. While assembling, remember that too much swirling turns it into purple mush, and we want distinct layers or a beautiful pattern. For inspiration on other quick no-bake recipes, you should check out my No-Bake Peppermint Bark Cheesecake Magic—it uses a similar principle of chilling instead of baking!
Creating the Blueberry Oat Crust Base
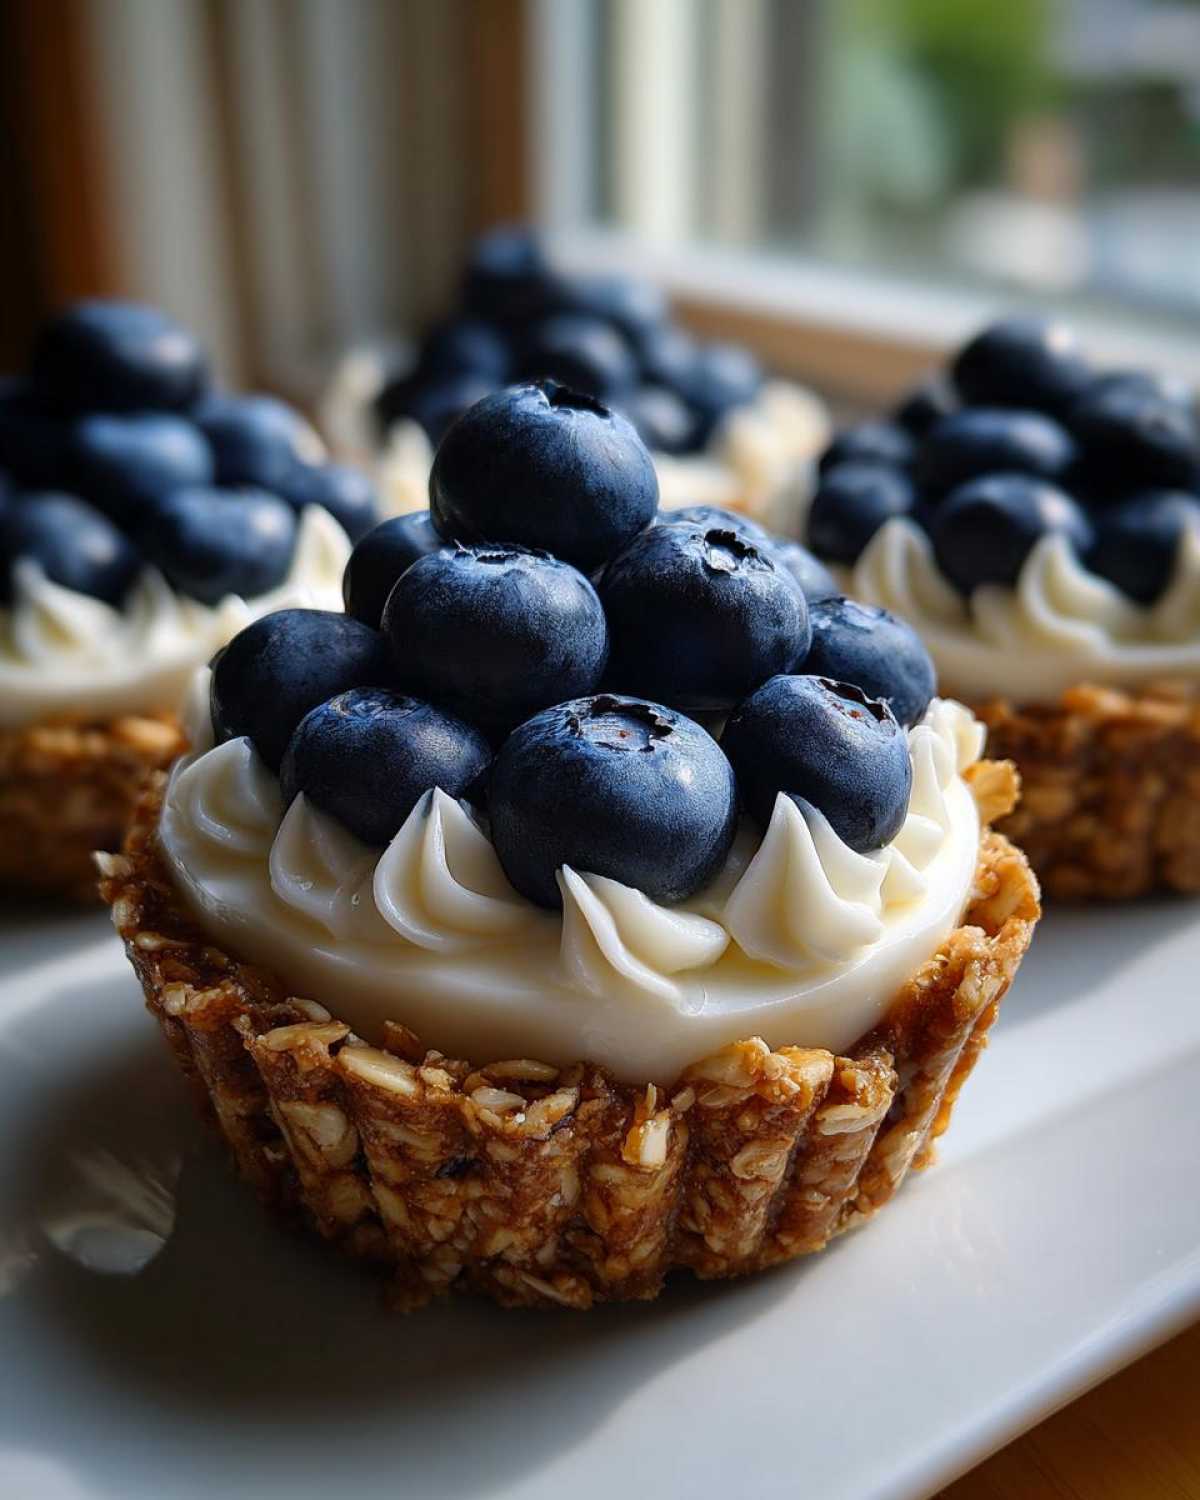
First things first, you need to get those liners ready in your muffin tin. It’s important that they are ready to go! In a small bowl, take your rolled oats, pour in the melted coconut oil, and drizzle in the maple syrup. Give that a good stir with a fork until all the oats look damp and coated. Don’t skimp on the mixing here!
Now, divide that oat junk evenly among those 12 paper liners. This step takes a minute, but you have to press it down hard! Use the bottom of a small glass or just your knuckles to really compact the crust. We need it firm so it doesn’t crumble when people pick it up later. Once they’re pressed tight, pop that entire muffin tin into the freezer for just 10 minutes while we move on to the filling. That quick freeze gives it a nice head start on setting!
Mixing the Creamy Cheesecake Filling
This is where your softened cream cheese earns its keep. Put the eight ounces of room-temperature cream cheese into a clean bowl. Beat it with your hand mixer (or a sturdy whisk, if you’re feeling brave!) until it is completely smooth. This is my expert tip: if your cheese is cold, you get lumps, and lumps are a disaster in a no-bake treat!
Once it’s velvety smooth, gently mix in the Greek yogurt, powdered sugar, and vanilla extract. You only want to mix until the sugar disappears and everything looks uniform. Stop mixing as soon as it’s creamy! Over-beating this mix incorporates too much air, and it won’t set as nicely for your **Individual Cheesecake Desserts**.
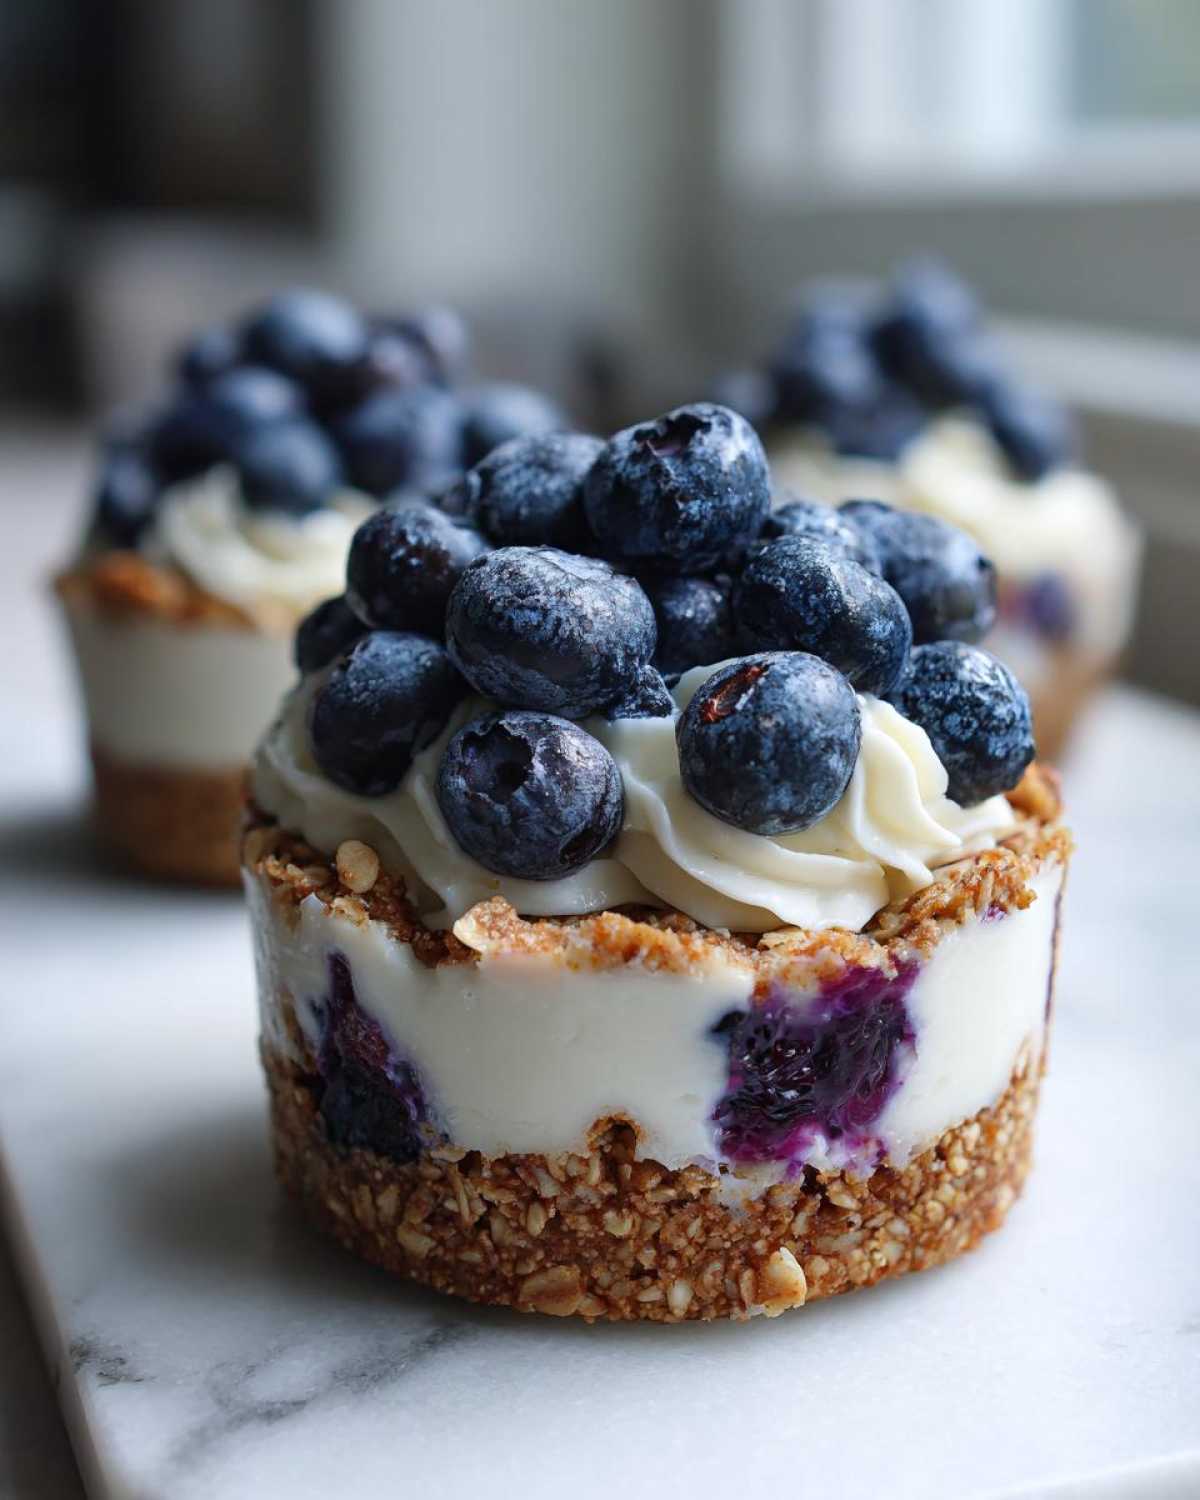
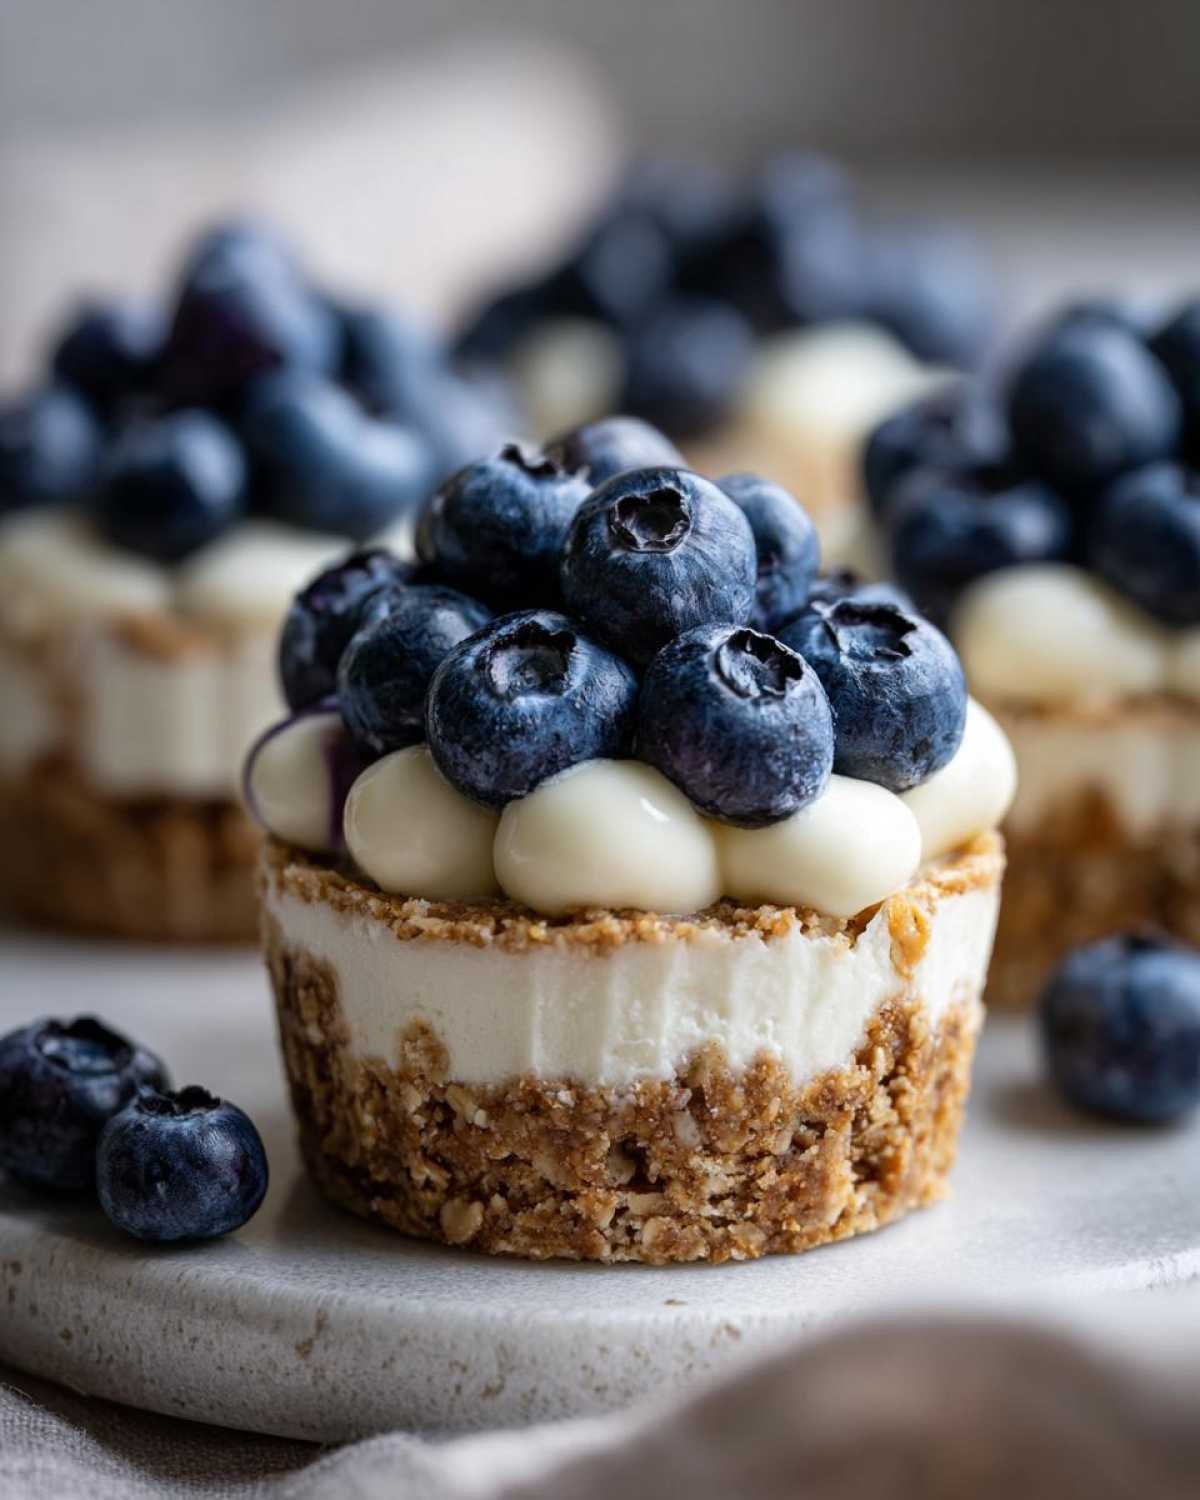
Assembling and Adding the Blueberry Swirl
Time to pull the crusts out of the freezer! Spoon that gorgeous cheesecake filling right over the chilled oat crusts, filling each little cup about three-quarters of the way up. Don’t worry about making the top perfectly flat yet.
Now for the color pop! In a separate tiny bowl, mash about half of your one cup of blueberries along with that tablespoon of lemon juice. They should break down nicely into a chunky sauce. Spoon dollops of this blueberry mash over the top of the cheesecake filling in each cup. If you want that classic **Blueberry Swirl Dessert** look, take a toothpick and gently drag it through the blueberry dollop and into the white filling once or twice. Don’t dig deep or move it around too much, or you’ll lose that beautiful contrast!
Finally, place the remaining whole blueberries right on top of each swirl for presentation. Then, the hardest part: put the whole tray back into the refrigerator for a minimum of four hours. Seriously, you need that long to get them firm enough to serve beautifully. If you need help moving them later, look up my post on how to make homemade Oreo Dirt Cake—the pan prep tips apply here too!
Expert Tips for Success with No-Bake Blueberry Cheesecake Oat Cups
When you’re relying on chilling instead of baking, you have to be a little smarter about your technique, right? I’ve learned the hard way what makes the difference between a perfectly set, lovely treat and one that collapses into a puddle when you try to peel off the liner. These little secrets ensure your cups are firm, flavorful, and worthy of any party.
First, let’s talk about setting agents. Coconut oil is our hero in the crust because it’s solid at fridge temperature, but you must make sure it’s fully melted before you mix the oats, or parts of your crust will stay loose. Also, for that filling, remember what I said about the room temperature cream cheese? If you skip that, you’re going to end up trying to beat cold clumps, which results in a filling that doesn’t mix well but also won’t ever set as firmly as we need it to. It’s worth the wait!
For those of you looking for a truly Light Cheesecake Dessert, I experimented a bunch by swapping out some of the cream cheese for Greek yogurt, which I included in the main ingredient list. But here’s a pro-tip I discovered when running low on cream cheese: you can substitute up to half of the cream cheese with cottage cheese, but you have to blend that cottage cheese until it is absolutely smooth as silk first. Nobody wants a grainy cheesecake, baked or not!
Finally, don’t rush the chill time! Four hours is the minimum, but honestly, if you can let these sit overnight, they are unbeatable. This allows the oat crust enough time to fully absorb the moisture from the filling without getting soggy, and the whole structure becomes incredibly sturdy. If you love a good fruit pairing, once you try these, you HAVE to check out how I use berries in my baked version, like over on my Classic New York Cheesecake with Berry Compote recipe—it’s a total classic!
Ingredient Notes and Substitutions for No-Bake Oat Cups
Let’s talk ingredients for a second, because while this recipe is super basic, knowing *why* we use certain things helps you swap things out later without ruining the set! The success of these **No Bake Blueberry Cheesecake Cups** really hinges on a few key players here, especially since we aren’t using the oven to save us if we make a mistake.
The big one is the coconut oil for the crust. Why coconut oil and not, say, butter? Simple! Coconut oil is liquid when warm, so it mixes beautifully into the oats and maple syrup, but when it hits the cold temperature of the freezer or fridge, it gets totally firm. That hardening action is what locks your oat crust in place so it doesn’t fall apart when someone grabs their cup! If you hate coconut flavor, don’t stress—refined coconut oil has virtually no taste left once it’s mixed in.
Then we have the Greek yogurt. I love using plain Greek yogurt, usually full-fat, because it adds that lovely little tang that cuts through the richness of the cream cheese. It also loosens the filling just enough so it’s creamy but not runny. If you don’t have any, you could try using sour cream, but you might need a little extra powdered sugar since sour cream is usually tarter. If you’re using it for a totally different purpose, like a smoothie, you should check out my Blueberry Spinach Green Smoothie Recipe—those blueberries are versatile!
As for the blueberries themselves, you can absolutely use frozen ones if fresh aren’t in season or are too pricey. If you use frozen, just let them thaw out slightly first, especially if you are mashing them for the swirl. If you skip the sugar in the crust, I mention you can swap the maple syrup with honey. Honey works totally fine, but the flavor is a bit different, so just be aware of that shift!
Serving Suggestions for Your Individual Cheesecake Desserts
These little **Portion Controlled Desserts** look so cute sitting on a platter, and presentation really does make a difference, doesn’t it? Since these cheesecake cups have that light, bright blueberry flavor, you want to pair them with drinks that won’t completely overpower them. They feel way too elegant for a regular glass of tap water, if you ask me!
For a beautiful afternoon get-together, I always treat them like a mini brunch dessert. A simple, freshly brewed coffee—not too strongly roasted—is just perfect. The slight bitterness really balances out the sweetness of the crust and the cream cheese filling. If we’re talking afternoon tea, stick to something delicate, like an Earl Grey or maybe a nice simple peppermint tea. It keeps the palate clean for that next creamy bite.
If you’re serving these as a lighter end to a summer dinner, you absolutely need a fun, bubbly drink nearby. A crisp white wine, like a Pinot Grigio, works wonders because its acidity complements the lemon in the blueberry swirl. Or, if you want to get a little festive, my favorite pairing is a light spritz. Have you ever tried pairing them with something fizzy and fruity? I have a recipe for a Winter Aperol Spritz with Pomegranate that I think would actually taste amazing with the tartness of these cups, even though it feels like a winter drink!
When you set them out, leave the paper liners on—they act like little handles! If you want to dress up the serving plate, just dust a little extra powdered sugar lightly around the bases of the cups on the plate for a snowy effect. It makes them look instantly professional. Honestly, just seeing them lined up is half the fun!
Storage and Make Ahead Tips for No-Bake Blueberry Cheesecake Oat Cups
The best thing about these **No-Bake Blueberry Cheesecake Oat Cups**? You can totally make them ahead of time! This makes them absolutely ideal for busy weeks or when you have company coming over and you don’t want to be stuck in the kitchen. Since there’s no actual baking involved, we rely entirely on the cold to keep things firm and fresh.
Once you’ve finished swirling your blueberries and they’ve chilled for that minimum four hours (or preferably overnight!), they are ready to store. You want to keep them covered, and keeping them cold is non-negotiable if you want them to keep that perfect cheesecake bite.
In the refrigerator, these babies will stay fantastic for about three to four days. That’s nearly a week’s worth of dessert ready to go! I usually cover the entire muffin tin tightly with plastic wrap, making sure the wrap isn’t directly touching the blueberry swirl tops, maybe using plastic wrap tented over the tops, or I just transfer them gently to an airtight container once they are fully set. If you’re looking for other great meals or snacks you can prep ahead, you should definitely check out my list for Make Ahead Cheesy Egg Cups for Kids—same principle of getting things ready earlier!
Now, can you freeze them? Yes, you totally can! I’ve done this, and it works well if you need them for a future event. Wrap each individual cup very securely in plastic wrap first—like, really tight winding is necessary to prevent freezer burn or absorbing freezer smells. Then you can place those wrapped cups into a freezer-safe bag or container.
They should stay perfectly good in the freezer for up to about a month. When you’re ready to eat them, just pull out the number you want and let them thaw slowly in the refrigerator overnight. They almost always come back perfectly! This is why I love these as **Make Ahead Desserts**; they save me so much stress later on.
Frequently Asked Questions About Quick Cheesecake Bites
I always get heaps of questions about no-bake recipes because people aren’t used to ingredients setting up like magic! I tried to make these **Quick Cheesecake Bites** as foolproof as possible, but here are the few things folks usually ask me about before they dive in!
Can I use regular sugar instead of powdered sugar in the filling?
You technically *can*, but I really, really advise against it if you want that ultra-smooth cheesecake experience. Powdered sugar (or confectioner’s sugar) is super fine because it has cornstarch in it, which allows it to dissolve instantly when you mix it into the cream cheese and yogurt. If you use granulated or regular table sugar, you run the risk of having tiny, gritty sugar crystals that just won’t dissolve when they chill. Then, instead of creamy, you get a slightly crunchy filling. Trust me, stick to the powdered sugar for that smooth texture!
What is the best way to remove these No Bake Oat Cups from the muffin tin?
This is crucial for keeping your **Individual Cheesecake Desserts** looking perfect! Paper liners are your absolute best friend here. Don’t skip them, even though that oat crust seems sturdy enough on its own. Once they’ve chilled for those four hours minimum (or better yet, overnight), the filling is totally solid. To peel them out, just gently pinch the sides of the paper liner and lift upward. If the liner seems to be clinging even when pulled, you can carefully slide a very thin, offset spatula or butter knife right between the liner and the tin wall, but usually, a gentle lift is all you need!
Are these considered Healthy No Bake Desserts?
That’s a great question! I list them under **Healthy No Bake Desserts** because compared to a traditional, fully loaded, baked cheesecake that uses heavy cream and has a graham cracker crust, these are definitely lighter and more manageable. We’re using oats instead of refined crackers in the base, and the Greek yogurt cuts down on some of the heavy fat from needing *all* cream cheese.
However, let’s be real—it’s still dessert! We have cream cheese and sugar in there. I like to think of them as ‘lightened-up’ or ‘portion-controlled’ treats. They are perfect when you want something satisfying without diving into a giant slice of pie. If you’re looking for something truly pure, you should look at my recipe for Quick Easy Shredded Chicken Tacos—that’s a real healthy meal, unlike my sweets! Haha!
Estimated Nutritional Data for No-Bake Blueberry Cheesecake Oat Cups
I always try to give you guys a rough idea of what you’re taking in, especially since these are designed as single servings! Keep in mind that these numbers are just estimates based on the standard ingredients I use, so if you swap out for full-fat yogurt or use honey instead of maple syrup, things will shift a little bit. But here’s the ballpark for one sweet little cup:
- Serving Size: 1 cup
- Calories: 210
- Sugar: 15g
- Fat: 13g (with 7g saturated fat)
- Carbohydrates: 20g
- Protein: 6g
- Cholesterol: 35mg
It’s great seeing that 6 grams of protein coming in from the oats and the yogurt, which helps keep you a little more satisfied than a straight sugar bomb! For more recipes where you can track nutrition, you can check out my Protein-Packed Greek Yogurt Overnight Oats—those are genuinely good for you!
Share Your No-Bake Blueberry Cheesecake Oat Cups Experience
I absolutely live for seeing your creations! When you make these **No-Bake Blueberry Cheesecake Oat Cups**, please, please snap a picture! I especially want to see your blueberry swirl technique—did you keep it tight and clean, or did you go wild and get a beautiful mess? You can rate the recipe right on the page if you feel generous!
If you have any little tweaking secrets you discover—maybe you added a teaspoon of lemon zest to the filling, or found an even better way to press the crust—share it in the comments below! I read every single one, and sharing tips is what makes this baking community so great. If you need to reach us directly with a major question or suggestion, don’t forget you can always send a message through my contact page!
Print
No-Bake Blueberry Cheesecake Oat Cups
- Total Time: 4 hr 20 min
- Yield: 12 servings 1x
- Diet: Vegetarian
Description
Make these easy, individual no-bake cheesecake cups featuring a simple oat crust and a creamy filling topped with fresh blueberries.
Ingredients
- 1 cup rolled oats
- 1/4 cup melted coconut oil
- 2 tablespoons maple syrup
- 8 ounces cream cheese, softened
- 1/2 cup Greek yogurt, plain
- 1/4 cup powdered sugar
- 1 teaspoon vanilla extract
- 1 cup fresh or frozen blueberries
- 1 tablespoon lemon juice
Instructions
- Prepare a standard 12-cup muffin tin by lining it with paper liners.
- For the crust, combine the rolled oats, melted coconut oil, and maple syrup in a small bowl. Mix until the oats are evenly coated.
- Divide the oat mixture evenly among the 12 liners, pressing firmly into the bottom of each cup to form a crust. Place the tin in the freezer for 10 minutes.
- While the crust chills, make the filling. Beat the softened cream cheese until smooth. Add the Greek yogurt, powdered sugar, and vanilla extract. Mix until just combined and creamy.
- Spoon the cheesecake filling over the chilled oat crusts, filling each cup about three-quarters full.
- For the blueberry topping, gently mash half of the blueberries with the lemon juice in a separate small bowl.
- Spoon a small amount of the mashed blueberry mixture over the top of each cheesecake cup. Use a toothpick to gently swirl the blueberry mixture into the filling if desired.
- Place the remaining whole blueberries on top of each cup.
- Refrigerate the cups for at least 4 hours, or until firm. Serve directly from the refrigerator.
Notes
- You can substitute maple syrup with honey for the crust if preferred.
- If using frozen blueberries for the topping, thaw them slightly before mashing.
- For a lighter filling, substitute half of the cream cheese with low-fat cottage cheese blended until smooth.
- Prep Time: 20 min
- Cook Time: 0 min
- Category: Dessert
- Method: No-Bake/Chilling
- Cuisine: American
Nutrition
- Serving Size: 1 cup
- Calories: 210
- Sugar: 15
- Sodium: 85
- Fat: 13
- Saturated Fat: 7
- Unsaturated Fat: 6
- Trans Fat: 0
- Carbohydrates: 20
- Fiber: 2
- Protein: 6
- Cholesterol: 35