Oh, summer lunches. Sometimes they feel like a puzzle, right? Especially when you’re trying to find something quick, easy, and that your little ones will actually eat without a fuss. I know the feeling! Between splash pad trips and trying to keep up with their endless energy, I need recipes that are simple wins. That’s where these Grilled Cheese Dippers for Kids: Fun Summer Lunch Idea with Tomato Soup come in. They’ve been a absolute lifesaver in my house, especially on those warm, busy days.
My son, Leo, went through a phase where he’d only eat things he could dip. Everything! So, I started cutting his grilled cheese into strips, and it was like magic. His sister, Mia, loved it too, and dipping them into warm tomato soup just makes it even more fun. It’s such a simple tweak, but it makes all the difference in getting them excited about lunch.
I love this recipe because it takes a classic comfort food and makes it kid-friendly and interactive. Plus, it’s super fast to whip up, which is exactly what I need during the summer rush. No complicated steps, just simple goodness. It’s a go-to I think you’ll reach for again and again.
Why You’ll Love These Grilled Cheese Dippers for Kids
Trust me, these Grilled Cheese Dippers for Kids: Fun Summer Lunch Idea with Tomato Soup are going to become a favorite in your house, just like they are in mine. Why? Let me tell you!
- They’re super easy to make. We’re talking minimal effort for maximum kid happiness.
- Kids love dipping! Turning a sandwich into dippers makes it instantly more fun and engaging.
- It’s a classic combo that most kids already enjoy – grilled cheese and tomato soup.
- Perfect for busy summer days when you need a quick and reliable lunch option.
- You can easily adjust it to fit your kids’ preferences, which is always a win!
Everything You Need for Grilled Cheese Dippers for Kids
Gathering your tools before you start makes everything go so much smoother. For these yummy grilled cheese dippers, you’ll need just a few basic things that you probably already have in your kitchen. Here’s what I use:
- A good cutting board
- A knife for buttering and slicing
- A large skillet or griddle
- A spatula for flipping
- A small pot for heating the soup
That’s it! Simple and ready to go.
Simple Ingredients for Grilled Cheese Dippers
One of the best things about these grilled cheese dippers is how few ingredients you need. They’re all pantry staples, which means you can probably whip these up right now! Here’s what you’ll want to have on hand:
- 8 slices of your favorite white bread (sandwich bread works perfectly)
- About 4 to 6 tablespoons of butter, make sure it’s softened so it spreads easily
- 8 slices of cheddar cheese (I usually use mild cheddar for the kids)
- 1 can (10.75 oz) of condensed tomato soup
- 1 cup of water or milk (for thinning the soup)
See? Nothing fancy, just simple goodness that comes together fast.
Making Your Grilled Cheese Dippers for Kids: Step-by-Step
Okay, let’s get cooking! Making these grilled cheese dippers is super straightforward. Just follow these simple steps, and you’ll have happy eaters in no time. This is how I make Grilled Cheese Dippers for Kids: Fun Summer Lunch Idea with Tomato Soup in my kitchen.
- First things first, grab your bread. Spread a nice, even layer of softened butter on one side of each slice. This buttered side is key for getting that golden, crispy crust we all love.
- Lay four of your buttered bread slices butter-side down on your cutting board. These are the bottoms of your sandwiches.
- Now for the cheesy goodness! Place two slices of cheddar cheese on top of each of those four bread slices. Don’t be shy with the cheese!
- Top each with the remaining four bread slices, this time with the buttered side facing up. You’ve built your sandwiches!
- Heat up a large skillet or griddle over medium heat. You want it warm enough to get a good sear but not so hot that it burns the bread.
- Carefully place your sandwiches in the warm skillet. Don’t overcrowd the pan; cook them in batches if needed.
- Let them grill for about 3 to 4 minutes on the first side. You’re looking for a beautiful golden brown color.
- Flip each sandwich gently with your spatula. Grill the other side for another 3 to 4 minutes, until it’s also golden brown and the cheese inside is all melted and gooey.
- While your sandwiches are doing their thing, let’s get the soup ready.
Heating the Tomato Soup
While those gorgeous grilled cheese sandwiches are finishing up, it’s the perfect time to heat the tomato soup. Just open the can and pour it into a small pot. Stir in the water or milk, whichever you prefer (I often use milk for a creamier soup for the kids). Heat it over medium heat, stirring occasionally, until it’s nice and warm. You want it ready for dipping as soon as the dippers are done!
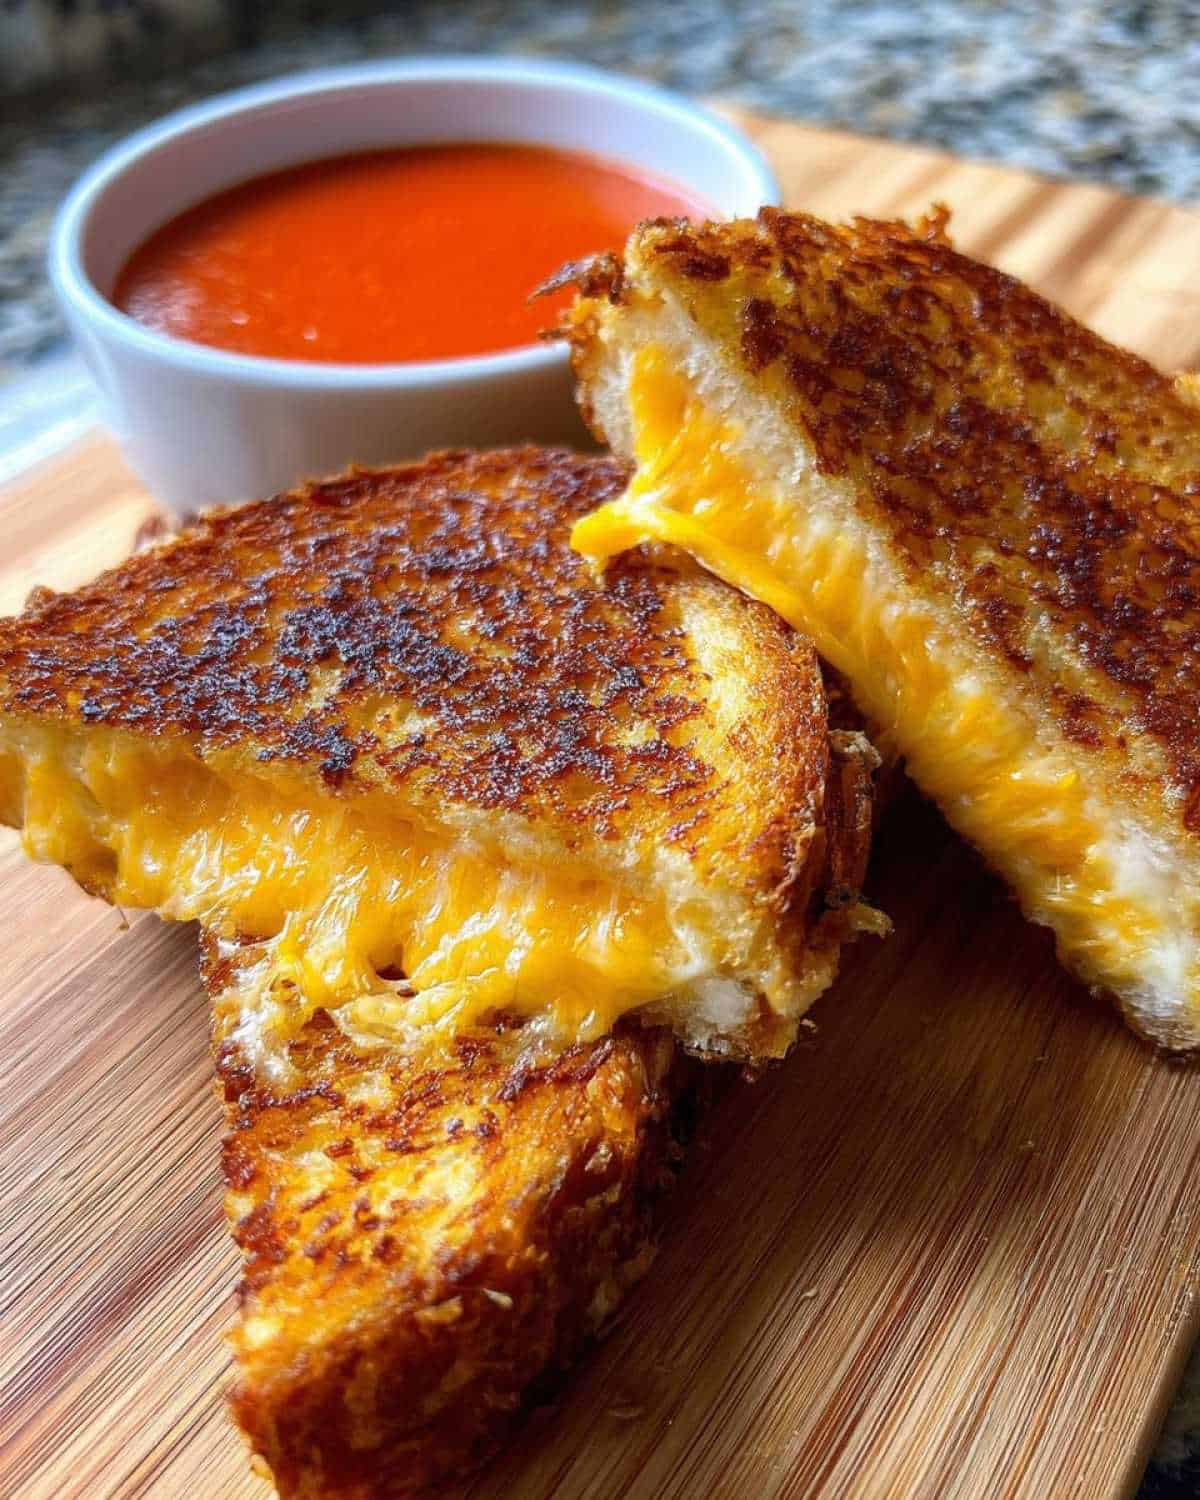
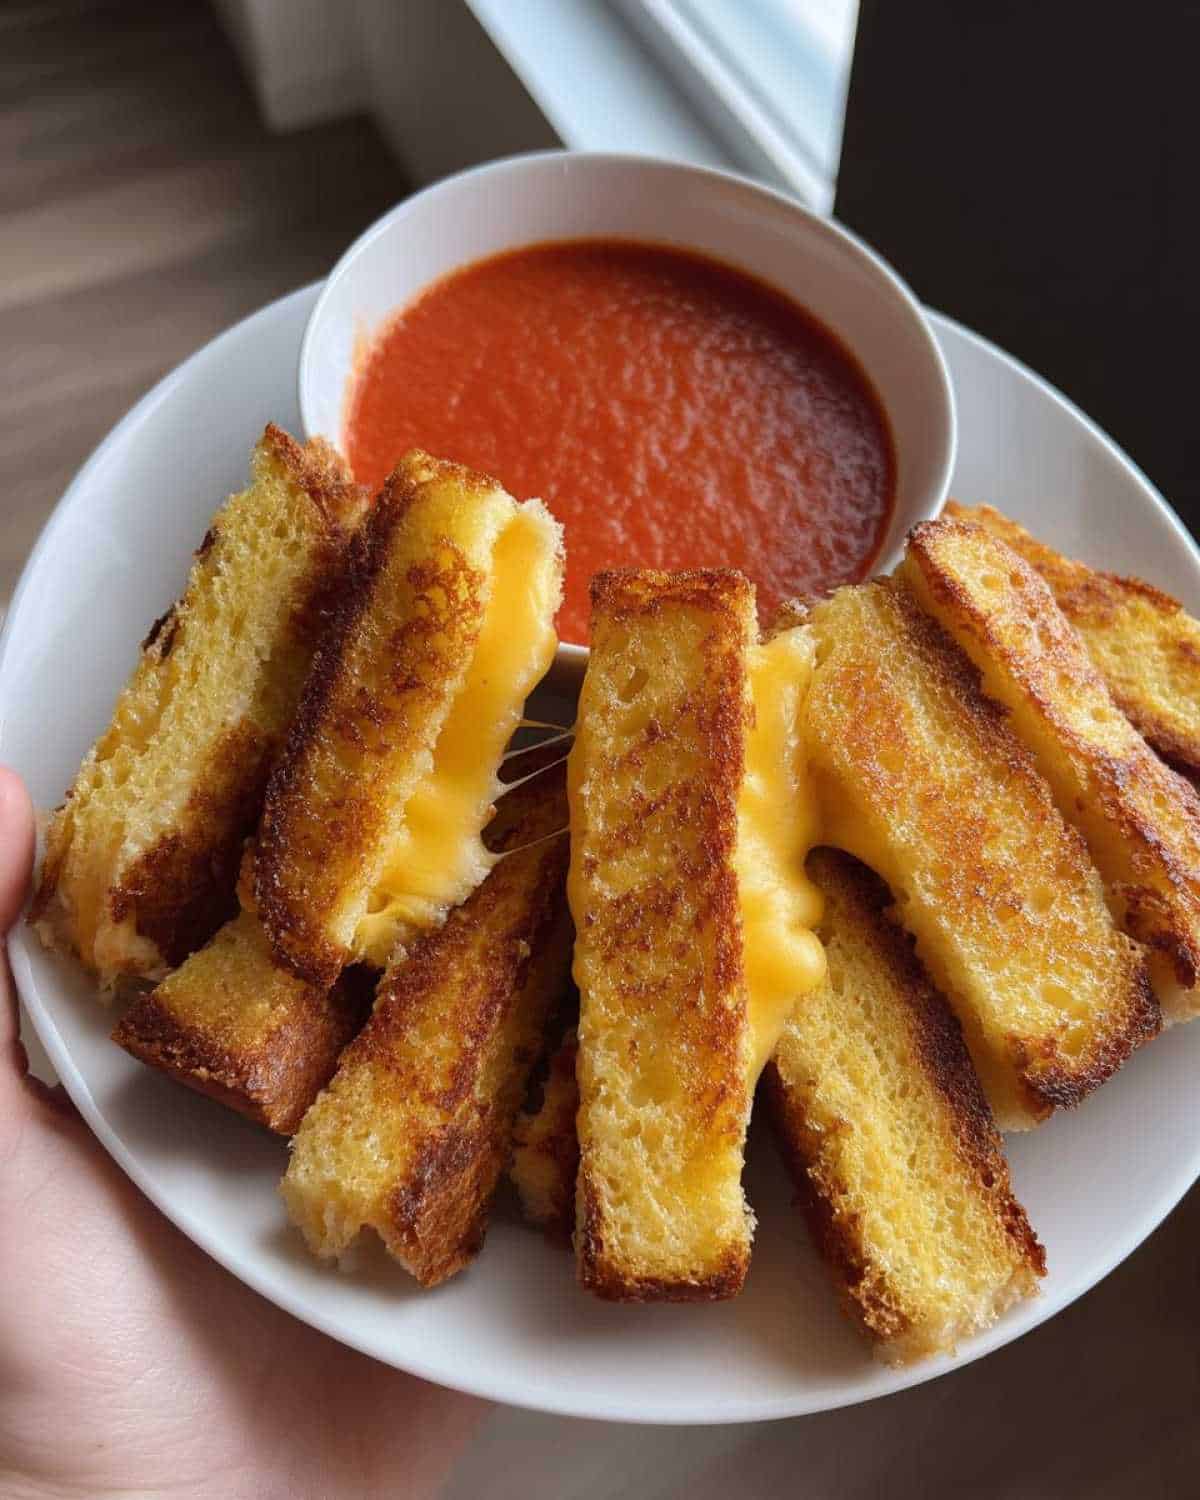
Slicing and Serving the Grilled Cheese Dippers
Once your grilled cheese sandwiches are perfectly golden and the cheese is melted, take them off the skillet. Let them sit on the cutting board for just a minute or two. This short cooling time makes them much easier to handle and slice. Now, here’s the fun part! Take each sandwich and slice it lengthwise into four strips. These are your dippers! Arrange them on plates and serve them immediately with the warm tomato soup for dipping. Watch those little faces light up!
Tips for Perfect Grilled Cheese Dippers Every Time
Want to make sure your Grilled Cheese Dippers for Kids: Fun Summer Lunch Idea with Tomato Soup turn out amazing every single time? Here are a few little tips I’ve picked up along the way:
- Use softened butter! Cold, hard butter is a nightmare to spread evenly. Take it out of the fridge a bit before you start.
- Don’t crank the heat too high. Medium heat is your friend here. It lets the bread get golden brown without burning before the cheese melts.
- Give your sandwiches some space in the pan. Overcrowding means they won’t cook evenly and won’t get that perfect crust. Cook in batches if you need to.
- Let them cool slightly before cutting. This is a game-changer! It keeps the hot cheese inside where it belongs and makes slicing much cleaner.
Frequently Asked Questions About Grilled Cheese Dippers for Kids
I get asked a few things often about these dippers! Here are some answers to common questions you might have when making Grilled Cheese Dippers for Kids: Fun Summer Lunch Idea with Tomato Soup.
Can I use different types of cheese for these grilled cheese dippers?
Absolutely! Cheddar is a classic, but feel free to experiment. American cheese melts beautifully and is a kid favorite. Monterey Jack is another great option that melts well and has a mild flavor. You could even mix a couple of cheeses!
How can I make these grilled cheese dippers ahead of time?
Grilled cheese is best right after it’s made because of that melty cheese and crispy bread. However, you can prep the sandwiches ahead of time. Assemble them but don’t grill them. Store them covered in the fridge for a few hours. Then, grill them when you’re ready to eat. You can also grill them completely, let them cool, cut into dippers, and then gently reheat in a skillet or even air fryer. Just know the texture might not be quite as perfect as fresh.
Nutritional Information
Just a quick note about nutrition for these grilled cheese dippers. The values provided in the recipe are estimates. They can change quite a bit depending on the specific type of bread, cheese, butter, and even the brand of tomato soup you use. So, think of them as a general guide rather than exact numbers!
Share Your Grilled Cheese Dippers Success!
I hope your little ones absolutely love these grilled cheese dippers as much as mine do! There’s nothing better than seeing them happily dipping away. If you make these Grilled Cheese Dippers for Kids: Fun Summer Lunch Idea with Tomato Soup, I’d be so thrilled to hear about it!
Leave a comment below and let me know how they turned out. Did your kids try a different cheese? Did they dip with enthusiasm? You can also rate the recipe, and if you share photos on social media, be sure to tag me! I can’t wait to see your creations.
Print
Amazing Grilled Cheese Dippers: 1 Painless Summer Lunch Secret
- Total Time: 25 minutes
- Yield: 4 servings 1x
- Diet: Vegetarian
Description
Fun and easy grilled cheese dippers perfect for a summer lunch, served with tomato soup.
Ingredients
- 8 slices white bread
- 4–6 tablespoons butter, softened
- 8 slices cheddar cheese
- 1 can (10.75 oz) condensed tomato soup
- 1 cup water or milk
Instructions
- Butter one side of each bread slice.
- Place 4 slices of bread butter-side down on a cutting board.
- Top each with 2 slices of cheddar cheese.
- Top with the remaining 4 slices of bread, butter-side up.
- Heat a large skillet or griddle over medium heat.
- Grill sandwiches for 3-4 minutes per side, or until golden brown and cheese is melted.
- While sandwiches are grilling, heat the tomato soup according to can directions, using water or milk.
- Once grilled, let sandwiches cool slightly.
- Cut each sandwich into 4 strips (dippers).
- Serve grilled cheese dippers with warm tomato soup for dipping.
Notes
- You can use other types of cheese like American or Monterey Jack.
- Adjust the amount of butter as needed for grilling.
- Make sure to not overcrowd the skillet when grilling.
- Letting the grilled cheese cool slightly before cutting makes it easier to handle.
- Prep Time: 10 minutes
- Cook Time: 15 minutes
- Category: Lunch
- Method: Grilling
- Cuisine: American
Nutrition
- Serving Size: 1 sandwich and 1/4 of soup
- Calories: 450
- Sugar: 9g
- Sodium: 850mg
- Fat: 25g
- Saturated Fat: 15g
- Unsaturated Fat: 8g
- Trans Fat: 0g
- Carbohydrates: 40g
- Fiber: 2g
- Protein: 18g
- Cholesterol: 60mg