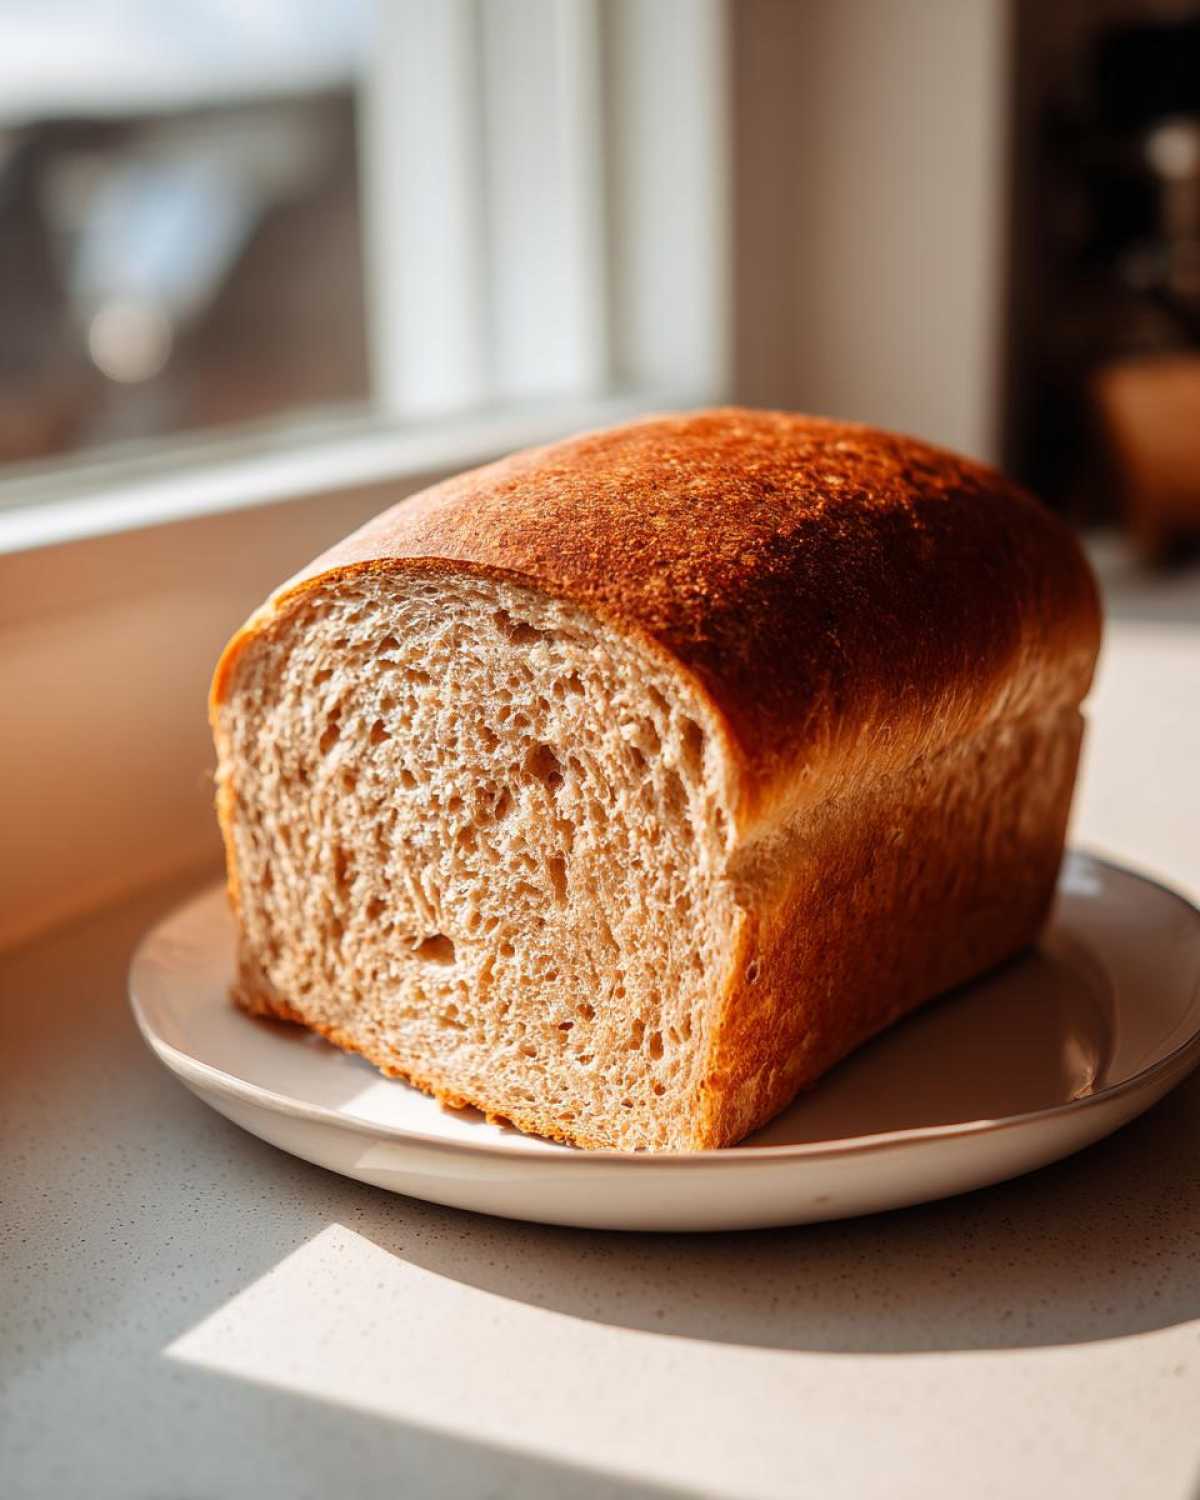
If you’ve ever been burned by a batch of homemade whole wheat bread that came out looking more like a dense brick than a fluffy slice for your lunch, I totally get it! For years, I thought whole wheat meant sacrificing softness, but trust me, that stops today. My mission was always to create a truly delicious, soft and fluffy homemade bread that everyone would actually eat, crumbs and all. We finally nailed it with this Soft & Easy Honey Whole Wheat Sandwich Bread recipe. It’s hearty enough to feel healthy but light enough for your best sandwich fillings. Seriously, this is the easiest whole wheat bread you will ever ask a friend about!
Why This Soft & Easy Honey Whole Wheat Bread Recipe Works (E-E-A-T)
Okay, so what’s the secret sauce here? It’s not magic, it’s just smart baking! Most whole wheat recipes call for 100% whole wheat flour, and that makes it heavy every single time. My trick is mixing a good amount of hearty whole wheat flour with standard all-purpose flour. That blend gives you incredible structure without turning it into sourdough territory. Plus, the honey doesn’t just sweeten it up; it keeps the crumb unbelievably moist and tender, which you can see reflected in our other moist bread recipes!
Key Benefits of Our Whole Wheat Bread
- It delivers that super soft texture folks always ask for in a whole grain loaf.
- Honestly, it’s perfect for everything—toasting, lunch meat, dripping butter, you name it.
- The steps are straightforward, making it a fantastic beginner whole wheat bread tutorial.
- That touch of honey makes it slightly sweet, which is wonderful for picky eaters in the family.
Ingredients for Your Soft Whole Wheat Sandwich Bread
Gathering your ingredients is the first step toward that amazing, healthy homemade bread smell filling your house. Don’t just grab any flour, though—the type and temperature matter huge here! We need two specific waters, the good stuff for the yeast, and the honey for that subtle sweetness that balances the grain flavor perfectly.
- 1 cup warm water (105-115°F)
- 2 1/4 teaspoons active dry yeast
- 1/4 cup honey
- 2 tablespoons unsalted butter, melted
- 1 1/2 teaspoons salt
- 1 1/2 cups warm water (lukewarm)
- 3 cups whole wheat flour
- 2 1/2 cups all-purpose flour (plus more for dusting)
Ingredient Notes and Substitutions for Whole Wheat Bread
Listen, this is where baking authority comes in. We need both flours for this light texture. The whole wheat flour gives you the wonderful, hearty grain flavor and fiber, but the all-purpose flour has less bran, which means it lets the dough stretch and get fluffy without tearing during the knead. If you skip the honey, that’s okay, but you might want to add a tiny bit more sugar, as honey retains moisture better than granulated sugar.
Step-by-Step Instructions for Easy Whole Wheat Loaf
Baking this easy whole wheat loaf is a process, not a race! I follow these steps religiously because rushing the dough results in sad, tiny loaves, and nobody wants that. Pay close attention to those water temperatures in the beginning—that’s your non-negotiable starting line for success.
Activating the Yeast and Mixing the Whole Wheat Dough
First things first: get your yeast happy! Pour that first cup of warm water (it should feel pleasantly warm, not hot, on your wrist—aim for 105°F to 115°F) into your large bowl and sprinkle on the yeast. Let it go sit for five minutes until it gets foamy and bubbly. That foam lets you know your yeast is alive and ready to work its magic! Once it’s foamy, stir in your honey, the melted butter, and the salt. Then, dump the 3 cups of whole wheat flour right in along with the next 1 1/2 cups of lukewarm water. Mix it until everything just looks combined.
Kneading and First Rise for Fluffy Homemade Bread
Now we mix in the rest of that all-purpose flour until you have a shaggy, messy clump. Turn that out onto a lightly floured counter. This is where you put in the work! You need to knead this dough for a solid 8 to 10 minutes. Seriously, stick with it! You are looking for the dough to transform; it should stop sticking everywhere and become smooth and super elastic. That feeling tells you you’ve developed the gluten, which is what gives you that *fluffy homemade bread* texture. Pop the dough into an oiled bowl, cover it up, and let it rest gently in a warm spot for about an hour and a half until it has doubled in size.
Shaping, Second Rise, and Baking Your Whole Wheat Bread
Gently give that beautiful risen dough a punch to deflate it—try not to stir it all up! Shape it carefully into a nice log and tuck it into your greased 9×5 loaf pan. Cover this lightly and let it have its second nap for about 35 to 45 minutes. The cue for me is when the dough crests about an inch over the top edge of the pan; that means it’s ready for the heat! Pop it into the preheated 375°F oven. It bakes for about 30 to 35 minutes. How do I know it’s done? When the top is gorgeously golden brown and my instant-read thermometer hits 200°F internally. Make sure you pull it out immediately and let it cool completely on a rack before slicing—slicing warm bread is a rookie mistake that leads to gummy slices!
If you want to check out another easy baking project while you wait for this one to rise, take a peek at how I make soft, fluffy skillet naan!
Tips for Baking the Best Soft Whole Wheat Sandwich Bread
Even with a great recipe, one or two little slips can turn your **soft whole wheat sandwich bread** into something a little too chewy. I learned these tricks over many batches, especially when troubleshooting why a certain loaf just wouldn’t behave, so trust me on these five points.
First, remember to brush it with butter right when it comes out of the oven, as noted in the recipe—that melts the crust down just enough for softness. Also, if you notice your dough is just too sticky while you’re kneading (it happens!), add only one tablespoon of that extra all-purpose flour at a time until you can handle it. Don’t dump it all in!
My absolute most critical tip, which isn’t even in the main instructions, is about cooling. You must let the bread cool completely on a wire rack before you slice it, even if the smell is making you crazy. Slicing it while it’s still hot traps the steam inside, and that steam turns into gummy pockets right in the middle of your beautiful loaf. It ruins the airy texture we worked so hard for!
Also, if you want a faster bake or sometimes when I try making an easy homemade naan bread recipe, I find that making sure the oven racks are centered really helps heat distribution, which prevents the bottom from burning before the center cooks through. Use your thermometer for that internal checkpoint!
Making 100 Percent Whole Wheat Baking Possible
I know, I know. We used all-purpose flour in this recipe, and I’m going to tell you why later! But I hear you loud and clear: sometimes you just need that full, hearty, 100 percent whole wheat baking experience. Using only whole wheat flour is fantastic for nutrition, but it’s a little tricky because the bran in the whole wheat actually cuts the gluten strands we need for that lift.
If you want to skip the all-purpose flour next time, here is my quick adjustment guide. Because the 100 percent whole wheat flour absorbs way more liquid, you have to increase the water, or your dough for your easy whole wheat loaf will be stiff as a rock. For every 2 1/2 cups of all-purpose flour I used, swap in 2 1/2 cups of whole wheat flour, AND add about 1/4 to 1/3 cup extra lukewarm water total throughout the mixing process.
You might also need to knead it a little longer to develop whatever gluten you can. Your dough won’t feel quite as stretchy as the one in the recipe above—that’s normal! It will be heavier and more rustic looking. Don’t worry; just follow the rise times. If you are having issues with density, check out my tips for making quick baking soda breads; sometimes switching techniques helps when you are working with denser grains!
Storage and Reheating Instructions for Your Homemade Whole Wheat Bread
You baked the perfect loaf—now we have to keep it perfect! The best way to store this homemade whole wheat bread is actually just to leave it on the counter for a day or two. Keep it in a paper bag or a bread box where air circulation prevents sweating, which makes the crust go soft too fast. If you need it to last longer than three days, freezing is the way to go.
Always slice the loaf before you freeze it! That way, you only pull out what you need immediately, and you don’t have to thaw the whole thing. Wrap individual slices tightly in plastic wrap, then slide them into a freezer bag. You can reheat them straight from frozen by just popping them in the toaster—they come out tasting freshly baked! For a warmer treat, check out how I use leftover loaves in my gingerbread banana bread recipes!
Serving Suggestions for Hearty Whole Grain Baking
This whole wheat bread is way too good to only use for those quick Monday lunch sandwiches, honestly. Because it has that great, hearty texture from the whole grains, it stands up beautifully to whatever you throw at it. Don’t let this loaf sit on the counter waiting for the next sandwich emergency!
My favorite way to enjoy a thick slice of this whole grain bread is toasted. Seriously, make it toast! The honey flavor really caramelizes beautifully under the broiler or in the toaster oven. It’s sturdy enough that you can pile on avocado, maybe even some crunchy sprouts or a fried egg, and the slice never, ever breaks. That’s the sign of a truly well-made hearty loaf, right?
And when you have stale-ish (never happens with this recipe, but just in case!) bread, turn it into the best French toast you’ve ever made. The slight sweetness from the honey works perfectly with cinnamon and maple syrup. If you want to get super creative, this bread is amazing when used as the base for a savory waffle turnover—check out my stuffing waffle turkey sandwich idea if you’re feeling adventurous!
Frequently Asked Questions About This Whole Wheat Bread
Baking bread always brings up a few questions, especially when you are trying to get that perfect fluffy texture from whole grains. I’ve gathered the questions I get asked the most about this fantastic whole wheat bread recipe. Don’t stress if something feels tricky—we’ll figure it out!
Can I use only whole wheat flour in this simple whole wheat recipe?
You absolutely can, but you have to adjust! Remember, we used that mix of whole wheat and all-purpose flour specifically to keep the loaf soft and light. If you switch to 100 percent whole wheat flour, your dough will be much drier and heavier from the start. You need to add about 1/4 to 1/3 cup more lukewarm water when mixing it all up, or you’ll end up with a very stiff **easy whole wheat loaf** that won’t rise well. It will still be wholesome and delicious, just denser than the loaf described here!
Why is my whole wheat bread dense?
Oh, density is the bane of every baker’s existence! Usually, when a whole wheat loaf is dense, it comes down to one of two things. First, check your yeast; if your yeast wasn’t active, it never created the gas needed to lift the dough. Did you see a foamy head after 5 minutes? If not, the yeast was dead, and that’s the problem. Second, did you knead enough? For bread for sandwiches, you really need that full 8 to 10 minutes of kneading until it feels smooth and elastic. Under-kneading leaves you with a crumb that just collapses in on itself.
Is this honey wheat bread recipe suitable for making toast?
Oh my gosh, yes! This **honey wheat bread recipe** makes the absolute best toast. Because of the honey and melted butter, the edges toast up beautifully crunchy while the interior stays perfectly tender—it doesn’t dry out like plain white bread toast can. My favorite way to toast it is slicing it a tiny bit thicker than usual, about 3/4 of an inch, and putting it in the toaster oven at medium heat. It gives you the perfect crunch factor for avocado or jam!
If you’re looking for more inspiration on great things to use your bread for, I have a fantastic springtime soup recipe—maybe try a side of my taco soup with some toast points?
Nutritional Estimates for This Whole Wheat Bread
I always get asked about the healthier side of this delicious loaf, and while I’m a cook, not a nutritionist, I do track what goes into our favorite whole wheat bread! We bake this bread mostly for sandwiches and toast, so measuring by the slice makes the most sense for our family. Remember, these numbers are just estimates because just like Grandma, I sometimes eyeball the honey a tiny bit!
These estimates are based on slicing the finished loaf into 16 fairly generous slices. Knowing the approximate breakdown helps when you’re planning out your meals for the week. I always love seeing the fiber content being so high in whole grain baking!
Approximate Nutritional Breakdown Per Slice
- Serving Size: 1 slice
- Calories: 130
- Fat: 2g
- Carbohydrates: 25g
- Protein: 5g
- Sugar: 4g
See? It’s a wonderfully wholesome slice! If you are trying to cut back on sodium or fats, this recipe is already quite moderate, keeping saturated fat low. We keep the fat low by using just 2 tablespoons of butter for the whole loaf. It really proves you don’t need tons of rich fat to get a fluffy texture when you use the right flours and have a happy yeast colony.
Because this recipe has that touch of sweetness from the honey, it pairs wonderfully with lower-fat toppings. For instance, if you are pairing this bread with my low-sodium baked salmon, you get a balanced, healthy meal! It’s all about balancing flavor with goodness when you are baking at home.
Print
Easy Soft Honey Whole Wheat Sandwich Bread
- Total Time: 2 hours 5 minutes
- Yield: 1 loaf 1x
- Diet: Vegetarian
Description
Bake a soft, fluffy loaf of whole wheat bread perfect for daily sandwiches and toast using this simple recipe.
Ingredients
- 1 cup warm water (105-115°F)
- 2 1/4 teaspoons active dry yeast
- 1/4 cup honey
- 2 tablespoons unsalted butter, melted
- 1 1/2 teaspoons salt
- 1 1/2 cups warm water (lukewarm)
- 3 cups whole wheat flour
- 2 1/2 cups all-purpose flour (plus more for dusting)
Instructions
- Combine the warm water and yeast in a large bowl. Let it sit for 5 minutes until foamy.
- Stir in the honey, melted butter, and salt into the yeast mixture.
- Add the whole wheat flour and the first 1 1/2 cups of lukewarm water. Mix until just combined.
- Gradually add the all-purpose flour, mixing until a shaggy dough forms.
- Turn the dough out onto a lightly floured surface. Knead for 8 to 10 minutes until the dough is smooth and elastic. It will feel soft.
- Place the dough in a lightly oiled bowl, turning to coat. Cover the bowl with plastic wrap and let it rise in a warm place for 1 to 1.5 hours, or until doubled in size.
- Gently punch down the risen dough. Shape it into a loaf and place it in a greased 9×5 inch loaf pan.
- Cover the pan loosely and let the dough rise again for 30 to 45 minutes, or until it crests about 1 inch over the rim of the pan.
- Preheat your oven to 375°F (190°C).
- Bake for 30 to 35 minutes, or until the top is golden brown and the internal temperature reaches 200°F (93°C).
- Remove the loaf from the pan immediately and cool completely on a wire rack before slicing.
Notes
- For a softer crust, brush the top of the loaf with melted butter immediately after removing it from the oven.
- If your dough feels too sticky during kneading, add all-purpose flour one tablespoon at a time.
- Using lukewarm water is key for activating the yeast properly.
- Prep Time: 20 min
- Cook Time: 35 min
- Category: Baking
- Method: Baking
- Cuisine: American
Nutrition
- Serving Size: 1 slice
- Calories: 130
- Sugar: 4g
- Sodium: 180mg
- Fat: 2g
- Saturated Fat: 1g
- Unsaturated Fat: 1g
- Trans Fat: 0g
- Carbohydrates: 25g
- Fiber: 3g
- Protein: 5g
- Cholesterol: 5mg