Forget everything you think you know about making naan bread at home! I spent ages chasing that perfect, airy, slightly charred texture you get at your favorite Indian restaurant, usually ending up with tough, flat hockey pucks. But folks, I finally cracked the code. I’m so excited to share this incredibly easy homemade naan bread recipe with you because the magic happens right on your stovetop. Seriously, no fancy tandoor oven needed! This is easily the softest and fluffiest naan bread you will ever make. After years of disappointing flatbreads, this method finally delivered the chew I always craved. Get ready for bread therapy!
Why This Easy Homemade Naan Bread Recipe Works So Well
I know what you’re thinking: another flatbread recipe? Trust me, this one is different. We aren’t aiming for a simple quick bread here; we want that beautiful chew and puffiness. The secret sauce, oddly enough, is the combination of yogurt and a screaming hot, dry skillet. It’s a method that consistently beats out all the complicated ones I used to try. This is truly the key to mastering a Soft Naan Bread texture without needing an outdoor oven.
Achieving Soft Naan Bread Texture
The yogurt is non-negotiable; it adds lactic acid which tenderizes the dough beautifully, giving you that amazing softness. When you knead it properly—and make sure you knead it until it feels elastic!—you are building the gluten network needed for chew. When you pull on it later, it stretches instead of tearing apart. That structure is what traps those gorgeous air pockets that make this a fantastic Fluffy Naan Recipe.
The Skillet Naan Bread Magic: No Tandoor Needed
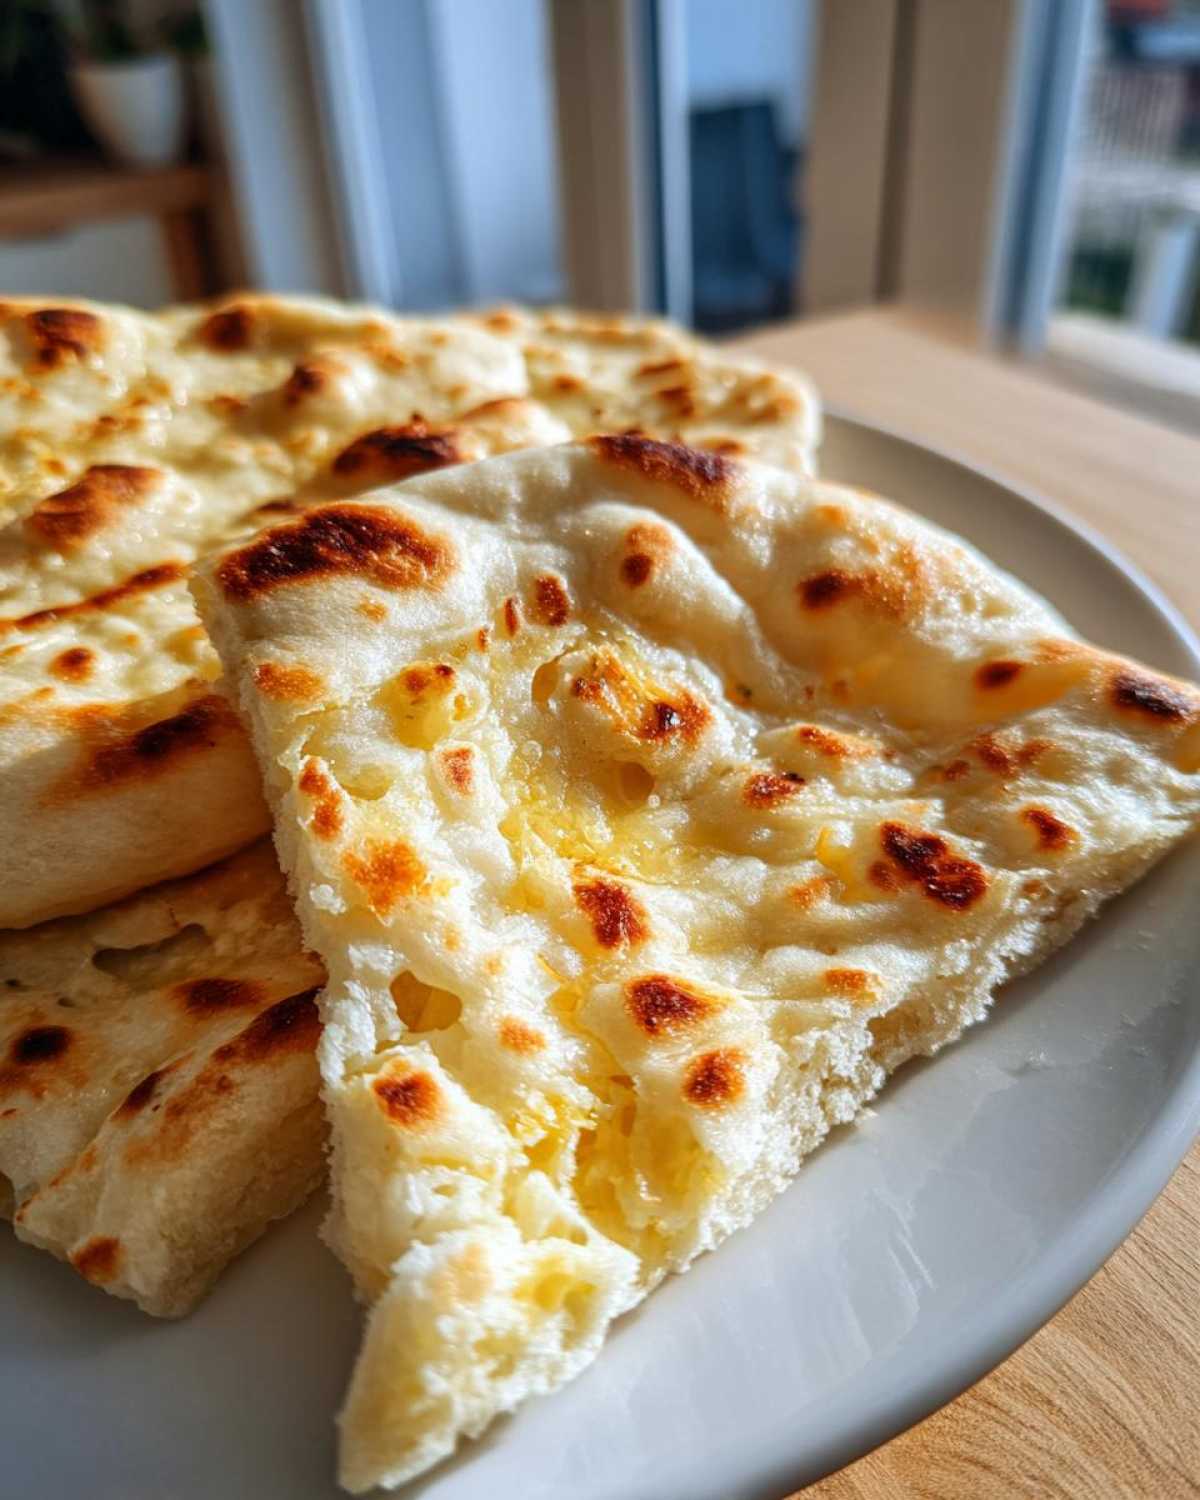
Forget trying to bake this in your regular oven. The real magic happens when you use a cast-iron skillet that will hold intense heat. We heat that pan until it’s practically smoking, and when that thin dough hits that surface, BAM! It steams and puffs up instantly, mimicking the fierce heat of a traditional tandoor. That’s what gives you those lovely charred spots and makes it feel like Better Than Takeout Bread.
Ingredients for Your Soft & Fluffy Garlic Naan Bread
Gathering your components is the fun part before the real work begins! I like to organize everything into two piles right on the counter—the dough stuff and the glorious topping stuff. Getting the water temperature just right is crucial for making the yeast happy, which is the foundation of a great Homemade Naan Bread Recipe. Don’t skimp on the full-fat yogurt either; it gives the dough that richness we’re after. Everything here leads to that amazing, chewy texture!
For the Naan Bread Dough
You’ll need 1 1/2 cups of warm water—and I mean 110°F, give or take! If it’s too hot, you kill your yeast; too cold, and it takes forever. Make sure you measure out exactly 2 1/4 teaspoons of active dry yeast so it foams up beautifully later. Then grab 3 1/2 cups of all-purpose flour (plus extra for dusting, obviously), 1 teaspoon of salt, 2 tablespoons of plain, full-fat yogurt (don’t grab the low-fat stuff, trust me!), and finally, 2 tablespoons of good olive oil.
For the Garlic Butter Topping
This is where the flavor explosion happens! You need 4 tablespoons of unsalted butter melted until it’s perfectly liquid. Make sure you mince 4 cloves of garlic—freshly minced, please!—to mix right into that butter for that incredible aroma when the bread comes off the skillet.
How to Prepare Perfect Stovetop Naan Bread Instructions
Alright, let’s get our hands dirty! This is the part that feels the most rewarding because you are actively turning simple flour and water into something magnificent. Remember that the results here—the fluffiness and the chew—depend entirely on following these steps precisely. We need that yeast to wake up, and we need our skillet to be absolutely blazing hot. Grab your big mixing bowl; we’re going step-by-step through the process for making amazing Skillet Naan Bread.
Activating the Yeast and Mixing the Simple Dough Recipe
First up, let’s wake the yeast! Pour your warm water (remember, 110°F!) into that bowl and stir in the sugar. Sprinkle the yeast right on top and leave it alone for about 5 to 10 minutes. If you see foam, congratulations, your yeast is alive and ready to party! If nothing happens, dump it and start over because we need that lift. Once it’s foamy, toss in the flour, salt, yogurt, and that 2 tablespoons of olive oil. Stir it all up until it looks like a total mess—a shaggy dough. That’s exactly what we want at this stage!
Kneading and Rising the Naan Bread Dough
Time to work that dough! Dump that sticky mess out onto a lightly floured surface. You need to knead this for a solid 5 to 7 minutes. Push, fold, turn, repeat. You’ll know it’s done when it’s smooth and starts feeling elastic when you pull it. Lightly oil your bowl, plop the dough in, give it a flip so it’s coated, cover it tight, and put it somewhere warm. It needs to rise for 1 to 1.5 hours, or until it’s doubled up—no cheating on the timing here! Once it’s peaked, punch it down gently, divide it into 8 equal pieces, and let those little balls rest for 10 minutes before shaping.
Shaping and Cooking the Skillet Naan Bread
While the dough rests, mix up your garlic butter so it’s ready to go. Now, make sure your heavy cast-iron skillet is cranked up over medium-high heat—it needs to be *very* hot, and remember, we cook it DRY, no oil in the pan! Roll one dough ball out into a thin oval shape, about 1/8 of an inch thick. Carefully lay it on that hot surface. Watch it! It should cook for about 1 to 2 minutes until big bubbles pop up underneath and it’s starting to brown. Flip it, cook the second side for just a minute until it gets those beautiful brown spots, pull it off immediately, and brush that glorious garlic butter all over the top. Stack them up and cover them lightly so they stay soft and warm while you cook the next batch!
Tips for Success Making Your Homemade Naan Bread Recipe
I’ve made this naan bread recipe so many times now that I can practically do it on autopilot, but there are definitely a few little tricks that make all the difference between a good batch and a truly spectacular one. Listen, if your bread comes out dense, don’t panic! Nine times out of ten, the issue is either hydration or, much more likely, the temperature of your cooking surface. These little adjustments are what push this from home baking into that authentic, chewy territory. If you have tried my focaccia bread recipes, you know I like my breads intense!
Troubleshooting Common Naan Bread Issues
The biggest mistake people make with the skillet method is not getting that pan hot enough. If your bread isn’t puffing up into beautiful little pillows, you need to crank that heat higher! Cast iron is your best friend here because it retains heat so well, but even stainless steel needs a good 10 minutes on medium-high heat before the first piece of dough touches it. If you happen to be baking other flatbreads, like a rosemary focaccia, you know the importance of pan prep. Also, if your dough feels too sticky when you roll it out, dust your counter generously—it’s better to use a little extra flour during rolling than to have a dough that drags and tears when you move it to the pan.
Making Buttery Naan or Plain Naan Bread
The garlic butter we made is heavenly, but sometimes you just want something simpler to dip in a rich curry. If you want plain naan, just skip mixing the garlic in and brush the hot bread with plain melted butter or even a little olive oil. If you want to lean into richness and make a decadent Buttery Naan, try brushing melted butter onto both sides as soon as it comes off the heat, and maybe even sprinkle it lightly with flaky sea salt while it’s still hot. It’s richer, but oh so worth the extra fat!
Naan Bread Variations: Garlic Naan Bread and Yeast Free Naan Option
We’ve made the standard soft naan, but the fun doesn’t stop there! I always have requests for the famous Garlic Naan Bread, which is why we made that buttery topping separately—you can easily brush some loaves with butter mixed with just garlic and salt, leaving others plain for the kids. But what if you are in a rush? I totally get it; sometimes overnight rising just isn’t happening.
Quick Homemade Bread: The Yeast Free Naan Option
If you need this Quick Homemade Bread right now, you can totally skip the yeast step! For this Yeast Free Naan Option, you need to swap out the yeast and sugar completely. Instead, mix 2 teaspoons of baking powder and about 1/2 teaspoon of baking soda right into your dry ingredients with the flour and salt. Because you’re skipping the yeast, you might need to add just a tiny bit more yogurt or a splash more water to make sure the dough hydrates nicely. You still knead it, but the rising time is cut way down—usually just 20 minutes of rest is enough before you roll them out!
Serving Suggestions for Naan Bread for Curry
Once you have your glorious stack of naan bread, what do you do with it? The obvious answer, of course, is scooping up rich, fragrant curry—it’s the ultimate pairing. But don’t stop there! These chewy flatbreads are amazing warmed up and used as dipping vehicles for hummus or yogurt raita. You can even slice them open once they cool slightly and use them instead of a pita for a sandwich pocket. They make a surprisingly fantastic base if you need a super quick, no-fuss pizza crust too!
Storage & Reheating Instructions for Leftover Naan Bread
The best naan is eaten immediately, piping hot with garlic butter dripping off, I won’t lie to you! But if you manage to have any leftovers—which is rare in my house—knowing how to store them is key to keeping that wonderful chewiness. Don’t just toss them in the fridge uncovered; they will turn into stiff cardboard quickly. For up to two days, keep them in an airtight container at room temperature. If you really need to keep them longer, the fridge is okay, but you absolutely must reheat them properly.
Microwaving naan is fast, but it often makes them rubbery. For the best results, I always go back to the skillet. Heat your dry cast-iron pan until it’s hot, and slap the naan on there for about 30 seconds per side. It re-crisps the outside and softens the inside perfectly. If you’re reheating a few at once, a quick 5 minutes in a moderate oven (350°F) wrapped loosely in foil works wonders too. This keeps our Chewy Flatbread wonderfully soft!
Frequently Asked Questions About Making Naan Bread
I always get questions after people try making their first batch of this Homemade Naan Bread Recipe! It’s just natural when you’re trying to replicate those restaurant results. Most of the questions revolve around texture and equipment, which makes total sense since getting that airy, chewy thing right can be tricky the first few times. Here are the answers to the things I hear the most when people try this Fluffy Naan Recipe!
Can I use milk instead of water for this Indian Flatbread Recipe?
Oh yes, you absolutely can, and it makes for a wonderfully rich Indian Flatbread Recipe! Milk contains fats and proteins that water doesn’t, so when you substitute milk (make sure it’s room temperature just like the water should be), the final naan comes out a little softer and richer tasting. The downside is that sometimes, the extra fat can inhibit the dough from puffing up quite as dramatically as it does with water. You might lose a tiny bit of that signature hollow puff, but you gain incredible tenderness. It’s a trade-off, but a delicious one!
What is the best pan to use for Skillet Naan Bread?
If you want that authentic, slightly charred look, your pan choice really matters for the Skillet Naan Bread! Honestly, my number one favorite is cast iron. You just cannot beat cast iron for holding an insane amount of heat evenly. If you don’t have cast iron, grab the heaviest, thickest stainless steel skillet you own. What you MUST avoid is a cheap, thin non-stick pan, because it won’t retain enough heat after you drop the cold dough in, and instead of cooking fast and puffing, it will just steam the dough slowly, leading to a tougher result. Pre-heat it for ages!
How long does homemade Naan Bread stay soft?
If you’re hoping for bread that tastes as fresh as when it came off the skillet three days later, you’re going to be disappointed, sorry! The reality is that the very best texture—soft and pliable—lasts about 4 to 6 hours once it cools down. After that, it definitely starts to firm up. That’s why I always recommend making this right before you eat! If you have leftovers, they are best eaten the next day, but only after being properly reheated using the skillet method we talked about earlier. They won’t stay truly soft for much longer than 24 hours, even sealed up tight.
Estimated Nutritional Data for This Naan Bread Recipe
I always feel a tiny bit awkward sharing nutritional information because, let’s be honest, when I’m making homemade naan bread, I’m really doing it for the pure joy of eating warm, garlicky bread, not for counting macros! But I know some of you are curious, so I’ve put together a general estimate based on the ingredients we used—especially since we’re loading it up with that lovely butter topping.
Please remember, these numbers are just a guideline! They are based on dividing the entire recipe (all 8 pieces) by the listed nutritional components. If you use less butter on your Homemade Naan Bread Recipe, or if you skip the garlic butter entirely for a plain version, your numbers will obviously be different. For the full breakdown of calories, fat, and carbs per piece, here’s what we are generally looking at:
- Serving Size: 1 piece
- Calories: 220
- Fat: 7g (with 4g being saturated fat from the butter)
- Carbohydrates: 35g
- Protein: 6g
It’s important to keep in mind that this data doesn’t account for what you use to dip it in—if you’re pairing this with a heavy butter chicken curry, your final meal will look quite different! I always point folks over to my recipes disclaimer page if they want the full details on how these estimates are calculated. Enjoy your phenomenal, restaurant-quality **naan bread**!
Share Your Best Naan Recipe Creations
Now that you’ve got the secrets to the fluffiest, chewiest, most sensational **naan bread** you’ve ever made at home, I really, really want to hear about it! Seriously, seeing your photos pop up on my social media feed while I’m working away is the best part of sharing these recipes. Did you manage to get those amazing leopard spots on your skillet? Did the garlic butter drip down the sides just like mine does? Don’t be shy!
If you followed along and made this incredible Fluffy Naan Recipe, please take a minute to leave a rating for the recipe right here on the page. Stars help other folks know this recipe is worth their time, and detailed comments about your experience are gold to me. Were you surprised how easy the stovetop method was? Did you try the yeast-free alternative? Drop all your thoughts, tips, and successes in the comments section below!
If you have any questions as you go, or maybe just want to share a picture of the amazing dinner you made using this bread—perhaps a wicked lamb curry—you can always reach out directly via my contact page too. Happy baking, and enjoy scooping up every last bit of sauce with your perfect, homemade **naan bread**!
Print
Easy Homemade Soft & Fluffy Garlic Naan Bread (Stovetop Method)
- Total Time: 1 hour 45 min
- Yield: 8 servings 1x
- Diet: Vegetarian
Description
Make soft, fluffy, restaurant-quality naan bread on your stovetop using a simple dough recipe. This version includes garlic butter for extra flavor.
Ingredients
- 1 1/2 cups warm water (about 110°F)
- 1 teaspoon sugar
- 2 1/4 teaspoons active dry yeast
- 3 1/2 cups all-purpose flour, plus more for dusting
- 1 teaspoon salt
- 2 tablespoons plain yogurt (full fat recommended)
- 2 tablespoons olive oil, plus more for brushing
- 4 cloves garlic, minced
- 4 tablespoons unsalted butter, melted
Instructions
- Combine the warm water and sugar in a large bowl. Sprinkle the yeast over the top and let it sit for 5 to 10 minutes until foamy.
- Add the flour, salt, yogurt, and 2 tablespoons of olive oil to the yeast mixture. Mix until a shaggy dough forms.
- Turn the dough out onto a lightly floured surface. Knead for 5 to 7 minutes until the dough is smooth and elastic.
- Place the dough in a lightly oiled bowl, turning to coat. Cover the bowl with plastic wrap or a clean towel and let it rise in a warm place for 1 to 1.5 hours, or until doubled in size.
- Punch down the risen dough gently. Divide it into 8 equal pieces and roll each piece into a ball. Let the balls rest for 10 minutes.
- While the dough rests, prepare the garlic butter: Mix the minced garlic and melted butter together in a small bowl.
- Heat a heavy-bottomed skillet or cast-iron pan over medium-high heat until very hot. Do not add oil to the pan.
- Working with one ball at a time, roll the dough into an oval shape about 1/8 inch thick.
- Place one piece of rolled dough onto the hot, dry skillet. Cook for 1 to 2 minutes until bubbles form on the surface and the underside is lightly browned.
- Flip the naan and cook the second side for about 1 minute until browned spots appear.
- Remove the cooked naan from the skillet and immediately brush the top generously with the garlic butter mixture.
- Repeat with the remaining dough pieces, stacking the cooked naan and keeping them covered lightly to stay warm.
Notes
- For a yeast-free option, substitute the yeast and sugar with 2 teaspoons of baking powder and 1/2 teaspoon of baking soda added directly to the dry ingredients. Increase the yogurt slightly for moisture.
- If you prefer plain naan, skip the garlic butter and brush the cooked bread with plain melted butter or olive oil.
- To get the characteristic charred spots, ensure your skillet is very hot before placing the dough down.
- Prep Time: 20 min
- Cook Time: 15 min
- Category: Side Dish
- Method: Stovetop Cooking
- Cuisine: Indian
Nutrition
- Serving Size: 1 piece
- Calories: 220
- Sugar: 2
- Sodium: 350
- Fat: 7
- Saturated Fat: 4
- Unsaturated Fat: 3
- Trans Fat: 0
- Carbohydrates: 35
- Fiber: 2
- Protein: 6
- Cholesterol: 15