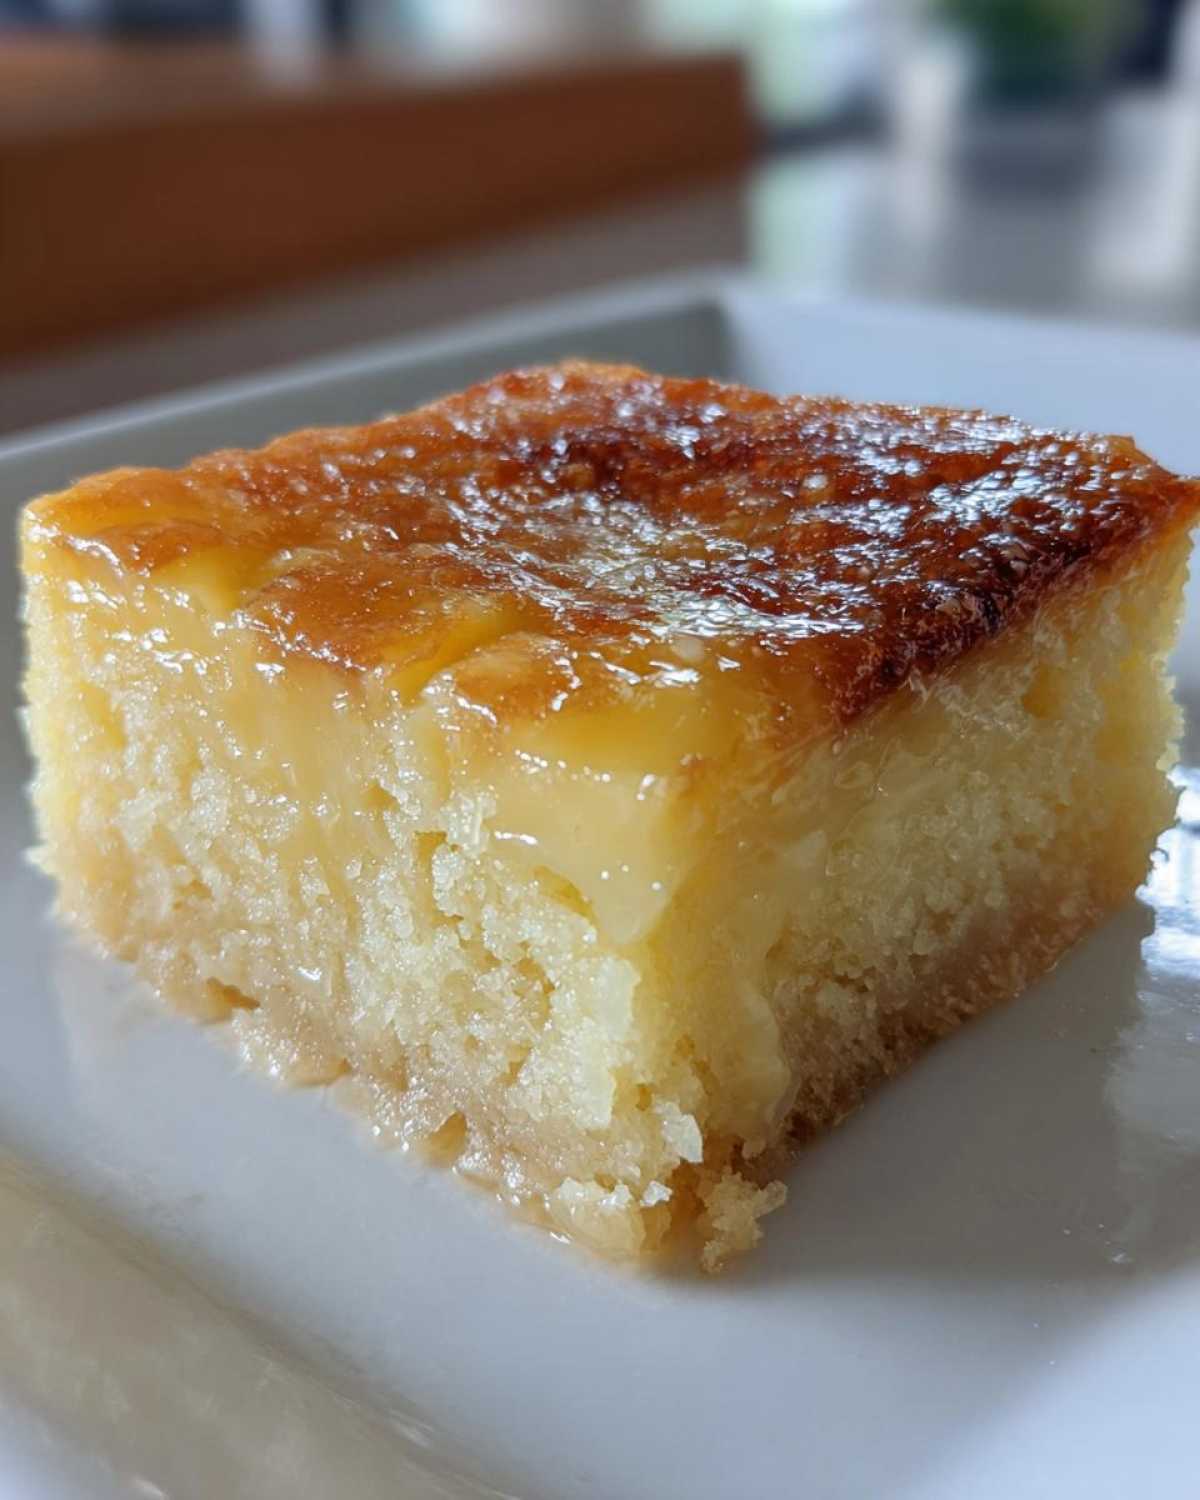
Oh, Filipino desserts! Nothing beats that warm, comforting feeling you get from a truly perfect sweet treat that tastes like home, right? For me, that has always been the classic cassava cake. Forget those complicated recipes that make you feel like you need a culinary degree just to get started. I spent years messing around with ratios until I cracked the code for a super creamy cassava cake that actually tastes traditional, but is so incredibly simple to make. Trust me when I say this easy cassava cake recipe is going to be your new secret weapon for parties or just an amazing afternoon merienda. It’s moist, it’s chewy, and that golden topping? Pure magic.
Why This Easy Cassava Cake Recipe Works So Well
I know there are fancy versions out there, but this recipe is designed to deliver that authentic, rich Filipino flavor without stressing you out. We keep things straightforward so you can focus on enjoying the results! This is truly the best way to approach making this classic dessert at home.
- It hits all the right texture notes: chewy, moist, and wonderfully dense.
- The optional custard topping brings that sought-after layer of creamy richness we all crave.
- It uses simple pantry staples, making it perfect for a quick batch, even if you’re just starting out with baking.
If you want to compare techniques, you might also check out some of my other straightforward bakes, like this easy gluten-free cake—simplicity always wins!
Achieving the Perfect Moist Chewy Dessert Texture
The secret sauce here, aside from the grated cassava itself, is the heavy use of full-fat coconut milk and sweetened condensed milk. These liquids don’t just add flavor; they create the perfect environment for baking. They soak into the root vegetable as it cooks, guaranteeing you end up with that signature moist chewy dessert texture that separates a good cassava cake from a dry, sad one. You absolutely cannot skimp on the fats here!
Simple Steps for a Creamy Cassava Cake
What makes this an easy cassava cake recipe is how little fuss you have during mixing. It’s truly a dump-and-stir situation until the custard gets involved. There is no complicated folding or over-aerating needed for the base. We are aiming for simplicity to ensure anyone can pull off this creamy cassava cake that tastes like it came straight from a neighborhood bakery.
Essential Ingredients for Traditional Filipino Cassava Cake
Getting this right starts with using exactly what you need. I’ve learned that when you respect the core ingredients—especially the dairy and root vegetable—the cake does most of the work for you. Don’t try to swap out the full-fat coconut milk for light; you’ll lose that depth of flavor that makes this a true traditional Filipino dessert. If you’re working with frozen grated cassava, remember moisture control is key! You have to squeeze out that excess water before you mix everything, or your base will be runny.
For a truly luxurious experience, check out how I use coconut milk in my coconut milk rice pudding with mango—it’s the same rich base flavor we are aiming for here!
Base Layer Ingredients for Your Cassava Cake
This is the hearty, chewy foundation of our cassava cake. Make sure your eggs are at room temperature if you can manage it, though it’s not strictly required for this simple mixture.
- 3 cups grated fresh or frozen cassava, thawed (remember to squeeze out the liquid!)
- 1 can (13.5 oz) full-fat coconut milk – this is non-negotiable for richness!
- 1 can (14 oz) sweetened condensed milk
- 1 cup white sugar
- 4 large eggs
- 1/2 cup melted unsalted butter
- 1 teaspoon vanilla extract
- 1/2 cup macapuno strings (optional, but so worth it for that sweet coconut sport texture)
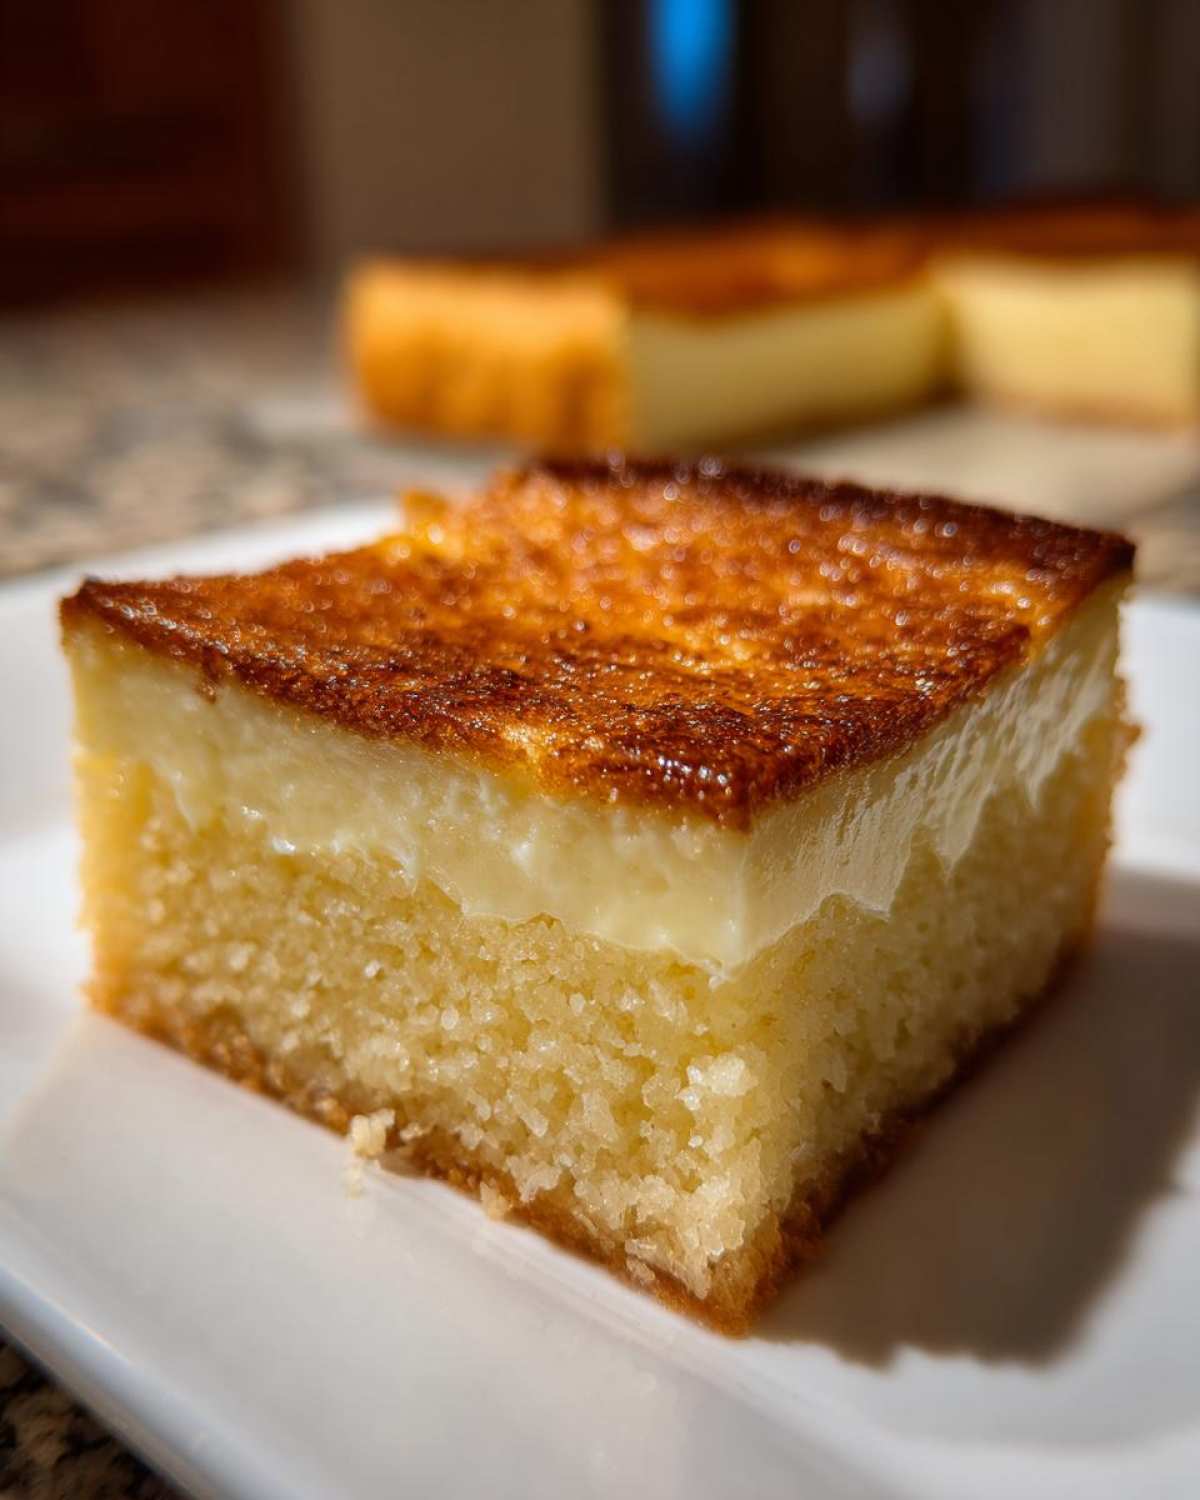
Crafting the Creamy Cassava Cake with Custard Topping
The topping is what elevates this from a simple baked pudding to a show-stopping dessert. The cornstarch is essential here because it thickens the custard quickly on the stovetop, giving you that beautiful, spoonable texture.
- For the Custard Topping:
- 1 can (13.5 oz) full-fat coconut milk (yes, another can!)
- 1/2 cup granulated sugar
- 2 large egg yolks
- 1 tablespoon cornstarch
- 1/4 cup shredded cheese (optional, but highly encouraged if you love that salty-sweet topping common in a classic Filipino cassava cake)
How to Prepare Your Cassava Cake with Custard Topping
Okay, this is where the real fun begins! Even though we’ve got a lot of steps here, I promise they flow naturally. Think of it like putting together a puzzle—each piece fits perfectly and moves you closer to that amazing, creamy cassava cake. We’re going to bake the base first, whisk up that gorgeous topping while it bakes, and then combine them for the grand finale! While you’re waiting for the oven to heat for the second round, you can check out my wacky but super fun easy Grinch punch recipe to keep the kitchen energy up!
Prepping the Pan and Baking the Base
First things first: get your oven humming at 350°F (175°C). Grab your 9×13 inch pan—you absolutely must grease it well and then line the bottom with parchment paper. This is my safety net, especially since this baked cassava dessert is very rich and can stick! Pour your mixed batter right into that prepped pan. Now, slide it in and let it bake for about 45 to 55 minutes. You’re looking for the edges to start setting up and getting just a tiny bit golden. Don’t worry if the center still looks a little jiggly; that’s totally normal because the topping is coming next!
Making the Rich Custard Topping
While that base is setting, whip up your topping. In a saucepan—and please use a whisk!—combine that second can of coconut milk, sugar, egg yolks, and the cornstarch. This step demands your attention: heat it over medium and stir constantly. Seriously, don’t walk away! We are cooking this until it thickens enough to coat the back of your spoon—that’s the tell-tale sign it’s ready. It should take maybe 5 to 8 minutes. Try not to let it boil hard, or you’ll end up scrambling the yolks. Once it coats the spoon beautifully, take it right off the heat.
Final Bake and Cooling for the Best Cassava Cake
Carefully pull that semi-baked base out of the oven. Gently spoon your warm custard topping evenly over the top—try not to stir it into the base layer, we want distinct layers! Pop the whole thing back into the oven for another 15 to 20 minutes. The custard should look set and maybe just lightly browned. If you’re using cheese, sprinkle it on during the last 5 minutes! My biggest tip for serving this homemade cassava cake perfectly? Let it cool completely—and I mean completely—on a wire rack. If you slice it hot, it’ll fall apart. Patience here gives you that beautiful, clean slice and the perfect set for that moist chewy dessert texture!

Tips for Success Making Homemade Cassava Cake
I want you to have the same success I do every time I make this! Since this is such a rich, root-vegetable-based dessert, a few little tricks can make all the difference between a good cake and an absolutely unforgettable one. Remember, building trust means sharing the insider knowledge, like the little secrets I found in my grandma’s old recipe notebook!
If you ever feel like you need an ultra-reliable binder, I have a terrific foolproof guide for homemade mayonnaise that might inspire your next project, but for this cassava cake, stick to the basics below!
Ingredient Preparation Secrets for Your Cassava Cake
The cassava itself is the key player here. If you are using frozen grated cassava—and hey, sometimes we all need a shortcut—you must absolutely squeeze out as much liquid as you can after it thaws. I mean, really wring it out! Excess water is the enemy of set custard and a firm base. You want a damp, fibrous texture, not a watery one. Also, while this recipe is forgiving, try to let your eggs sit out for maybe 15 minutes before mixing them in. They incorporate much better into that thick batter when they aren’t fridge-cold.
Custard Topping Adjustments for a Creamy Cassava Cake
The standard topping is amazing, don’t get me wrong, but if you want to take that creamy richness up several notches, try a little swap in the custard. The notes suggest you can substitute half of the sugar in the topping with heavy cream. Why does this work so well? Heavy cream introduces more fat, which yields an even more velvety, decadent finish when it sets. It slows down the setting process just a tiny bit, too, making the final texture unbelievably smooth. It’s an easy little tweak for a truly spectacular creamy cassava cake anytime you bake!

Serving Suggestions for this Filipino Cassava Cake
This rich and sweet Filipino cassava cake is naturally perfect on its own, but sometimes you want to build out a full spread, especially for gatherings! If you’re setting up a proper Filipino merienda ideas table, I find that something bright and tart really cuts through the richness of the coconut and condensed milk perfectly. Think fresh fruit slices—maybe some sweet mango or pineapple.
For drinks, skip the heavy sodas and go for something light and bubbly. I love making a big pitcher of my non-alcoholic sparkling pomegranate mocktail to serve alongside it. The slight acidity in the pomegranate helps cleanse the palate between bites of this wonderful cassava cake!
Storage and Reheating Instructions for Leftover Cassava Cake
One of the greatest things about this cassava cake is that it actually gets better the next day. Seriously! That extra time in the fridge lets all those sweet, creamy flavors really meld together. This is one of those desserts where chilling is part of the process, not just an afterthought. If you’re looking for the results of the best cassava cake recipe, you have to give it a good rest!
To store your leftovers, cover the pan tightly with plastic wrap, or transfer slices into an airtight container. You don’t even need to grease anything extra for storage, since the fat content keeps it moist. It keeps beautifully in the refrigerator for up to four days. I never reheat mine; I honestly think the dense, cold texture is the absolute best way to enjoy this moist chewy dessert.
However, if you absolutely must have it slightly soft, don’t even think about using the microwave! The microwave will try its best, but it always ends up making the edges tough. If you want to revive a slice, your best bet is to let it sit on the counter for about 30 minutes before serving, or give it a very short stint in a low oven (maybe 250°F for five minutes). For more ideas on handling leftovers, my guide to repurposing dinner favorites, like this holiday leftover minestrone soup recipe, highlights why slow and gentle reheating methods are always superior!
Frequently Asked Questions About Cassava Cake
I get so many questions whenever I post this recipe because everyone wants to make sure their homemade cassava cake turns out perfect! It’s natural to have a few worries when baking with root vegetables for the first time. Here are some of the ones I hear most often when folks are trying this easy cassava cake recipe.
Can I make this cassava cake recipe without an oven?
Sadly, for this version, no! Since we are aiming for that classic, rich cassava cake with custard topping, you really do need the oven. The base needs the dry heat to set properly, and the custard topping needs to bake on top until it’s firm and beautifully browned—you can’t achieve that on the stovetop like a regular pudding. If you’re hunting specifically for a cassava cake no bake version, you’d be looking at a completely different recipe that usually sets up in the fridge using gelatin or more condensed milk, which won’t give you this beautiful baked texture.
What is the difference between cassava cake and tapioca cake recipe?
This is a fun one that confuses folks all the time! Essentially, they are very closely related, especially in terms of flavor profile. Cassava itself is often called yuca, and when it’s grated, it acts very much like tapioca starch. Most recipes labeled as tapioca cake recipe are very similar to this one, often using either fresh/frozen grated cassava or pre-made tapioca pearls/flour. Because cassava is a starchy tropical root vegetable cake, it gives that characteristic chewiness. If a recipe uses dried tapioca pearls, it will be slightly more translucent and jelly-like, while using ground cassava flour or grated fresh cassava—like in our recipe—yields that dense, moist, and slightly more rustic texture we all love in our Filipino dessert!
If you are looking into the technical specifics of ingredients, you can always review my site’s formal terms and conditions, but for baking advice, just ask away!
Nutritional Estimates for Cassava Cake
Now, listen closely, because even though this cassava cake is truly divine, it definitely leans toward the decadent side of the spectrum. It’s made with coconut milk, condensed milk, and sugar, so it’s a perfect treat, but maybe not an everyday snack! I’ve pulled together the average estimates based on the amounts we use in this recipe, but remember, since we’re using real ingredients and you might be adding extra cheese or macapuno, these figures are just a guidepost, okay?
This information is fantastic if you are tracking macros or just curious about what you’re enjoying. It represents one slice based on a 12-serving yield from the 9×13 pan. For example, the fat content is definitely higher, which is exactly why the cake is so incredibly moist!
- Serving Size: 1 slice
- Calories: 350
- Sugar: 35g (Yep, it’s a sweet one!)
- Sodium: 150mg
- Fat: 18g
- Saturated Fat: 15g
- Unsaturated Fat: 3g
- Trans Fat: 0g
- Carbohydrates: 45g
- Fiber: 2g
- Protein: 5g
- Cholesterol: 60mg
Keep in mind that these numbers can bounce around quite a bit depending on the brand of coconut milk you grab or how generously you slather on that optional cheese topping! That said, it’s proof that the richness comes from the good fats and coconut flavor we worked so hard to include. Enjoy this incredible Filipino cassava cake knowing exactly what you’re indulging in!
Share Your Homemade Cassava Cake Experience
Whew! We did it! Now you have the blueprint for what I truly believe is the most satisfying, classic, and easy Filipino cassava cake you’ll ever make. I really, truly hope you loved pulling this together as much as I love making it every time!
The best part of sharing these recipes is hearing from you guys when you bring these sweet treats to your own family gatherings. Did you try the macapuno? Did you go all-in with the salty cheese on top? Tell me everything!
Seriously, pop down to the comments below and let me know how your bake went. If you followed these steps for the easy cassava cake recipe, let me know what rating you’d give it—five stars, I hope! A rating really helps other bakers feel confident jumping into a new recipe.
And hey, if you snap a picture of your golden-topped masterpiece, tag me on social media! Seeing you enjoy this wonderful, moist chewy dessert makes all the trial and error worthwhile. I always love seeing my recipes come to life in your kitchens. If you have any last-minute questions or want to connect directly about your baking journey, you can always hop over to my contact page!
Print
Easy Creamy Filipino Cassava Cake with Custard Topping
- Total Time: 95 min
- Yield: 12 servings 1x
- Diet: Vegetarian
Description
A simple recipe for traditional Filipino cassava cake, resulting in a moist, chewy base topped with a rich, creamy custard layer.
Ingredients
- 3 cups grated fresh or frozen cassava, thawed
- 1 can (13.5 oz) full-fat coconut milk
- 1 can (14 oz) sweetened condensed milk
- 1 cup white sugar
- 4 large eggs
- 1/2 cup melted unsalted butter
- 1 teaspoon vanilla extract
- 1/2 cup macapuno strings (optional)
- For the Custard Topping:
- 1 can (13.5 oz) full-fat coconut milk
- 1/2 cup granulated sugar
- 2 large egg yolks
- 1 tablespoon cornstarch
- 1/4 cup shredded cheese (optional, for garnish)
Instructions
- Preheat your oven to 350°F (175°C). Grease and line a 9×13 inch baking pan with parchment paper.
- In a large bowl, combine the grated cassava, 1 can of coconut milk, condensed milk, sugar, eggs, melted butter, and vanilla extract. Mix well until fully combined.
- If using, stir in the macapuno strings.
- Pour the batter into the prepared baking pan.
- Bake the base layer for 45 to 55 minutes, or until the edges are set and lightly golden.
- While the base bakes, prepare the custard topping. In a small saucepan, whisk together the second can of coconut milk, sugar, egg yolks, and cornstarch until smooth.
- Cook the custard mixture over medium heat, stirring constantly, until it thickens enough to coat the back of a spoon (about 5 to 8 minutes). Do not let it boil rapidly.
- Remove the partially baked cassava cake from the oven. Carefully spread the warm custard topping evenly over the cake base.
- Return the cake to the oven and bake for another 15 to 20 minutes, until the custard is set and lightly browned. If using cheese, sprinkle it over the custard during the last 5 minutes of baking.
- Let the cassava cake cool completely in the pan before slicing and serving.
Notes
- If you use frozen grated cassava, make sure to squeeze out any excess liquid before mixing the batter.
- For a richer topping, substitute the 1/2 cup sugar in the custard with 1/4 cup sugar and 1/4 cup heavy cream.
- This cake tastes best when chilled for several hours before serving.
- Prep Time: 20 min
- Cook Time: 75 min
- Category: Dessert
- Method: Baking
- Cuisine: Filipino
Nutrition
- Serving Size: 1 slice
- Calories: 350
- Sugar: 35
- Sodium: 150
- Fat: 18
- Saturated Fat: 15
- Unsaturated Fat: 3
- Trans Fat: 0
- Carbohydrates: 45
- Fiber: 2
- Protein: 5
- Cholesterol: 60