You know those moments when you are craving that satisfying, deep-fried crunch but you really, really don’t want to deal with a huge vat of hot oil? I live for those moments now! That’s why I’m absolutely obsessed with turning snacks low-oil-but-high-flavor with my air fryer. Forget mushy disappointment; this recipe delivers the jackpot.
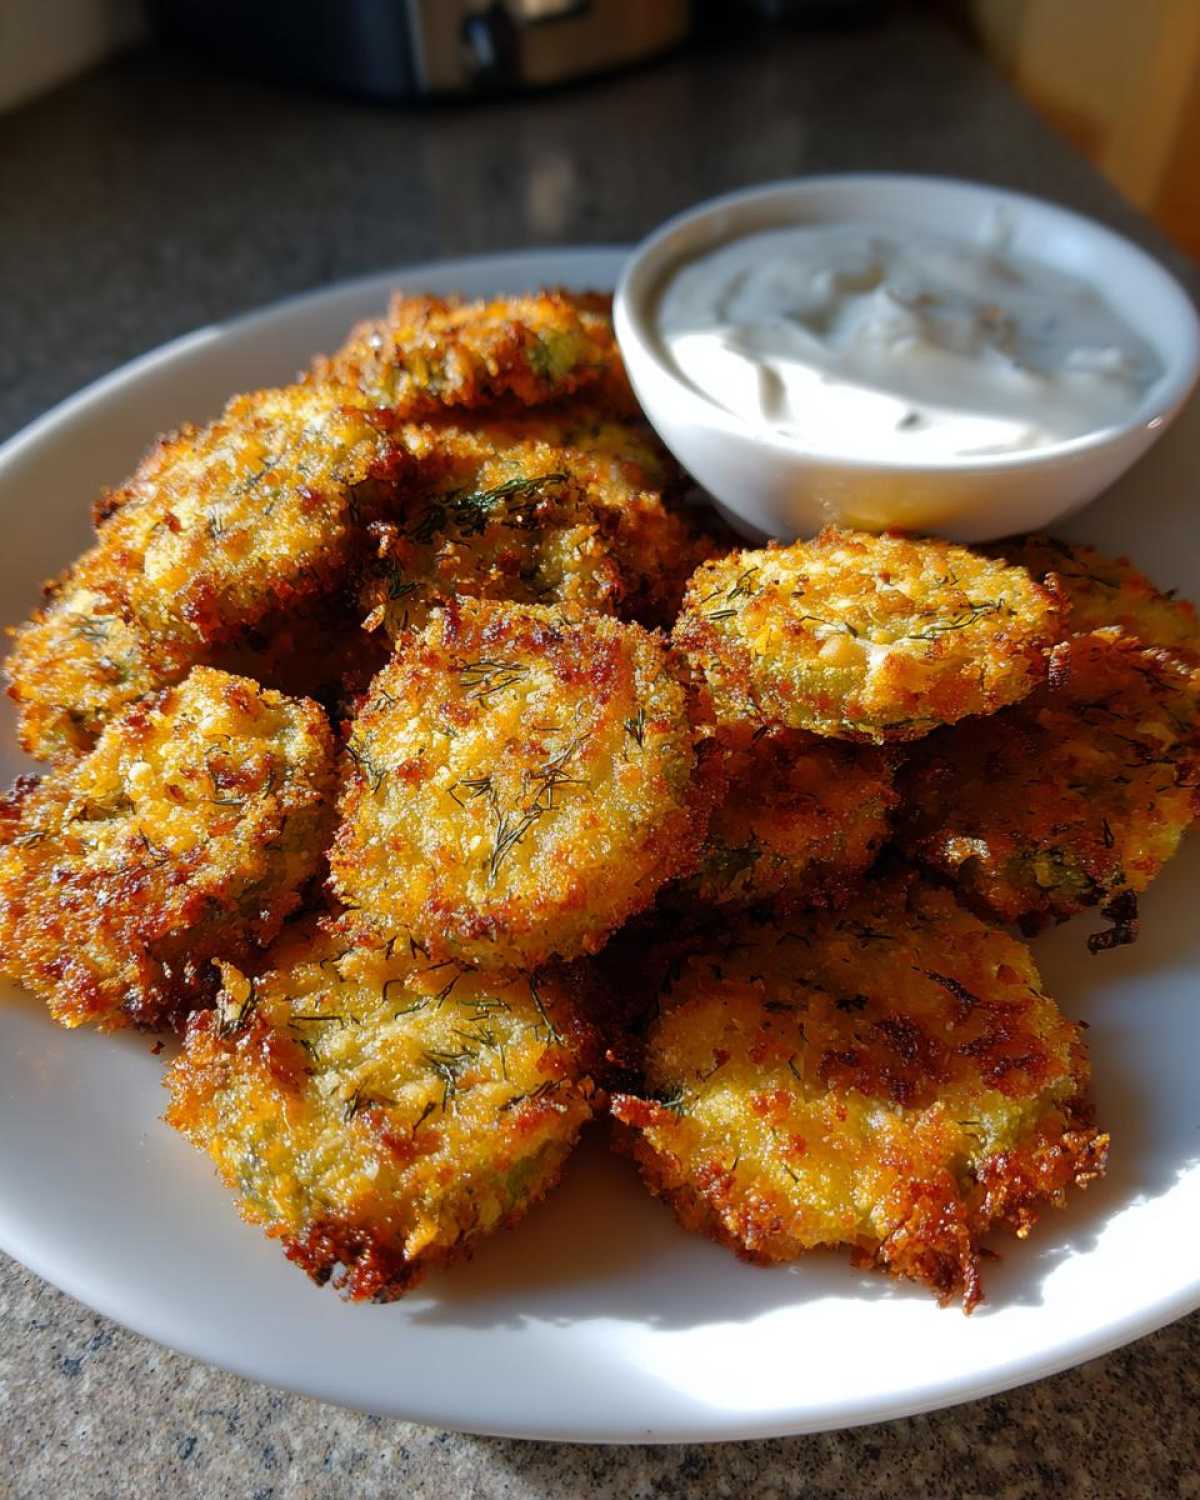
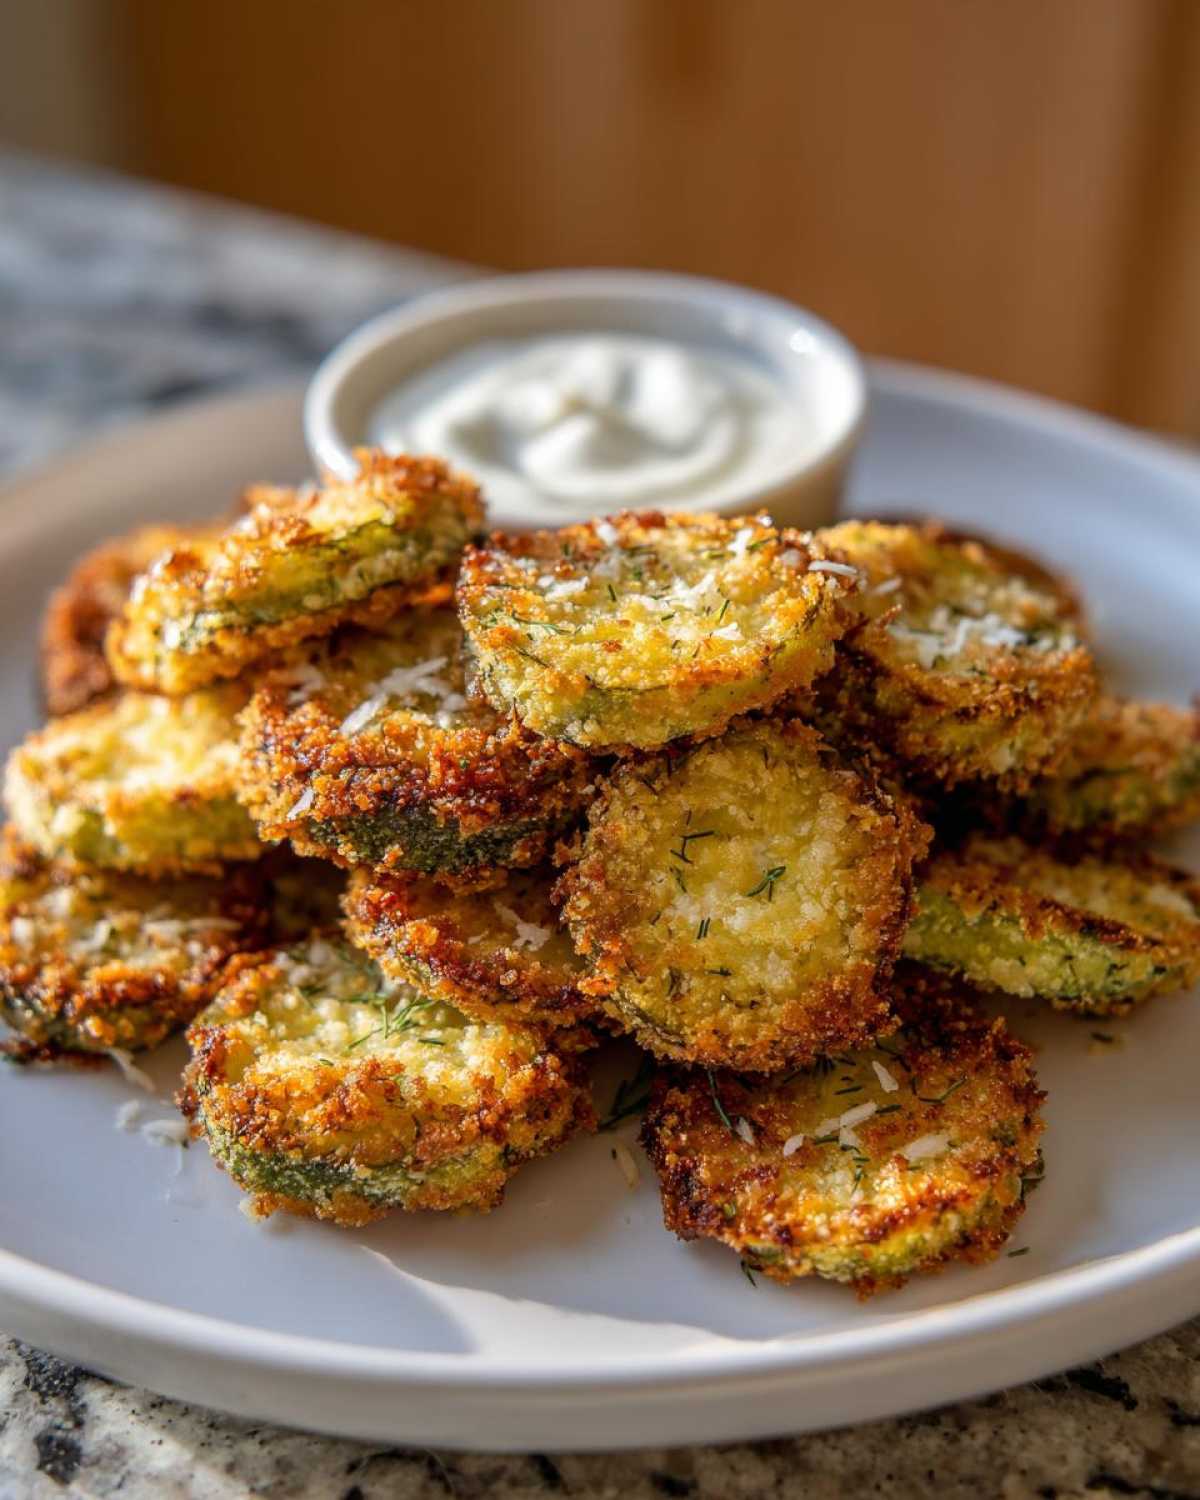
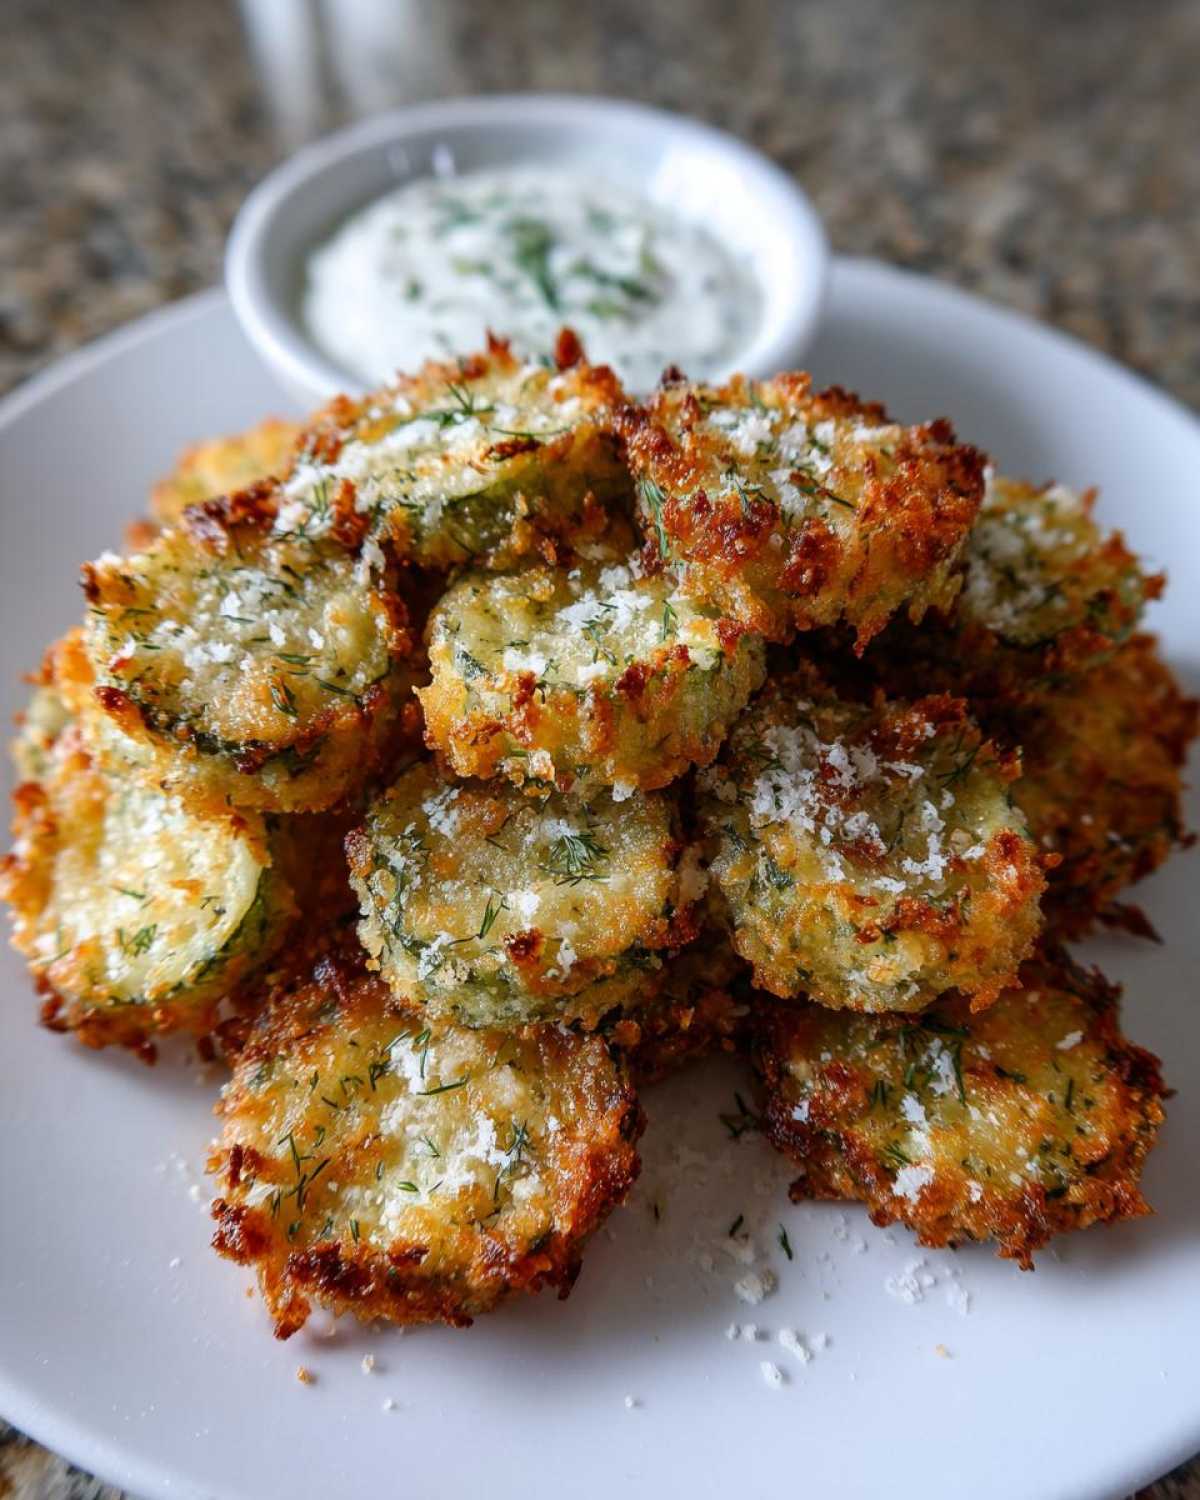
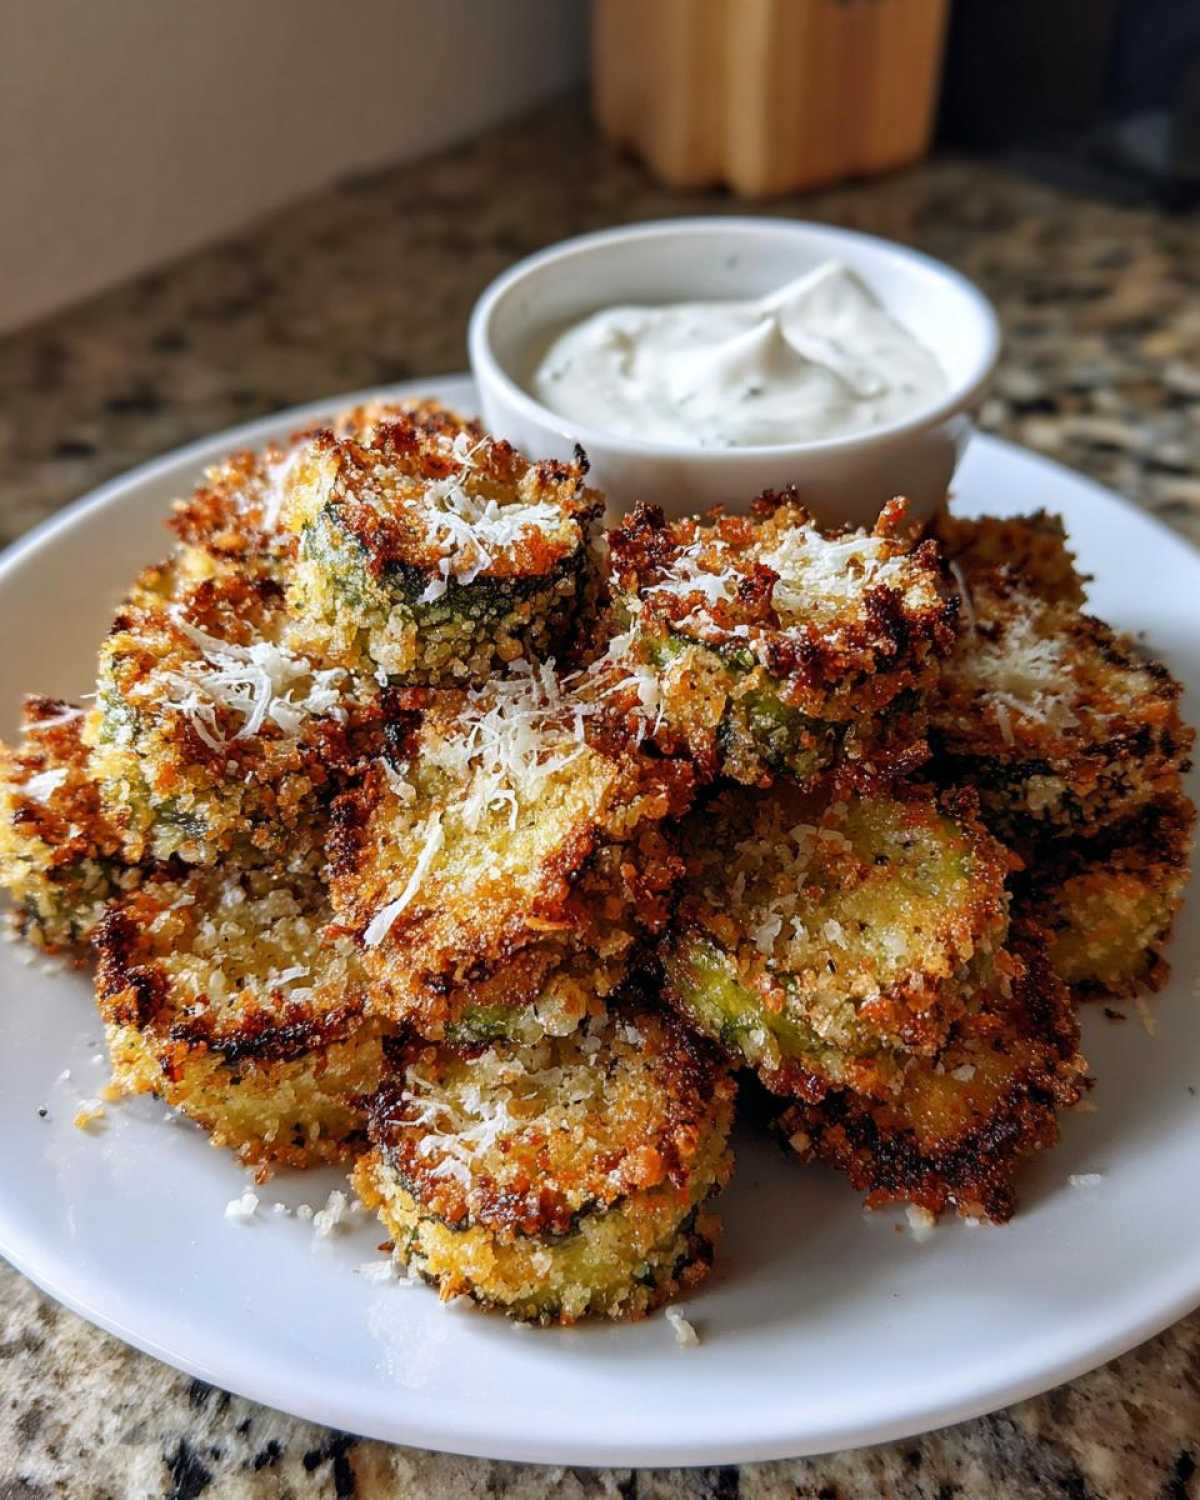
We are talking about the ultimate savory hit: **Air Fryer Crispy Garlic Dill Pickles**. Seriously, these are my go-to game day snack, and they turn out perfectly golden and crunchy every single time. The secret, and I mean the *real* secret, is locking in that moisture when you bread them. It took me three tries to get the coating right so it locks onto the pickle like glue, but trust me, once you master that dredging technique, you’ll never look back. These crunchy little babies are the best!
Why You Will Love This Air Fryer Crispy Garlic Dill Pickles Recipe
I’ve tried a million ways to make a good homemade air fryer snack, but these pickles? They are something special. They hit all the right notes for a quick, satisfying bite. You absolutely have to try these!
- That Crunch You Crave: The breading mixture, which I talk about in detail later, turns out incredibly crisp. It holds up beautifully in the air fryer basket, making these the best Air Fryer Pickles I’ve ever made.
- Flavor Explosion: We aren’t skimping on the seasoning here! The combination of tangy dill weed and robust garlic powder sinks right into the panko, making every bite intensely savory. It’s officially my favorite Garlic Dill Air Fryer Snack.
- It’s So Fast: Seriously, if I decide I need an appetizer on short notice, I can have these ready faster than ordering takeout. This is a true Quick Air Fryer Appetizer transformation.
- A Lighter Take: If you love the taste of fried snacks but hate the grease, this is your answer. It’s a fantastic Healthy Fried Pickles Alternative because we’re using just a tiny bit of spray oil.
- Perfectly Portion Controlled: Since you can’t pile them high in the basket, you end up making just the right amount without mindlessly eating an entire deep-fried bag.
Ingredients for Air Fryer Crispy Garlic Dill Pickles and Dip
Okay, listen up, because the ingredients are super straightforward, but one thing separates the soggy mess from the crunchy winner. You absolutely, positively MUST drain those pickles and pat them bone dry. Like, pat them until you think they might crumble. That step is the foundation for achieving that true ‘Crispy Fried Pickles Air Fryer’ texture, so don’t rush it!
Here is everything you need to gather up for this addictive snack. I always like to have everything measured out before I start the breading process; things move quickly once you get going!
- 1 jar (16 oz) dill pickle chips or spears. Don’t forget to drain and dry them well!
- 1 large egg
- 1/4 cup all-purpose flour
- 1/2 cup panko breadcrumbs (Panko makes all the difference, trust me!)
- 1/4 cup finely grated Parmesan cheese (this adds a savory kick we love)
- 1 teaspoon garlic powder
- 1/2 teaspoon dried dill weed
- 1/4 teaspoon black pepper
- Cooking spray—make sure it’s an oil-based spray to help that golden crust form!
For the Creamy Ranch Dipping Sauce
You can’t have amazing homemade air fryer pickles without a killer dip on the side. This ranch is so easy, and frankly, it’s way better than anything that comes out of a bottle. If you want to see a full recipe with a couple of extra twists, check out my lighter ranch alternative, but this quick version is perfect for immediate gratification:
- 1/2 cup mayonnaise
- 1/4 cup sour cream
- 1 tablespoon dried parsley
- 1/2 teaspoon garlic powder
- 1/4 teaspoon onion powder
- Salt and pepper to taste
Once you have all this gathered, you are halfway to the best Air Fryer Pickles Recipe you’ll ever try. Get that prep work done first!
Mastering the Breading for Air Fryer Crispy Garlic Dill Pickles
Okay, this is where the *magic* happens, folks. Getting that perfect, unbroken, super-crunchy shell on our **Crispy Fried Pickles Air Fryer** creation is all about the dredging station. If you just toss your wet pickles into the breadcrumbs, they’ll fall off halfway through cooking, and nobody wants that sad, soggy outcome. So, we set up a disciplined three-bowl system. It sounds fancy, but it’s really just organization!
First up, Bowl One: the flour. This layer acts like the first step in grabbing hold of the pickle surface. You want a light dusting here. Next comes Bowl Two, the egg wash—this is our sticky glue! Finally, Bowl Three is the texture powerhouse. This is where we combine our panko breadcrumbs, the savory Parmesan cheese, the garlic powder, and the dried dill.
My little expert tip, something I learned after my first batch looked a little patchy? Make sure that Parmesan cheese gets broken down finely and mixed thoroughly into the panko *before* you start breading anything raw. I like to crush it a little more with the back of a spoon in the breadcrumb bowl. You want that cheesy goodness integrated for great flavor streaks, not big clumps that burn up in the air fryer. This technique ensures every single one of these **Homemade Air Fryer Pickles** comes out looking golden and totally perfect, just like the ones I share in my Garlic Parmesan Roasted Chickpeas recipe!
When you dip them, use one hand for the dry stuff (flour/panko) and the other for the wet stuff (egg). This stops your fingers from getting entirely gummed up. Coat firmly in the panko mix—press it in there! The firmer the coating, the less likely it is to detach during cooking.
Step-by-Step Instructions for Air Fryer Crispy Garlic Dill Pickles
Alright, the prep work is done—your dredging station is set, and those beautiful pickles are coated! Now it’s time to put them to work in the air fryer. Remember, the air fryer is essentially a tiny, high-powered convection oven, so we have to treat it right! Speed and space are your best friends here.
- First things first, get that air fryer humming! You need to preheat it to 380°F (195°C) for a solid 5 minutes. If your basket is cold when you put the breaded pickles in, they’ll just steam instead of crisping up immediately. Don’t skip the heat!
- Give the basket a nice, light coat of your cooking spray. We don’t want them sticking, but we also don’t want to drown the beautiful coating we just made.
- Carefully lay your coated pickles down in the basket. This is super important: they must be in a single layer! If they overlap even a little bit, you end up with soggy spots where the hot air can’t circulate. Think of it like arranging fries; you need space for maximum effectiveness in achieving that Crunchy Pickle Chips Air Fryer result.
- Spray the tops of the pickles lightly with that cooking spray again. They need a little oil on top to brown properly.
- Now, cook them for about 8 to 10 minutes total. You’ve got to flip them halfway through, around the 4 or 5-minute mark, so they get golden and crispy on both sides.
While they are cooking, whip up that creamy ranch dip—it only takes a second. Trust me, pulling those hot, savory, crunchy pickles out and dipping them into cool, tangy ranch is pure joy.
Preparing the Pickles: The Secret to Crispiness
I cannot stress this enough: Step one is all about the moisture removal. The pickle brine is mostly water and salt. If you put a wet pickle into flour, guess what happens? You get wet flour, which instantly turns into a soggy paste when it hits the heat. That breading needs to be dry to adhere properly and puff up into a crisp shell. I use industrial amounts of paper towels until I can’t see any surface moisture left on those slices. This is how we build trust with the recipe; zero sogginess allowed!
Cooking Time and Temperature for Perfect Air Fryer Crispy Garlic Dill Pickles
We want 380°F (195°C). It’s hot enough to cook the coating quickly without burning the outside before the center is heated through. Set your timer for 8 minutes initially, but always peek at the 8-minute mark. If they look pale, give them two more minutes. If they are deep golden brown, pull them out immediately! Better to check a little early than scrape burned breading off your basket.
Tips for the Best Air Fryer Pickles Recipe Success
Now that you know the basic steps to get these **Air Fryer Crispy Garlic Dill Pickles** coated beautifully, let’s talk about how to guarantee success and avoid the common pitfalls that lead to disappointment. This is where the rubber meets the road, and trust me, a few little tweaks can make the difference between good pickles and the absolute Best Air Fryer Pickles you’ve ever had!
First up: Basket space. I know this is tough when you’re making a huge batch for a party, but you simply cannot overcrowd the air fryer basket. If those breaded pieces are touching significantly, the circulating hot air can’t do its job. It creates steam pockets, and steam equals sogginess. If you have to cook in two batches, do it! It’s worth the extra five minutes of waiting to pull out perfectly crunchy snacks.
Speaking of cooking, let’s revisit that spray. I mentioned spraying *before* they go in, but I highly recommend that secret double-spray right before you hit start. That initial spray coats the breading, but a second, quick mist right before they start cooking helps the Panko toast up evenly and turn that gorgeous, deep golden brown color. This mimics the effect of oil from deep-frying without any of the mess!
What if you chose pickle spears instead of chips? Great choice for dipping! Just know that spears are thicker toward the middle. Because they are denser, they take longer for the heat to penetrate evenly. If you’re using spears, I always bump that cooking time up by at least one to two minutes total. Check them around the 9-minute mark, flip them, and give them a couple more minutes until that breading feels super firm.
Lastly, remember that the recipe note suggested an extra spray for crunch? That’s real talk! If your breading mixture seems like it’s just not adhering perfectly, a tiny, thin mist (just a few pumps!) of oil directly onto the breadcrumb layer *after* you’ve dredged them but *before* they hit the basket gives you an almost unbelievable crispness. It’s a pro move for maximizing that crispy texture every time you make these **Homemade Air Fryer Pickles**.
Variations for Your Garlic Dill Air Fryer Snack
Part of the fun of cooking—especially with something as wonderfully versatile as the air fryer—is tinkering a little bit, right? While this recipe for **Air Fryer Crispy Garlic Dill Pickles** is truly fantastic as is, I love trying little twists depending on what mood I’m in or what I have lying around. You can really customize the flavor profile here!
If you’re feeling like you need a little *zing* to go along with that garlic and dill, you absolutely have to try adding heat. Mix about 1/4 to 1/2 teaspoon of cayenne pepper right into that panko breadcrumb bowl with the garlic powder. It gives you this wonderful slow burn that makes dipping them into the cool ranch that much better. It’s a perfect match, similar to the spicy kick I get from my Spicy Roasted Almonds with Rosemary.
Don’t feel locked into just dried dill, either. If you happen to have fresh dill on hand—that lovely feathery herb—you can swap out the dried weed! You’ll just need about a tablespoon of finely chopped fresh dill. Fresh herbs always brighten things up, though you might want to skip the initial heavy spray of oil if you opt for fresh; sometimes fresh herbs can burn faster than dried ones.
Now, I know not everyone eats dairy, and honestly, I love a good cheese flavor in everything! If you’re trying to keep these **Garlic Dill Air Fryer Snacks** dairy-free or vegan, you can easily swap out that grated Parmesan cheese. My go-to replacement is nutritional yeast. It packs a huge cheesy, savory punch and mimics that slightly nutty flavor Parmesan brings to the crust, without any dairy involved. Just use the same 1/4 cup measurement. You won’t miss the cheese a bit, I promise!
You can also try swapping the panko for crushed pork rinds if you are keeping things low-carb or Keto—now you’re talking seriously crunchy **Keto Air Fryer Pickles**! Just remember that pork rinds don’t need as much oil spray, so be mindful when you get to that second misting step.
Serving Suggestions for Homemade Air Fryer Pickles
So, you’ve pulled a beautiful, piping hot basket of these crunchy **Homemade Air Fryer Pickles** out of the machine. They are golden, they smell incredible with that garlic and dill combo, and you’ve got your creamy ranch dip ready to go. Amazing! But what are you serving them *with*? Because while they are a spectacular snack all on their own, they really shine when paired with the right dish.
Since these are salty, tangy, and rich from that panko crust, they go absolutely perfectly with hearty, savory foods that need a little acidic cut-through. Think about burgers and sandwiches—they are the perfect sidekick! I personally love setting up a little air fryer platter where the pickles sit right next to a grilled chicken breast or maybe even some crispy air-fried zucchini fries.
However, if you’re building the ultimate burger, you *have* to try my go-to burger sauce. That tangy, creamy dressing is the perfect counterpart to the sharpness of the dill pickle. You can find the recipe details for my Easy Smash Burger Sauce Recipe, and honestly, you’ll want to dip everything in it—the burgers, the fries, and definitely these pickles!
If you are doing a full appetizer spread, these **Air Fryer Crispy Garlic Dill Pickles** are superstars alongside creamy dips or maybe some smoked salmon spread if you want something a little more elegant. But always remember: the warm, seasoned crunch needs that cool, smooth dip to really make the textures pop. Keep them coming hot, keep the sauce cold, and enjoy watching them disappear!
Storage and Reheating Instructions for Leftover Air Fryer Crispy Garlic Dill Pickles
Look, I’m going to be completely upfront with you, just like I promised: the absolute pinnacle, the peak experience for these **Air Fryer Crispy Garlic Dill Pickles**, is eating them hot, right out of the air fryer basket. That crunch is fleeting, my friends! The moment they cool off or sit around waiting, they start to absorb moisture from the air (and let’s face it, moisture from the pickle itself), and they lose that glorious snap.
If you happen to have extras—maybe you made too many for the crew, or you’re just being diligent about meal prepping your snacks—you need to store them correctly. Pop any leftovers into an airtight container, but I mean *truly* airtight. Do not store them in a zip-top bag or an unsealed Tupperware; they’ll be guaranteed mush in the morning. The general rule I follow is: If they aren’t eaten within an hour, they weren’t meant to last!
But hey, I get it. Sometimes you just can’t finish the batch. Here is how I attempt to rescue them and bring back *some* of that crispness, though it will never quite match the first go-around. We have to use the air fryer again to suck that surface moisture right back out. You want to reheat them at a slightly higher temperature than you cooked them at, which helps crisp the outside before the inside gets steaming hot.
Take your leftover pickles and arrange them in a single layer in your air fryer basket—no crowding! Set the temperature to about 390°F (200°C). We are aiming for quick resuscitation here, not a full second cook. Air fry them for just 3 to 4 minutes. Check them at the 3-minute mark, shaking the basket gently. If they feel firm and sound slightly crisp when you tap them, they are ready to go.
If you have to reheat just a couple of spears, you can even do this right before you eat them while you are finishing up your cleanup. It’s such a quick process, and it makes these leftovers feel almost brand new. They are certainly better reheated in the air fryer than in the microwave, which just turns them immediately into rubbery, salty sponges. For the best results when reheating, just think fast, hot, and airy! If you are looking for other successful air fryer uses, check out my instructions for Air Fryer BBQ Chicken Drumsticks; the low-moisture cooking environment is key there too!
Frequently Asked Questions About Air Fryer Pickles
I get so many questions every time I post these tangy, crunchy snacks on social media! People always want to know the little tricks that keep them from getting soggy. I’ve tried to cover everything, but here are some of the most common things folks ask about when making these delicious **Air Fryer Crispy Garlic Dill Pickles**!
What if my breading falls off during cooking?
Oh, that’s the worst! That usually means one of two things happened. The most common culprit is that the pickles weren’t dry enough when they went into the flour. Remember, water actively fights against flour adhesion! If your pickles are dripping wet, the flour turns into soup, and the panko just slides right off later. The other reason is pressing too lightly in the final panko step. You really need to press that panko onto the egg wash firmly so it glues itself on. Don’t worry if it happens once or twice; just ensure your basket isn’t overcrowded, as shaking can sometimes dislodge a loose one!
Can I use pickle spears instead of chips in this Air Fryer Pickles Recipe?
Absolutely, you can! Some people prefer the shape of **Dill Pickle Spears Air Fryer** style, especially when they want something thicker to dunk. Spears take a tiny bit longer to cook because they are thicker in the center than chips. When I switch to spears, I cook them at the same temperature—380°F—but I check them closer toward the 10-minute mark, sometimes needing up to 12 minutes total. Just keep a close eye on that breading color!
How do I make these Dill Pickle Spears Air Fryer a Keto Air Fryer Pickles option?
That’s a great question, especially since the regular flour and panko aren’t Keto-friendly due to the carbs. To adapt this for a low-carb approach, you need to swap out the dry coatings. For the flour layer, use almond flour or coconut flour—almond flour tends to give a slightly better texture overall. Then, instead of the panko breadcrumbs, you crush up pork rinds until they resemble coarse crumbs! It sounds strange, but pork rinds fry up phenomenally well, staying super crunchy. Keep the Parmesan cheese, as that’s already low-carb. You can find some great inspiration for other low-carb air fryer cooking in my Keto recipes section!
Can I use fresh dill instead of dried dill weed?
If you have fresh dill, use it! Fresh herbs always bring a brighter flavor. The general rule is that fresh herbs are about three times stronger than dried herbs. So, my recipe calls for 1/2 teaspoon of dried dill weed. If you are chopping fresh dill, you’ll want about 1 1/2 teaspoons, finely chopped. It’s wonderful, and it blends right into that breading mix beautifully!
Can I make the ranch dip ahead of time?
You bet! In fact, I encourage that! The dip is actually better if you make it and then let it chill in the fridge for at least 30 minutes before serving. This time allows those flavors—the garlic powder, onion powder, and parsley—to really meld together with the mayo and sour cream base. It thickens up just a bit too! Just keep it covered tightly in the fridge, and it’s good to go for three or four days.
Estimated Nutritional Information for Low Oil Pickle Recipe
So, we’ve talked flavor, we’ve talked crunch, but now let’s touch on the numbers, because one of the huge reasons I love making these **Air Fryer Crispy Garlic Dill Pickles** is that they are such a wonderfully lighter take on a fried favorite. Since we are skipping that oil bath and just using a quick spray, the fat content stays much lower than traditional recipes. That makes this a fantastic Low Oil Pickle Recipe!
Keep in mind that these figures are just estimates! I base this off the recipe I use with standard store-bought dill chips and no extra salt added to the breading other than what was in the Parmesan. Your particular pickle brand, how much spray oil you use, and whether you add extra seasonings will change things slightly. But this gives you a great ballpark idea for each serving.
Here is the breakdown for a single serving (about 1/4 of the entire recipe, remember we skipped the dip calories here!):
- Calories: 180
- Fat: 8g (Only 2g of that is Saturated Fat—win!)
- Carbohydrates: 18g
- Protein: 8g
- Sodium: 650mg (Pickles are naturally salty, so keep that in mind!)
See? 180 calories for a massive dose of savory, garlicky crunch! That’s what I call a successful swap in the kitchen. This is why I push so hard for everyone to have an air fryer—you get all those amazing textures without loading up on extra oil. Honestly, if you want to compare this to a healthier main, look at my low-sodium baked salmon—it’s proof that flavor doesn’t have to come at the cost of high fat!
Share Your Crispy Garlic Dill Air Fryer Snack Experience
Okay, you’ve done the work! You’ve dried the pickles, you’ve built the perfect breading station, and you’ve waited impatiently for those precious 10 minutes while the air fryer worked its magic. Now comes the best part: eating them! But before you devour the entire batch, I really, truly want to know how they turned out for you.
This recipe for **Air Fryer Crispy Garlic Dill Pickles** relies heavily on that breading adhering perfectly, and different air fryer models can behave differently. So, I need your feedback! Did you achieve that legendary crunch we were aiming for? Did the garlic and dill flavor come through exactly how you hoped?
Please, don’t be shy! Head down to the comments section right now and give this recipe a star rating. Let me know what temperature you used and if you had to cook them for the full 10 minutes. Sharing your exact results helps everyone else who visits this page to nail their bake on the first try. That’s how we build a community of amazing, well-fed air fryer fanatics!
And if you made these wonderful **Game Day Air Fryer Snacks** and snapped a picture—you absolutely *must* share it! Tag me on social media so I can see your gorgeous, golden-brown pickles. Seriously, nothing makes my day more than seeing your kitchen creations using my favorite recipes. It proves that real, delicious food can be made quickly, with minimal oil.
If you have any questions that didn’t get answered down in the FAQ (like maybe you tried a different dipping sauce!), drop those below too. I love hearing from you all! If you need to get in touch with me directly for something specific, you can always reach out over on my contact page, but for recipe talk, the comments section is where the party’s at. Happy Snacking!
Print
Air Fryer Crispy Garlic Dill Pickles
- Total Time: 25 min
- Yield: 4 servings 1x
- Diet: Vegetarian
Description
Make crunchy, flavorful garlic dill pickles in your air fryer with this simple recipe. This method ensures a crispy exterior without deep frying.
Ingredients
- 1 jar (16 oz) dill pickle chips or spears, drained well
- 1 large egg
- 1/4 cup all-purpose flour
- 1/2 cup panko breadcrumbs
- 1/4 cup finely grated Parmesan cheese
- 1 teaspoon garlic powder
- 1/2 teaspoon dried dill weed
- 1/4 teaspoon black pepper
- Cooking spray (oil-based)
- For Ranch Dip: 1/2 cup mayonnaise, 1/4 cup sour cream, 1 tablespoon dried parsley, 1/2 teaspoon garlic powder, 1/4 teaspoon onion powder, salt and pepper to taste
Instructions
- Remove pickles from the brine and pat them completely dry using paper towels. This step is crucial for crispiness.
- Set up a dredging station with three shallow bowls. In the first bowl, place the flour. In the second bowl, whisk the egg. In the third bowl, combine the panko breadcrumbs, Parmesan cheese, garlic powder, dried dill, and black pepper.
- Working in small batches, dredge each pickle: first coat lightly in flour, shaking off excess. Dip into the egg mixture, letting excess drip off. Finally, press firmly into the breadcrumb mixture to coat thoroughly.
- Preheat your air fryer to 380°F (195°C) for 5 minutes.
- Lightly spray the air fryer basket with cooking spray. Arrange the coated pickles in a single layer in the basket, ensuring they do not overlap.
- Lightly spray the tops of the pickles with cooking spray.
- Air fry for 8 to 10 minutes, flipping them halfway through the cooking time. Check at 8 minutes; they should be golden brown and crispy.
- While the pickles cook, prepare the dip: Mix the mayonnaise, sour cream, parsley, garlic powder, onion powder, salt, and pepper in a small bowl until smooth.
- Serve the hot, crispy garlic dill pickles immediately with the creamy ranch dip.
Notes
- For extra crunch, you can lightly spray the coated pickles with oil a second time just before placing them in the air fryer.
- If using pickle spears instead of chips, you may need to increase the cooking time by 1 to 2 minutes.
- Do not overcrowd the air fryer basket; cook in batches if necessary to maintain crispness.
- Prep Time: 15 min
- Cook Time: 10 min
- Category: Appetizer
- Method: Air Frying
- Cuisine: American
Nutrition
- Serving Size: 1/4 of recipe (without dip)
- Calories: 180
- Sugar: 2
- Sodium: 650
- Fat: 8
- Saturated Fat: 2
- Unsaturated Fat: 6
- Trans Fat: 0
- Carbohydrates: 18
- Fiber: 1
- Protein: 8
- Cholesterol: 75