: A 10-Minute Happy Meal Fix")
Oh, the mealtime dance! As a parent, I totally get it. We dream of peaceful dinners, but often, it feels more like a circus act, especially with little ones. Trying to find something quick, healthy, and that everyone actually eats? It’s a challenge, right? My own kids, Leo and Mia, have certainly put my culinary skills to the test, especially during those picky eater phases. But I’ve found a secret weapon that almost always wins: these amazing Kid-Friendly Mini Pizza Calzones (DIY)!
I swear, these little pockets of goodness have saved me on countless busy weeknights. They’re super easy to make, and the best part is, your kids can actually help create them. It turns meal prep into a fun activity, not a chore. Plus, when kids help make their food, they are way more likely to eat it!
I remember one evening, Leo was refusing everything. He just wanted “pizza.” Mia, of course, echoed him. That’s when these mini calzones became our go-to. They’re like personalized pizzas, folded up neat and tidy. No more arguing over toppings! Everyone gets exactly what they want. It’s a win-win, truly.

Why You’ll Love These Kid-Friendly Mini Pizza Calzones (DIY)
I can tell you, these Kid-Friendly Mini Pizza Calzones (DIY) are a game-changer. They really make life easier for us busy parents. For starters, they’re incredibly simple to put together.
- You control the ingredients.
- No more fighting over what toppings to get.
- Each child picks their own fillings.
- This recipe is super flexible.
- It’s perfect for picky eaters.
My Leo loves his plain cheese. Mia, on the other hand, always adds mini pepperoni. It makes them feel like little chefs. Plus, they always gobble up what they create!
It’s a fantastic way to get them involved in the kitchen. This helps them feel proud of their food. It also teaches them a bit about cooking. This recipe truly takes the stress out of mealtime.
Making Mealtime Fun with Kid-Friendly Mini Pizza Calzones (DIY)
Mealtime can be a struggle, right? These mini calzones change that completely. They turn cooking into a fun family activity. My kids actually ask to help make them. It’s not just about eating anymore.
It becomes a playful experience. This helps build a happy relationship with food. We avoid those dreaded mealtime battles. Instead, we make memories together. Food should always be enjoyable!

Essential Equipment for Your Kid-Friendly Mini Pizza Calzones (DIY)
Making these delightful Kid-Friendly Mini Pizza Calzones (DIY) doesn’t need fancy gadgets. You probably have most of these things already. You will definitely need a baking sheet. I like using parchment paper too. It makes cleanup so much easier! A round cookie cutter helps create perfect circles. You could use the rim of a glass instead. We also need a small bowl for the olive oil. A pastry brush is handy for brushing the tops. A fork is great for sealing the edges. These simple tools help make the process smooth.
Gathering Your Ingredients for Kid-Friendly Mini Pizza Calzones (DIY)
Okay, let’s get our ingredients ready for these awesome Kid-Friendly Mini Pizza Calzones (DIY)! The beauty of this recipe is its simplicity. You won’t need a huge shopping list. First, grab one 13.8-ounce can of refrigerated pizza dough. This is our base. Then, we need half a cup of your favorite pizza sauce. My kids love a simple, classic marinara.
Next up is cheese! Get half a cup of shredded mozzarella cheese. This melts beautifully inside. For fillings, a quarter cup of mini pepperoni works great. Leo always insists on these! You can also try other things. Cooked sausage, chopped bell peppers, or even mushrooms are good. Just make sure they are cooked or very finely chopped. Finally, one tablespoon of olive oil is needed. We brush this on the calzones before baking. This gives them a lovely golden crust. Having everything ready makes assembly a breeze.
How to Craft Your Kid-Friendly Mini Pizza Calzones (DIY)
Now for the fun part: making your very own Kid-Friendly Mini Pizza Calzones (DIY)! This is where your little chefs can really shine. First, preheat your oven to 400°F (200°C). While it heats up, lightly grease a baking sheet. You can also line it with parchment paper. This makes cleanup super easy, trust me.
Next, unroll that pizza dough onto a lightly floured surface. I usually sprinkle a little flour on my clean counter. This keeps the dough from sticking. Now, for the circles! Grab a round cookie cutter. Mine is about three to four inches across. If you don’t have one, the rim of a glass works perfectly. Press it firmly into the dough to cut out circles. You should get about eight to ten circles from one can of dough.
Here’s where the kids can really get involved. For each dough circle, spread about one tablespoon of pizza sauce. Only spread it on one half of the circle. Make sure to leave a small border around the edge. This border is important for sealing later. Then, sprinkle about one tablespoon of shredded mozzarella cheese over the sauce. My Mia loves this part!
Now, add your chosen fillings. If you’re using mini pepperoni, just a few pieces will do. Remember, don’t overfill! If you put too much, the calzone won’t seal properly. If you’re using other fillings, like cooked sausage or chopped veggies, make sure they are small. Smaller pieces cook better inside. Also, they are easier for little hands to manage.
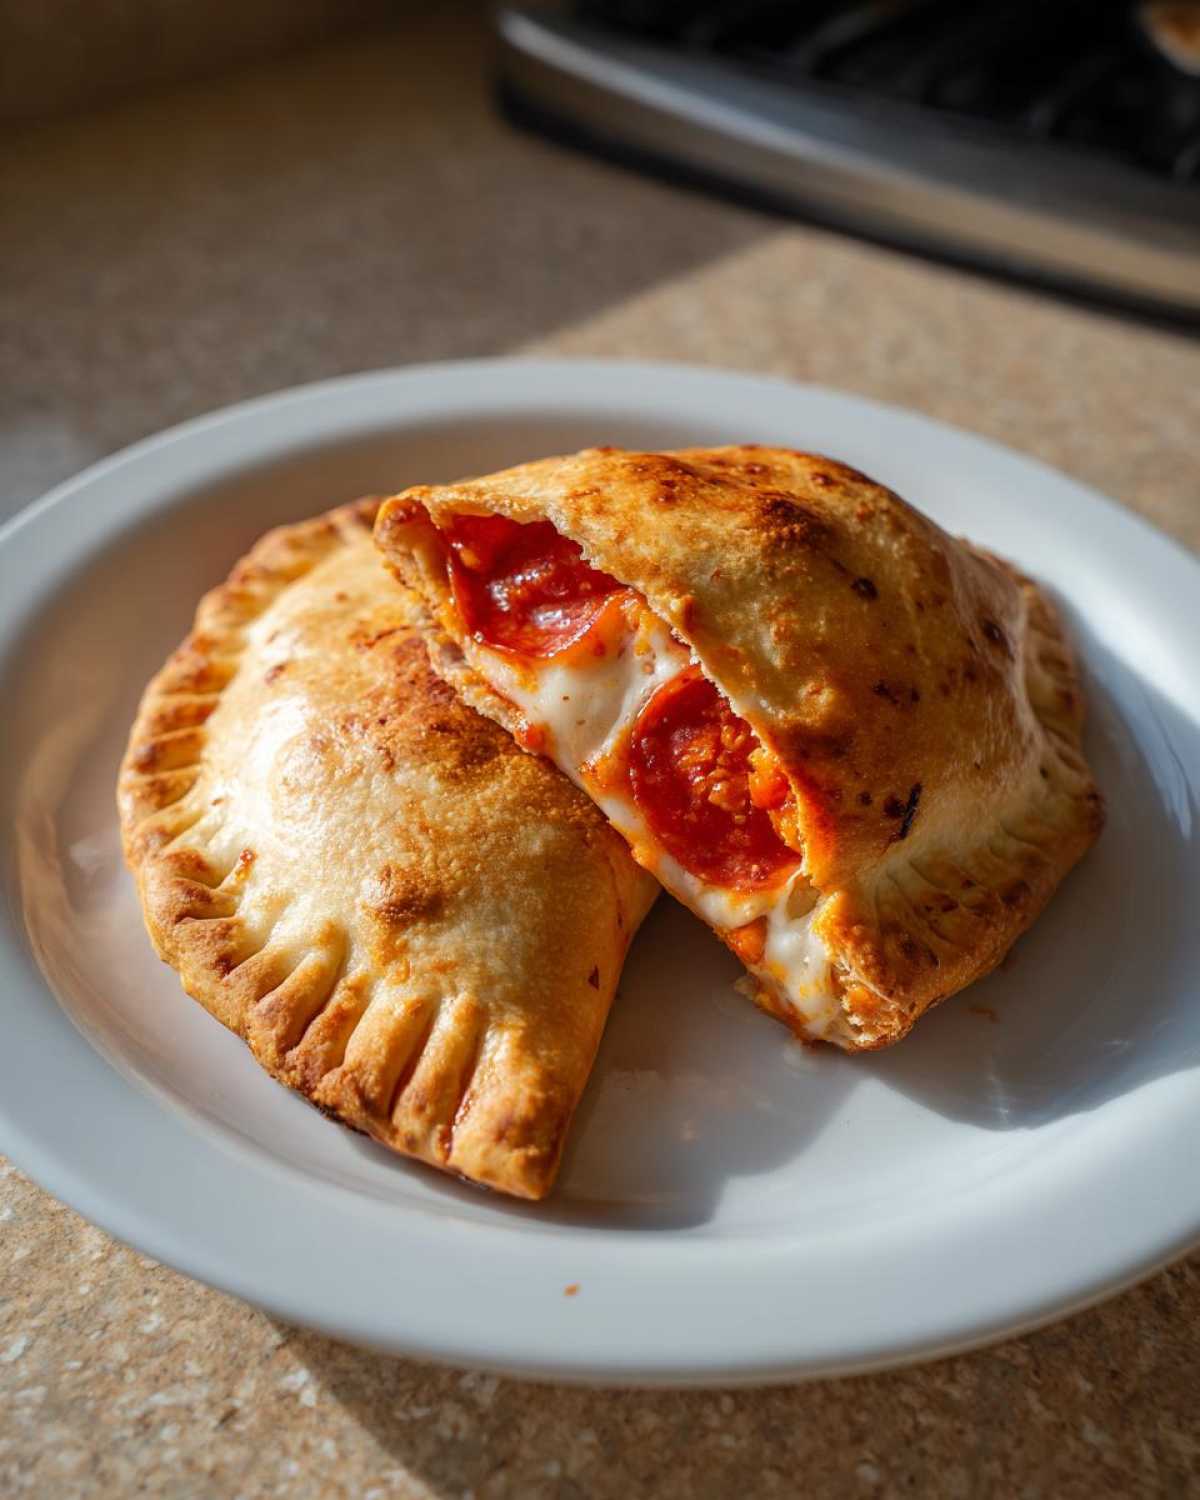
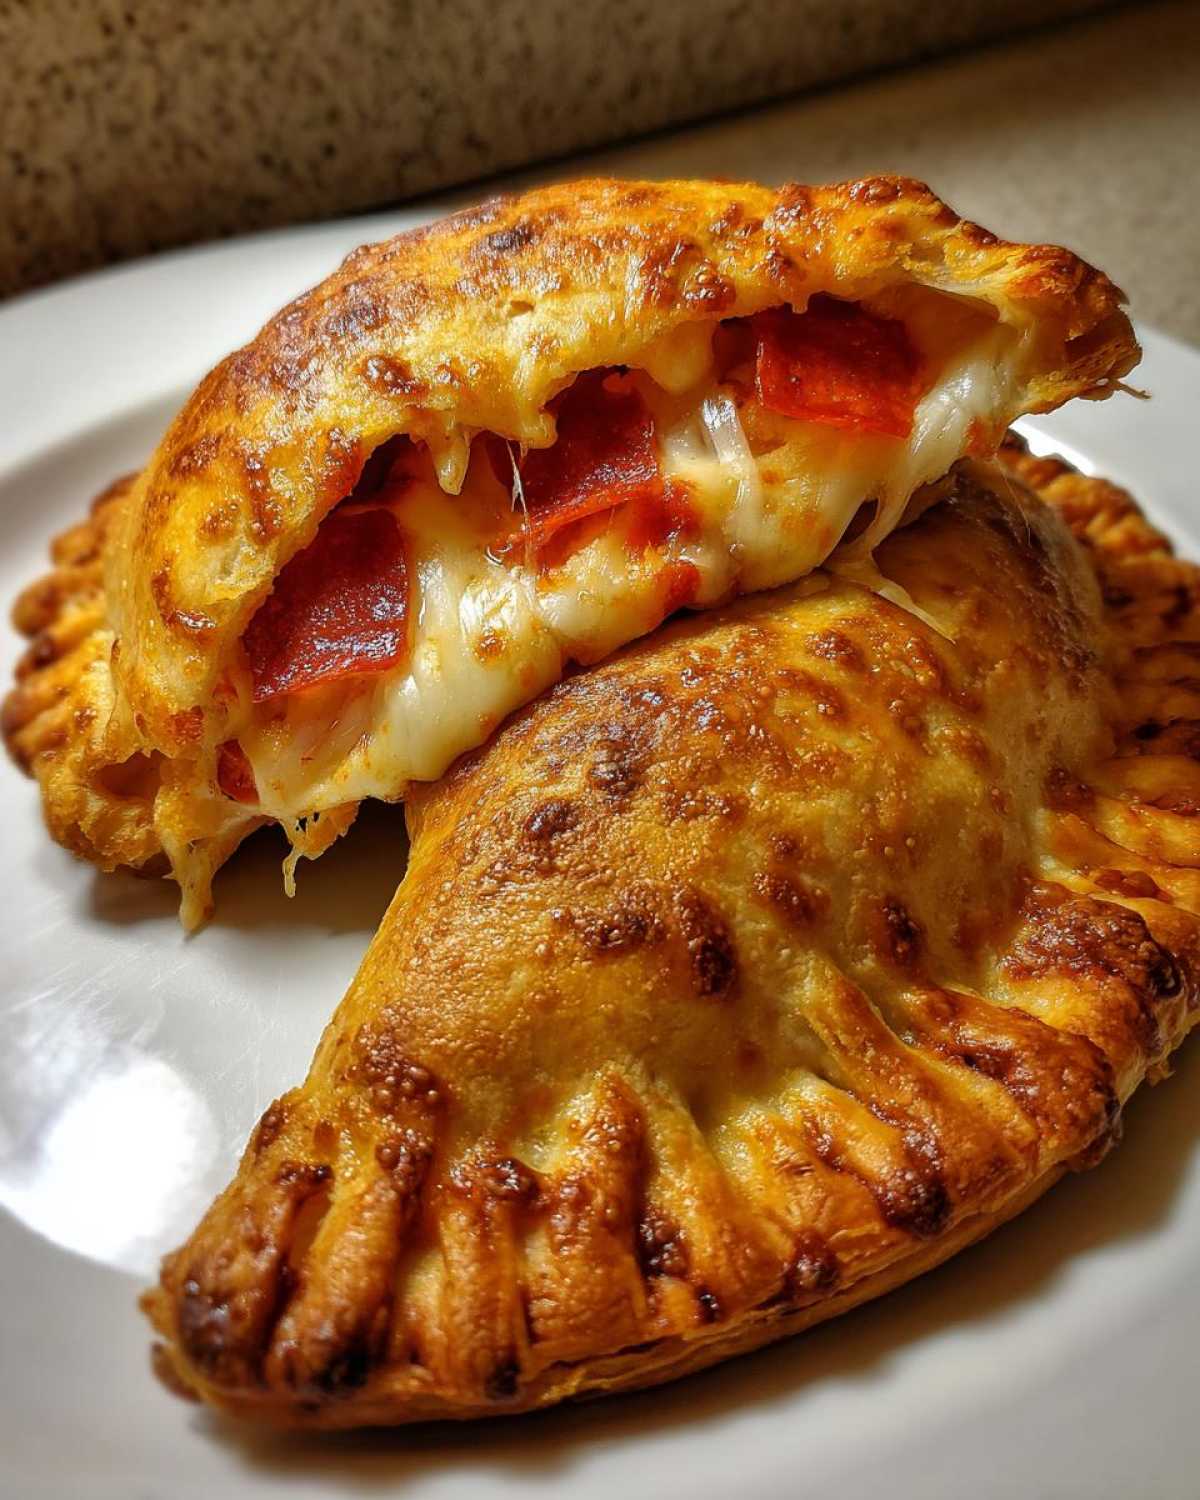
Once your fillings are in place, fold the other half of the dough over. This creates a half-moon shape. Gently press the edges together. You want a good seal to keep all that cheesy goodness inside. I always use a fork to crimp the edges. This makes a pretty design. It also helps seal them extra tight. It’s like giving your calzone a little hug!
Carefully transfer your sealed calzones to the prepared baking sheet. Leave a little space between each one. They expand a bit when they bake. Finally, brush the tops lightly with olive oil. This gives them a beautiful golden-brown crust. Bake them for ten to twelve minutes. Or, until the crust is golden brown. The cheese inside should be melted and bubbly. They will be very hot when they come out. Let them cool for a few minutes before serving. Enjoy your delicious Kid-Friendly Mini Pizza Calzones (DIY)!
Tips for Perfect Kid-Friendly Mini Pizza Calzones (DIY)
For truly perfect Kid-Friendly Mini Pizza Calzones (DIY), remember a few tricks. Don’t overfill them! Too much filling makes sealing tough. A good seal keeps all the yummy stuff inside. Use a fork to crimp the edges firmly. This helps prevent leaks. Watch them closely in the oven. They turn golden quickly.
If involving kids, let them do the sauce and cheese. They love that! For younger kids, pre-cut the dough circles. This makes it easier for them. And always let them cool a bit. That melted cheese is super hot. These tips make baking smooth and fun.
Creative Variations for Your Kid-Friendly Mini Pizza Calzones (DIY)
The beauty of these Kid-Friendly Mini Pizza Calzones (DIY) is how adaptable they are! While pepperoni and cheese are classics, don’t be afraid to get creative. My Leo loves a simple ham and cheese calzone. We just swap the pizza sauce for a tiny bit of mustard. Or sometimes, a sprinkle of garlic powder instead. Mia, on the other hand, is more adventurous.
For a veggie boost, try finely diced bell peppers or spinach. Make sure to sauté them first. This removes extra moisture. Cooked, crumbled sausage or ground beef also works well. Just be sure it’s fully cooked. For a fun twist, consider a taco calzone. Use seasoned ground beef, a pinch of cheddar cheese, and a tiny dab of salsa. Or how about a breakfast version? Scrambled egg and a sprinkle of cheese. The possibilities are endless. This helps cater to everyone’s unique tastes.
Serving Suggestions for Kid-Friendly Mini Pizza Calzones (DIY)
These Kid-Friendly Mini Pizza Calzones (DIY) are pretty satisfying on their own. But you can easily make them a full meal. I often serve them with a simple side salad. A bag of pre-washed greens works wonders. Or offer some carrot sticks and cucumber slices. A side of marinara for dipping is always a hit. Fresh fruit, like apple slices or grapes, makes a sweet finish. They also work great as a hearty snack after school. They are ideal for lunchboxes too.
Frequently Asked Questions About Kid-Friendly Mini Pizza Calzones (DIY)
I get lots of questions about these Kid-Friendly Mini Pizza Calzones (DIY). Here are some common ones! Can I make these ahead of time? Absolutely! You can assemble the calzones without baking them. Place them on a baking sheet. Cover with plastic wrap. Pop them in the fridge for up to 24 hours. Just bake as directed when ready. You might need an extra minute or two of bake time.
Can I freeze these pizza calzones? Yes, you sure can! Freezing is a great option. You can freeze them before or after baking. If freezing unbaked, place them on a tray. Freeze until solid. Then transfer to a freezer-safe bag. Bake from frozen, adding about 5-10 minutes to the cook time. If freezing baked, let them cool completely. Wrap each one individually. Then freeze. Reheat in the oven or toaster oven.
What if my kids have allergies? This recipe is super flexible for dietary needs. For gluten-free, use a gluten-free pizza dough. For dairy-free, use a plant-based cheese. Just make sure to check all ingredient labels. You can also swap fillings easily. For example, use turkey pepperoni. Always adjust to your family’s specific needs. These mini calzones really work for everyone!
Storing and Reheating Your Kid-Friendly Mini Pizza Calzones (DIY)
Got leftovers? Lucky you! These Kid-Friendly Mini Pizza Calzones (DIY) store really well. Just put them in an airtight container. Keep them in the refrigerator for up to three days. When you’re ready to eat them again, reheating is simple. My favorite way is in a toaster oven. It gets the crust nice and crispy again. You can also use the microwave. Just heat them until warmed through. They make a fantastic quick lunch or snack.
Estimated Nutritional Information for Kid-Friendly Mini Pizza Calzones (DIY)
When it comes to nutrition for these Kid-Friendly Mini Pizza Calzones (DIY), please keep in mind that the numbers are estimates. The actual nutritional values can change quite a bit. It depends on the specific brands you use. It also depends on the exact fillings you choose. Things like different cheeses or types of pepperoni will alter the counts. So, think of this as a general guide. It’s not a precise calculation.
Share Your Kid-Friendly Mini Pizza Calzones (DIY) Creations!
I just love seeing your kitchen adventures! If you make these Kid-Friendly Mini Pizza Calzones (DIY), please share your creations. Leave a comment below. Tell me how your kids liked them! You can also rate the recipe. And don’t forget to share photos on social media. Tag ChildRecipe.com! It helps our community grow. Let’s inspire other parents together. Happy cooking, friends!
Print
Remarkable Kid-Friendly Mini Pizza Calzones (DIY): A 10-Minute Happy Meal Fix
- Total Time: 27 minutes
- Yield: 8-10 mini calzones 1x
Description
These mini pizza calzones are a fun and easy way to get kids involved in the kitchen. They’re perfect for picky eaters and make mealtime enjoyable.
Ingredients
- 1 (13.8 ounce) can refrigerated pizza dough
- ½ cup pizza sauce
- ½ cup shredded mozzarella cheese
- ¼ cup mini pepperoni or other desired fillings (cooked sausage, chopped bell peppers, mushrooms)
- 1 tablespoon olive oil
Instructions
- Preheat oven to 400°F (200°C). Lightly grease a baking sheet or line with parchment paper.
- Unroll the pizza dough onto a lightly floured surface. Use a round cookie cutter or the rim of a glass (about 3-4 inches in diameter) to cut out circles. You should get about 8-10 circles.
- For each circle, spread about 1 tablespoon of pizza sauce on one half of the dough, leaving a small border.
- Sprinkle about 1 tablespoon of mozzarella cheese over the sauce.
- Add a few mini pepperonis or your chosen fillings on top of the cheese.
- Fold the other half of the dough over the filling, creating a half-moon shape.
- Press the edges firmly together to seal the calzone. You can use a fork to crimp the edges for a decorative seal.
- Carefully transfer the sealed calzones to the prepared baking sheet.
- Brush the tops of the calzones lightly with olive oil.
- Bake for 10-12 minutes, or until the crust is golden brown and the cheese is melted and bubbly.
- Let cool for a few minutes before serving. They will be hot!
Notes
- Get your kids involved in assembling their own calzones. It’s a great way to encourage them to eat what they make!
- For an extra cheesy touch, sprinkle a little Parmesan cheese on top before baking.
- Leftover calzones can be stored in an airtight container in the refrigerator for up to 3 days. Reheat in the microwave or a toaster oven.
- If your kids are hesitant about new fillings, start with familiar ones like pepperoni or plain cheese.
- Prep Time: 15 minutes
- Cook Time: 12 minutes
- Category: Main Dish, Snack
- Method: Baking
- Cuisine: Italian-American
Nutrition
- Serving Size: 1 mini calzone
- Calories: 150-200 (estimated)
- Sugar: 2-4g (estimated)
- Sodium: 300-400mg (estimated)
- Fat: 5-8g (estimated)
- Saturated Fat: 2-4g (estimated)
- Unsaturated Fat: 3-4g (estimated)
- Trans Fat: 0g (estimated)
- Carbohydrates: 20-25g (estimated)
- Fiber: 1-2g (estimated)
- Protein: 6-8g (estimated)
- Cholesterol: 10-20mg (estimated)