Oh, there is truly nothing better than pulling a loaf of homemade bread out of your own oven, right? Forget those sad, squishy grocery store loaves. I remember the first time I tried to make bread at home; I thought I was signing up for a four-hour commitment that would end in a sad, dense brick. Nope! This French bread recipe changed everything for me. It’s my personal shortcut to bakery perfection: you get that crackly, gorgeous crust on the outside, but the inside is unbelievably soft and fluffy. And the best part? You can be eating it in under two hours. Trust me, this is the simple yeast bread breakthrough you’ve been waiting for!
Why This Homemade French Bread Recipe Works So Well
I know you want that bakery experience without the all-day commitment, and I absolutely nailed that balance for you here. This particular French bread recipe is special because it respects your time but demands just enough attention to make it authentic.
- It delivers that craveable soft crumb inside.
- The crust gets beautifully golden, crisp, and crackly when baked right.
- It’s seriously quick, clocking in under two hours total!
Achieving the Perfect Soft French Bread at Home Texture
The softness comes down to two quick things: making sure your water is just the right temperature for the yeast—not too cold!—and giving the dough a good, honest knead. When you feel that dough go from shaggy to smooth and elastic, you’ve unlocked that tender crumb that makes this bread so wonderful for mopping up gravy.

Quick French Bread Recipe Timeline Breakdown
This isn’t one of those slow fermentation loaves, thank goodness! We sneak in a quick 45-minute first rise and a short 20-minute second rest while the oven heats up. That’s how we get a gorgeous, homemade French bread on the table easily within the same evening. Fifteen minutes of prep work for the best bread ever—deal!
Essential Ingredients for Your Easy French Bread
When you’re making bread this fast, you really need to pay attention to what you put in the bowl. Don’t skip following the recipe here, even if you think you know better! Every ingredient plays a small but vital role in getting that wonderful, crusty exterior and fluffy middle. Here is what you need for our amazing loaf:
- 3 cups all-purpose flour
- 1 teaspoon salt
- 1 packet (2 1/4 teaspoons) active dry yeast
- 1 1/4 cups warm water (about 105-115°F)
- 1 tablespoon olive oil
- 1 egg white, lightly beaten (for wash)
Ingredient Notes and Substitutions for Perfect French Bread
Okay, let’s talk details because these little things make a huge difference in a quick baking recipe. First, that water temperature! If it’s too cold, your yeast won’t wake up, and you’ll be waiting forever. If it’s piping hot—the kind that burns your finger—you’ll kill the little guys entirely. Aim for that warm-bath temperature, around 105 to 115 degrees Fahrenheit. That’s when the yeast gets happy and foamy.
Also, that egg white wash you see listed? Don’t skip it if you want that beautiful, shiny, crusty exterior that makes a classic French bread look like it came straight from the bakery. It’s how we lock in that golden color and give the crust that signature snap when you cut into it. It’s optional if you prefer a softer top, but I always go for the crunch!
Step-by-Step Instructions for Making Homemade French Bread
Alright, grab your apron because we’re diving into the fun part! Baking bread doesn’t need to be intimidating, and these steps are so straightforward, you’ll be shocked at how simple it is to make this gorgeous loaf. The key is just following the timing; yeast needs its rest, so don’t rush those rising phases, or your texture will suffer! We’re aiming for that perfect pillowy-soft interior that makes this French bread ideal for dipping and sandwiches.
Mixing and Kneading the Dough
First things first, get your salt and flour together in your big bowl. In your separate small cup, activate that yeast in the warm water—remember, foamy means happy! Once it’s bubbly, pour the yeast mixture and that tiny bit of olive oil right into the dry stuff. Mix it up until it looks like a shaggy mess. Now, turn that mess onto your counter. You’ve got to knead this for about 6 to 8 minutes. Keep working it until it stops sticking horribly and feels smooth. If you stretch a tiny part of it gently and you can see light through it without tearing (that’s the windowpane test!), you’ve developed enough gluten for our loaf.
The Two Rises for Fluffy Loaf Development
Once the dough feels nice, gently tuck it into an oiled bowl, cover it up tight so it doesn’t dry out, and leave it somewhere warm for 45 minutes until it really balloons up. Don’t poke it until it’s doubled! After that first big rise, gently punch all that air out—it’s very satisfying! Shape it into your loaf now, put it on the lined baking sheet, and cover it loosely again for just 20 minutes for the quick second rise. These rests are essential for getting that wonderful, airy quality in our French bread.
Scoring and Baking Your Crusty Exterior Bread
While the dough is resting the second time, crank your oven up to 400°F! This is where we set up the steam for that amazing crust. Remember that little pan of water we talked about putting on the bottom rack? Get that heating up now. Once the oven is hot, brush the top of your shaped loaf with that beaten egg white—that creates shimmer and bite. Then take a super sharp knife and make 3 or 4 quick, confident slashes across the top. This scoring lets the loaf expand properly. Pop it in and bake for about 25 to 30 minutes. Pull it out when it looks deep golden brown and sounds hollow when you tap the bottom. Congratulations, you’ve made crusty exterior bread!
Tips for Success: Baking Bakery Style Bread at Home
Now that you’ve got the basic steps down for this quick recipe, let me share a few little secrets I picked up over the years. These aren’t in the core steps, but they are the things that take your loaf from ‘really good homemade bread’ to ‘did you buy that from a fancy bakery?’ Seriously, these tricks help even out the texture and ensure that beautiful crust every single time.
My biggest game-changer was finally investing in a baking stone, or heck, even a heavy piece of cast iron if you have one! Preheat that stone in the oven while the bread is doing its second rise. When you slide the loaf onto that screaming hot surface, the immediate blast of heat helps the bottom set instantly and gives you that fantastic oven spring we’re looking for. It really boosts that crusty exterior!
Another thing—and this sounds small—is moisture control. Instead of just putting a pan of water on the bottom rack, try spraying the inside walls of your oven with a clean water bottle right after you put the loaf in, close the door quickly, and then spray one more time after about five minutes. That initial rush of steam really sets the crust beautifully before the bread starts drying out. Be careful not to spray the heating element, though—we want steam, not a short circuit!
Finally, I’ve learned that cooling matters just as much as baking. Never be tempted to slice into that hot loaf right away! I know, the smell is torture. But if you cut into it hot, you release all that steam that’s just finished setting the tender crumb. Let it cool completely on a wire rack. If you can wait 45 minutes to an hour, your slices will be firmer and much less gummy inside. Patience truly pays off when you’re finishing up your bakery style bread!
Storage and Reheating Instructions for Fresh French Bread
How long does homemade bread really last? That’s the question everyone asks after they devour the first loaf immediately! Since we worked so hard to get that wonderfully crisp crust and that cloud-like interior on our French bread, we need to treat it right overnight. Honestly, there’s no way this bread lasts more than a day in my house, but if you’re more disciplined than I am, here’s the trick.
You absolutely must let the bread cool completely on a rack before you wrap it—remember I said that cooling is crucial? Once it’s totally cool, wrap it loosely in a clean kitchen towel or, if you need to keep it for two days, just wrap it snugly in foil. Never, ever put fresh bread in plastic bags; the moisture they trap will ruin that gorgeous, hard-earned crust and make it soggy overnight. We want to keep that crust crackly!
When you’re ready to bring it back to life, reheating is the key to enjoying that fresh-baked flavor again. If you’ve got a full loaf of French bread, wrap it tightly in foil and pop it into a 350°F oven for about 10 minutes. This steams the inside gently while reheating the crust. If it’s just a slice or two, I pop mine directly onto the rack for about 5 minutes until it’s piping hot and crunchy again. It tastes like you just pulled it out of the oven!
Serving Suggestions for Your Homemade French Bread
So, you’ve baked this gorgeous, crusty loaf, and now it’s cooling perfectly on the rack. What are you going to do with it? Don’t just let it sit there looking pretty! This bread is exactly what you need for elevating simple meals into something special. It instantly transforms dinner from a weeknight chore into a cozy occasion.
My absolute favorite use for this bread is as the ultimate side dish for dipping. Think about it: a big, warm bowl of something rich and savory? You need something sturdy to scoop it all up, and this loaf is it. If you’re planning on making a French Onion Soup, you already know this is the only bread that will do justice to that melted gruyère topping! You can find my recipe for the best French Onion Soup right here.
It’s also fantastic when it’s just sliced thick and served alongside soup. This bread is the perfect companion for something creamy and smooth, like my recipe for Creamy Butternut Squash Soup in the autumn. Just slice it, toast it lightly if you like, and smear it with good quality salted butter. That fresh, savory flavor from the bread really cuts through the richness of the soup.
Of course, you can’t forget the sandwich potential! Because we got that soft crumb down, this loaf slices beautifully and holds up nicely to wet ingredients without getting soggy right away. It’s perfect for a classic Italian sub or even just turkey and cheese. Honestly, once you smell that fresh loaf baking, you’ll find a million reasons to serve it!
Variations on This Simple Yeast Bread Recipe
Even though this quick French bread recipe is just about perfect as it is—soft inside, crunchy outside—I love playing around with the flavor profiles once I’ve mastered the basic technique. You don’t have to change much to get a completely different experience at the dinner table! These small tweaks are great for using up leftover herbs or just keeping things fun.
If you want a beautifully flavored loaf that goes great with pasta sauce or just a little dip, try adding some dried herbs right when you mix the flour and salt. About a tablespoon of dried rosemary or Italian seasoning works miracles. It perfumes the whole kitchen while it bakes! Just make sure they are dried; fresh herbs will release too much moisture during the short bake time of this French bread.
Another fun swap is incorporating some whole wheat flour. You do need to be a little careful here since whole wheat absorbs more liquid, and we don’t want that soft crumb to disappear. I usually swap out just half a cup of the all-purpose flour for whole wheat, and that gives a nicer, nuttier flavor profile without compromising the texture too much. This still qualifies as a quick bake, too!
If you’re feeling ambitious, you can try making little rolls instead of a big loaf; just divide the dough into 8 or 10 equal pieces after the first rise, tuck them into little rolls, and pop them on the baking sheet. They’ll bake faster, so keep an eye on them, maybe 18 to 20 minutes max. It’s just a fun alternative way to serve up your perfect homemade French bread!
Frequently Asked Questions About Making French Bread
I always get questions when people try this recipe for the first time, especially when they are trying Beginner Bread Baking for the first time! Don’t worry if you run into small issues; it’s all part of making homemade bread from scratch. Here are the few things folks usually ask me about getting that perfect loaf.
Can I make this Quick French Bread Recipe without an egg wash?
Absolutely, you can skip the egg white wash! If you leave it off, you won’t hurt the bread at all. The main difference is that you won’t get that deep, shiny, crackly look on the outside. If you leave it off, you’ll end up with a slightly paler, softer crust overall. So, if you’re prioritizing the softest possible exterior, skip the wash, but if you want that true Bakery Style Bread look, go ahead and brush it on!
Can I use instant yeast instead of active dry yeast for this French Bread?
Yes, you definitely can! This is great news for a **Quick French Bread Recipe**. Active dry yeast needs that warm water bath to wake up first, right? If you are using instant yeast (sometimes called rapid rise), you can skip dissolving it in water entirely! Just whisk your instant yeast right in with the flour and salt mixture (Step 1). Then, proceed to add the water and oil mixture (Step 2). Because instant yeast is ready to go, you might even find your first rise is slightly faster than the 45 minutes listed for this fantastic **French Bread**!
If you’re looking for pairings for this loaf, you should check out how perfectly it goes with cheese, like in my classic homemade lasagna recipe—so good for dipping!
Nutritional Information for Homemade French Bread
Now, I’m no dietitian, so please take these numbers with a grain (or, well, a slice!) of salt. Baking is chemistry, but the final nutritional content of your loaf depends on exactly what brand of flour you use, how thick you slice it, and if you added any extra herbs or oil during baking. These estimates are based on breaking the large loaf down into 10 even slices.
Remember, because we keep things simple and avoid lots of additions, this is a fantastic, straightforward **Dinner Side Bread** base. If you follow the recipe closely, the macro numbers should be pretty close to this breakdown. For the most accurate count for your specific ingredients, always check the packaging, or you can read more about how we calculate these estimates on my nutrition disclosure page.
- Serving Size: 1 slice
- Calories: 150
- Sugar: 1g
- Sodium: 180mg
- Fat: 1g
- Saturated Fat: 0g
- Carbohydrates: 31g
- Fiber: 1g
- Protein: 4g
- Cholesterol: 0mg
See? That’s pretty clean fuel for a loaf of bread! Enjoy every slice!
Print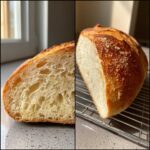
Easy Homemade Soft and Crusty French Bread
- Total Time: 1 hour 50 min
- Yield: 1 large loaf 1x
- Diet: Vegetarian
Description
Make soft, fluffy French bread with a crisp crust at home. This simple recipe is suitable for beginners and ready quickly.
Ingredients
- 3 cups all-purpose flour
- 1 teaspoon salt
- 1 packet (2 1/4 teaspoons) active dry yeast
- 1 1/4 cups warm water (about 105-115°F)
- 1 tablespoon olive oil
- 1 egg white, lightly beaten (for wash)
Instructions
- In a large bowl, mix the flour and salt.
- In a separate small bowl, dissolve the yeast in the warm water and let it sit for 5 minutes until foamy.
- Pour the yeast mixture and olive oil into the flour mixture. Mix until a shaggy dough forms.
- Turn the dough out onto a lightly floured surface. Knead for 6 to 8 minutes until the dough is smooth and elastic.
- Place the dough in a lightly oiled bowl, turning to coat. Cover the bowl with plastic wrap and let it rise in a warm place for 45 minutes, or until doubled in size.
- Gently punch down the risen dough. Shape it into a long, even loaf or two smaller baguettes. Place the loaf on a baking sheet lined with parchment paper.
- Cover the loaf loosely and let it rest for a second rise for 20 minutes. Preheat your oven to 400°F (200°C) during this time.
- Brush the top of the loaf lightly with the beaten egg white. Score the top of the bread 3 or 4 times with a sharp knife.
- Bake for 25 to 30 minutes, or until the crust is golden brown and the bread sounds hollow when tapped.
- Cool on a wire rack before slicing.
Notes
- For a crispier crust, place a shallow pan of water on the bottom rack of the oven while preheating to create steam.
- If you prefer a softer crust, skip the egg white wash.
- Use warm water for the yeast; water that is too hot will kill the yeast.
- Prep Time: 15 min
- Cook Time: 30 min
- Category: Baking
- Method: Baking
- Cuisine: French
Nutrition
- Serving Size: 1 slice
- Calories: 150
- Sugar: 1
- Sodium: 180
- Fat: 1
- Saturated Fat: 0
- Unsaturated Fat: 1
- Trans Fat: 0
- Carbohydrates: 31
- Fiber: 1
- Protein: 4
- Cholesterol: 0