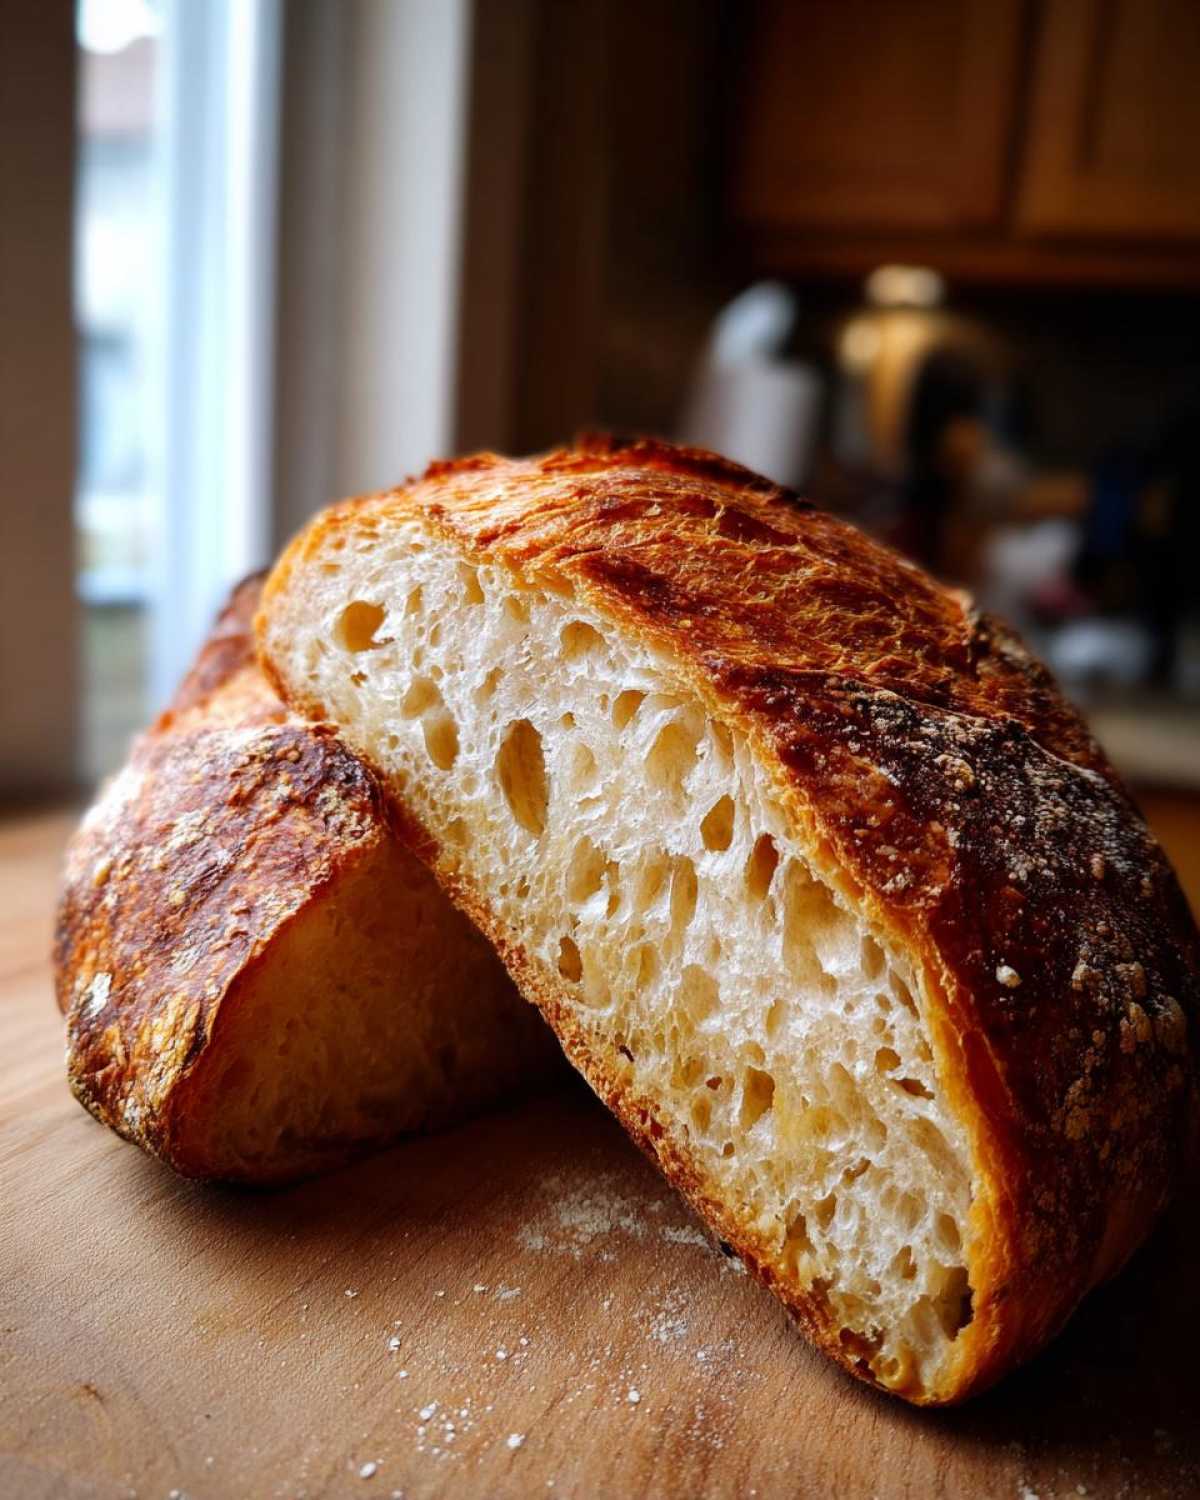
I used to think getting that perfect, crackly, bakery-style crust meant needing some crazy equipment or spending all day babysitting dough. Wrong! If you’re dreaming of turning out a loaf of Italian bread that makes your whole kitchen smell incredible—you know, the kind with that thick, golden, shattering crust and an inside that’s soft, open, and wonderfully chewy—you can do it. And fast, too! I’m sharing my absolute favorite recipe because it cuts out all the fuss. Seriously, the active time here is minimal, and the secret to that rustic perfection is something you probably already do: steam! Trust me, once you master this simple loaf, you’ll never buy store-bought again.
Why This Easy Crusty Italian Bread Recipe Works for Beginners
I get it—baking bread can look intimidating, but this recipe is seriously foolproof. We aren’t talking about fussy sourdough starters or hours of kneading that leaves your arms aching. This method is built for folks who want amazing results without the fuss. I promise, you don’t need to be a professional baker to pull this off!
- We use instant yeast, which gets going right away, cutting down on proofing time significantly.
- The minimal kneading required helps you get the right structure without overworking the dough.
- It delivers that incredible bakery-style look and feel—super crispy outside, delightfully soft inside!
If you have 15 minutes of active hands-on time, you’re basically ready to make this incredible artisan-style bread.
Quick Prep Time for Fresh Italian Bread
The true beauty of this recipe, especially when you are craving a warm Italian loaf right now, is the timeline. Active prep is done in under twenty minutes. Once you mix the water and flour, you let the yeast do the heavy lifting. Traditional loaves can take 4-5 hours total, but we shorten that first rise without sacrificing quality. You get the satisfaction of homemade Italian bread much faster!
Achieving Bakery Style Bread at Home
That crust you dream about? It only happens with steam. Seriously, don’t skip step 8! When you dump hot water into that screaming hot pan at the bottom of the oven, it creates a cloud of moisture. This steam keeps the outside of your dough supple for the first few minutes of baking, allowing it to expand wildly. Once that moisture burns off, the crust sets immediately, resulting in that crackly, shatter-on-your-plate exterior. It’s the best trick for true Bakery Style Bread at Home.
Ingredients for Your Soft and Chewy Italian Loaf
Okay, so this is the simple part—and I mean *really* simple. I want you using ingredients you probably already have tucked away in the pantry. No specialty flours needed here, which makes this such a fantastic easy homemade bread project. Measuring correctly is key, especially the water temperature, so make sure you check that before you mix!
- 3 cups all-purpose flour (scooped lightly and leveled, please!)
- 1 teaspoon instant dry yeast (the fast-acting kind!)
- 1 1/2 teaspoons fine sea salt
- 1 1/4 cups warm water (aim for 105-115°F—not too hot, or you’ll kill the yeast!)
- 1 tablespoon good quality olive oil
- 1 egg white, lightly beaten (this is our little secret for a golden shine!)
That’s it for the whole Italian bread loaf. See how short that list is? Amazing!
Ingredient Notes and Simple Bread Ingredient Substitutions
Let’s talk briefly about a few of these Simple Bread Ingredients because precision matters, even in an easy recipe! The warm water temperature is crucial; if it’s too cold, the yeast won’t wake up, and your dough won’t double. If it’s scalding (over 120°F), you risk killing the yeast completely, and we just won’t get that rise, will we?
Also, that egg white wash is there specifically for that lacquered, deep golden color. If you have an egg allergy or just don’t want to use it, don’t panic! You can brush the dough with a tiny bit of milk or even just water right before it goes into the oven. It won’t get quite as shiny, but it works wonderfully. For other variations, check out how I make amazing stovetop flatbreads! It’s all about understanding the basics.
Step-by-Step Tutorial for Easy Homemade Bread
Alright, let’s get our hands dusty! This is where the magic happens, and I promise every step is straightforward. This recipe makes achieving that coveted Easy Homemade Bread texture surprisingly manageable. Remember, we are aiming for that beautiful, airy structure that makes this Italian bread so perfect for soaking up sauce! If you want to see how similar dough techniques apply to a stovetop favorite, check out my thoughts on skillet naan bread.
Mixing and First Rise for Perfect Italian Bread Dough
First, grab a big bowl and whisk all your dry stuff—flour, yeast, salt—together completely. Then, pour in the warm water and that splash of olive oil. You’re not going to use a mixer here; just use a sturdy wooden spoon until you get what I call a ‘shaggy mess.’ It won’t look like bread dough yet, and that’s okay! Turn that shaggy mess onto a lightly floured surface and knead it for about five to seven minutes. You want it smooth, almost like silk, before you stick it in an oiled bowl, cover it up, and let it chill out for an hour to 90 minutes. You’ll know it’s ready when it’s doubled. Don’t worry if it takes the full 90 minutes!
Shaping and Creating Steam for a Crusty Italian Bread Recipe
Once it’s happily doubled, gently punch the air out—don’t beat it up, just deflate it. Shape it loosely into your loaf or round. Now, the most important part of this whole Crispy Crust Bread Tutorial: the steam setup! While the dough rests for its final 30 minutes (second rise), you must preheat your oven to 400°F with an empty shallow pan sitting right on the bottom rack. Once preheated, brush your dough with that beaten egg white and score it quickly with a sharp knife. Then, open the oven, quickly pour about half a cup of hot water into that bottom pan, shut the door fast, and bake for 25 to 30 minutes. That blast of steam is what guarantees your Crusty Italian Bread Recipe becomes a masterpiece!
Tips for Success When Making Your Rustic Italian Loaf
We’ve got the dough mixed and the oven screaming hot; now let’s talk about nailing that visual perfection for your Rustic Italian Loaf. The cooling step is just as crucial as the baking! You must let it cool completely on a wire rack before you even think about slicing it. I learned this the hard way. The first time I rushed to slice my loaf, it looked beautiful, but the inside steamed itself into a gummy mess—all that internal structure collapsed! Patience pays off, trust me.
If you really want that extra crispy shell, try this little trick: keep a spray bottle handy! During the first ten minutes of baking, quickly open the door, spritz the oven walls a couple of times with plain water, and slam that door. It gives the crust yet another boost of steam. Also, don’t forget you can use this basic dough for smaller things too! If you divide it into eight pieces instead of one big loaf, you get the cutest little homemade dinner rolls. For more tips on dough handling, you might want to peek at my soda bread muffin guide for comparison!
Serving Suggestions: What to Serve with Italian Bread
This gorgeous, crusty Italian bread isn’t just for looking at! Honestly, the best thing I ever do is pull a loaf out of the oven, let it cool just enough so I don’t burn my fingers, and hack off big chunks for dipping. If you’re wondering What to Serve with Italian Bread, my first answer is always: good olive oil, some flaky salt, and maybe a little cracked pepper. Simple perfection!
But let’s get serious about dinner, too. This bread is sturdy enough to handle soaking up all the rich sauce from your favorite pasta. I love making a giant bowl of creamy mushroom pasta just so I have an excuse to make this loaf. It’s also the perfect partner for something brothy, like a big pot of hearty minestrone—the bits that fall into the soup are the best part!
And okay, if you aren’t eating it with soup or sauce, you absolutely must slice it thick and use it for sandwiches. Hard salami, provolone, and some sharp mustard? Absolute heaven on this soft and chewy Italian loaf. It holds up beautifully!
Storage and Reheating Instructions for Your Warm Italian Loaf
This bread is truly best the day you bake it, but we definitely want to enjoy leftovers, right? You need to store your Italian bread at room temperature in a paper bag—never plastic! Plastic traps moisture and that glorious crust melts away into sadness. If you have leftovers the next day, don’t despair about losing that crispiness. Just spritz the crust lightly with water and pop the loaf back into a 350°F oven for about five minutes. That burst of heat and moisture reactivates that beautiful golden crunch, giving you a truly Warm Italian Loaf again!
Frequently Asked Questions About Making Italian Bread
I get so many messages asking about tweaks and troubleshooting when people try this recipe for the first time. That’s totally normal! Baking is chemistry, but it’s also intuition. Let’s clear up a few things so your Italian bread comes out perfect every time. It’s all about building that authority in the kitchen, and mastering these little hurdles is part of the fun!
Can I use this recipe for Quick Italian Bread?
If you need it done fast, this recipe is already pretty speedy! Because we use instant yeast, we skip the whole dead-time of letting the yeast bloom. If you are really rushing, you can try bumping up the yeast slightly (maybe 1/4 teaspoon more) and placing the bowl in a slightly warmer spot—like inside your oven when it’s off, but with the light on. However, don’t cut the first rise short by more than about 20 minutes, or you risk a gummy texture instead of that soft and chewy Italian loaf you deserve.
What if I don’t have a shallow pan for steam?
Oh, I’ve been there when I have too many items in the oven! If you don’t have that empty shallow pan for the steam, don’t fret about your crusty Italian bread recipe. The next best thing is using a cast-iron skillet, which holds heat better, or you can simply use an oven-safe metal baking dish that already has water in it when you preheat your oven. Just be super careful when adding more hot water later, as you don’t want to splash it! Another trick is placing ice cubes right onto the bottom oven floor during the first ten minutes of baking. It creates a quick blast of steam, just like the spray bottle method!
Want to see how a dough with zero kneading works? Check out my tips on making no-knead doughs; the principles are similar when it comes to respecting the rise!
Estimated Nutritional Data for Homemade Italian Bread
I always like to give you guys a little heads-up on what’s in these delicious loaves, though remember, this is just an estimate! Because we are using super simple ingredients like flour, water, and yeast, the numbers aren’t too shocking, especially when you consider how much bread this recipe makes—a whole single loaf!
These figures are based on dividing the recipe yield into 12 standard slices. If you cut bigger pieces for dipping, obviously the numbers will go up a bit! This transparency helps you use this Italian bread confidently alongside any meal plan.
- Calories: Approximately 150 per slice
- Total Fat: About 1 gram per slice
- Protein: Around 4 grams per slice
- Total Carbohydrates: Roughly 32 grams per slice
It’s wholesome, it’s satisfying, and it’s honest bread. Enjoy every single slice of that crispy crust!
Print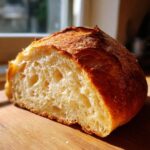
Easy Crusty Italian Bread
- Total Time: 1 hour 45 min
- Yield: 1 loaf 1x
- Diet: Vegetarian
Description
Make bakery-style Italian bread at home with a crispy crust and a soft, chewy interior. This recipe is simple enough for beginners.
Ingredients
- 3 cups all-purpose flour
- 1 teaspoon instant dry yeast
- 1 1/2 teaspoons salt
- 1 1/4 cups warm water (about 105-115°F)
- 1 tablespoon olive oil
- 1 egg white, lightly beaten (for wash)
Instructions
- In a large bowl, whisk together the flour, yeast, and salt.
- Add the warm water and olive oil to the dry ingredients. Mix with a wooden spoon until a shaggy dough forms.
- Turn the dough out onto a lightly floured surface. Knead for 5 to 7 minutes until the dough is smooth and elastic.
- Place the dough in a lightly oiled bowl, turning to coat. Cover the bowl with plastic wrap or a clean kitchen towel. Let the dough rise in a warm place for 60 to 90 minutes, or until doubled in size.
- Gently punch down the risen dough. Shape it into a long loaf or round shape. Place the loaf on a baking sheet lined with parchment paper.
- Cover the shaped loaf loosely and let it rest for a second rise for 30 minutes. Preheat your oven to 400°F (200°C) during this time. Place a shallow pan on the bottom rack to create steam later.
- Brush the top of the loaf lightly with the beaten egg white. Score the top of the bread with a sharp knife 2 or 3 times.
- Carefully pour about 1/2 cup of hot water into the shallow pan on the bottom rack and quickly close the oven door to trap the steam.
- Bake for 25 to 30 minutes, or until the crust is deep golden brown and the internal temperature reaches 200°F (93°C).
- Remove the bread from the oven and let it cool completely on a wire rack before slicing.
Notes
- For an extra crispy crust, spray the oven walls with water a couple of times during the first 10 minutes of baking.
- You can use this dough to make rolls by dividing it into 8 equal pieces before the second rise.
- This bread is excellent served warm with butter or used for dipping into pasta sauce.
- Prep Time: 15 min
- Cook Time: 30 min
- Category: Baking
- Method: Baking
- Cuisine: Italian
Nutrition
- Serving Size: 1 slice
- Calories: 150
- Sugar: 1
- Sodium: 300
- Fat: 1
- Saturated Fat: 0
- Unsaturated Fat: 1
- Trans Fat: 0
- Carbohydrates: 32
- Fiber: 1
- Protein: 4
- Cholesterol: 0