Oh my gosh, you know those nights, right? You’re craving that perfect, salty, cheesy burger flavor, but you just *cannot* deal with a heavy bun or the mess afterwards? I was there all the time until I figured out this absolute lifesaver. Seriously, this cheeseburger bowl has completely changed my weeknight dinners! I took everything I love about a classic burger—the savory seasoned beef, the sharp melted cheddar, the tangy sauce—and stripped away everything bulky. It’s fast, it’s low-carb, and it’s perfect for getting dinner ready in under 30 minutes. Trust me, once you try this deconstructed magic, you won’t look back!
Why This Low Carb Burger Bowl is Your New Favorite Quick Dinner Ideas
When I say 20 minutes, I mean it! This whole Low Carb Burger Bowl comes together faster than calling for takeout, which is a huge win on chaotic evenings. You get all the satisfaction of comfort food bowls without the blood sugar spike. It just hits all the right spots for a busy cook.
What makes this recipe so fantastic for planning ahead is how well the components store and reheat. Take a look at why this version is such a staple in my kitchen:
- It’s naturally Keto compatible—no starchy fillers means you stay on track!
- It’s a true 20-minute recipe when you cook the beef and sauce simultaneously.
- It’s designed to be assembled into four separate containers for grab-and-go lunches.
I even linked a great recipe for low-sodium baked salmon if you ever want a different protein for your bowl rotation!
Perfect for Meal Prep Burger Bowls
Since we aren’t dealing with soggy buns, these Meal Prep Burger Bowls are rock solid for batch cooking. I usually make four servings on Sunday evening. Having these ready to grab means I have a guaranteed High Protein Dinner waiting for me straight from the fridge three days in a row. The lettuce holds up great if you keep the sauce on the side!
Naturally Gluten Free Burger Option
If you or someone you’re cooking for needs to skip the gluten, you are golden here! Since there is zero bread involved, this cheeseburger bowl is automatically a safe and delicious Gluten Free Burger Option. No special flours or gluten-free buns required—just pure, delicious beef and toppings!
Essential Ingredients for Your Cheeseburger Bowl Recipe
Okay, the beauty of a cheeseburger bowl is that it relies on such simple, classic stuff. You don’t need a pantry full of fancy spices, just the core elements that make a burger taste like a burger! But, I do have opinions! For the best flavor in this whole Cheeseburger Bowl Recipe, you need to splurge just a tiny bit on the beef. That 80/20 ratio has more fat, which means more flavor once it cooks down—don’t skim on that, trust me!
Here’s exactly what you need to pull this wonderful thing together. Prep your things before you even turn on the stove; it speeds things up tremendously!
Ground Beef and Seasoning
This is the heart of the operation, so grab the good stuff. I recommend 80/20 ground beef because it gives you that perfect sizzle and richness you expect from a classic diner burger.
- 1 pound ground beef (80/20 recommended)
- 1 teaspoon salt
- 1/2 teaspoon black pepper
- 1 tablespoon olive oil
Tangy Burger Sauce Recipe Components
This sauce is non-negotiable! We make it from scratch, and it only takes two minutes. This homemade Burger Sauce Recipe is what makes the whole bowl pop and ties all the toppings together beautifully.
- 1/4 cup mayonnaise
- 1 tablespoon yellow mustard
- 1 teaspoon ketchup (low sugar if preferred)
- 1/2 teaspoon apple cider vinegar
Cheeseburger Bowl Toppings and Cheese
Keep these fresh and crisp so you get that great textural crunch when you bite into the bowl. The cheese needs to be a good melter, too!
- 1/2 cup shredded lettuce
- 1/4 cup chopped dill pickles
- 2 tablespoons diced white onion
- 4 slices cheddar cheese
How to Prepare the Ultimate Cheeseburger Bowl
Okay, this is where the magic happens, and honestly, it’s so fast! Since we want this to be one of those Easy Weeknight Bowl Meals that genuinely delivers on time, we multitask. The key is getting your beef happily sizzling away while you whip up that incredible sauce. Pay close attention to draining the fat—nobody wants a greasy bottom layer on their perfect cheeseburger bowl!
Preparing the Ground Beef for Your Cheeseburger Bowl
First things first: grab your pound of beef, the salt, and the pepper. I like to just use my clean hands to gently mix it all in—don’t overwork it! Over-mixing makes tough burgers, and we want tender crumbles here. Heat up that olive oil in your skillet over medium-high heat. Toss the seasoned beef in and get cooking. Use a spoon to break it up into little flavorful chunks as it browns. You’re looking for about 6 to 8 minutes until it’s perfectly browned. Once done, tilt that pan and drain off every bit of excess grease. We want flavor, not oil!
Making the Homemade Burger Sauce Recipe
While that beef is browning, start your sauce! This is what gives it that classic diner tang. You just whisk together the mayonnaise, mustard, ketchup, and that little splash of apple cider vinegar in a small bowl. It comes together in seconds. I always feel so accomplished when I’ve got both parts ready to rock at the same time. If you want more inspiration for bright flavors, check out this easy smash burger sauce recipe guide I did a while back!
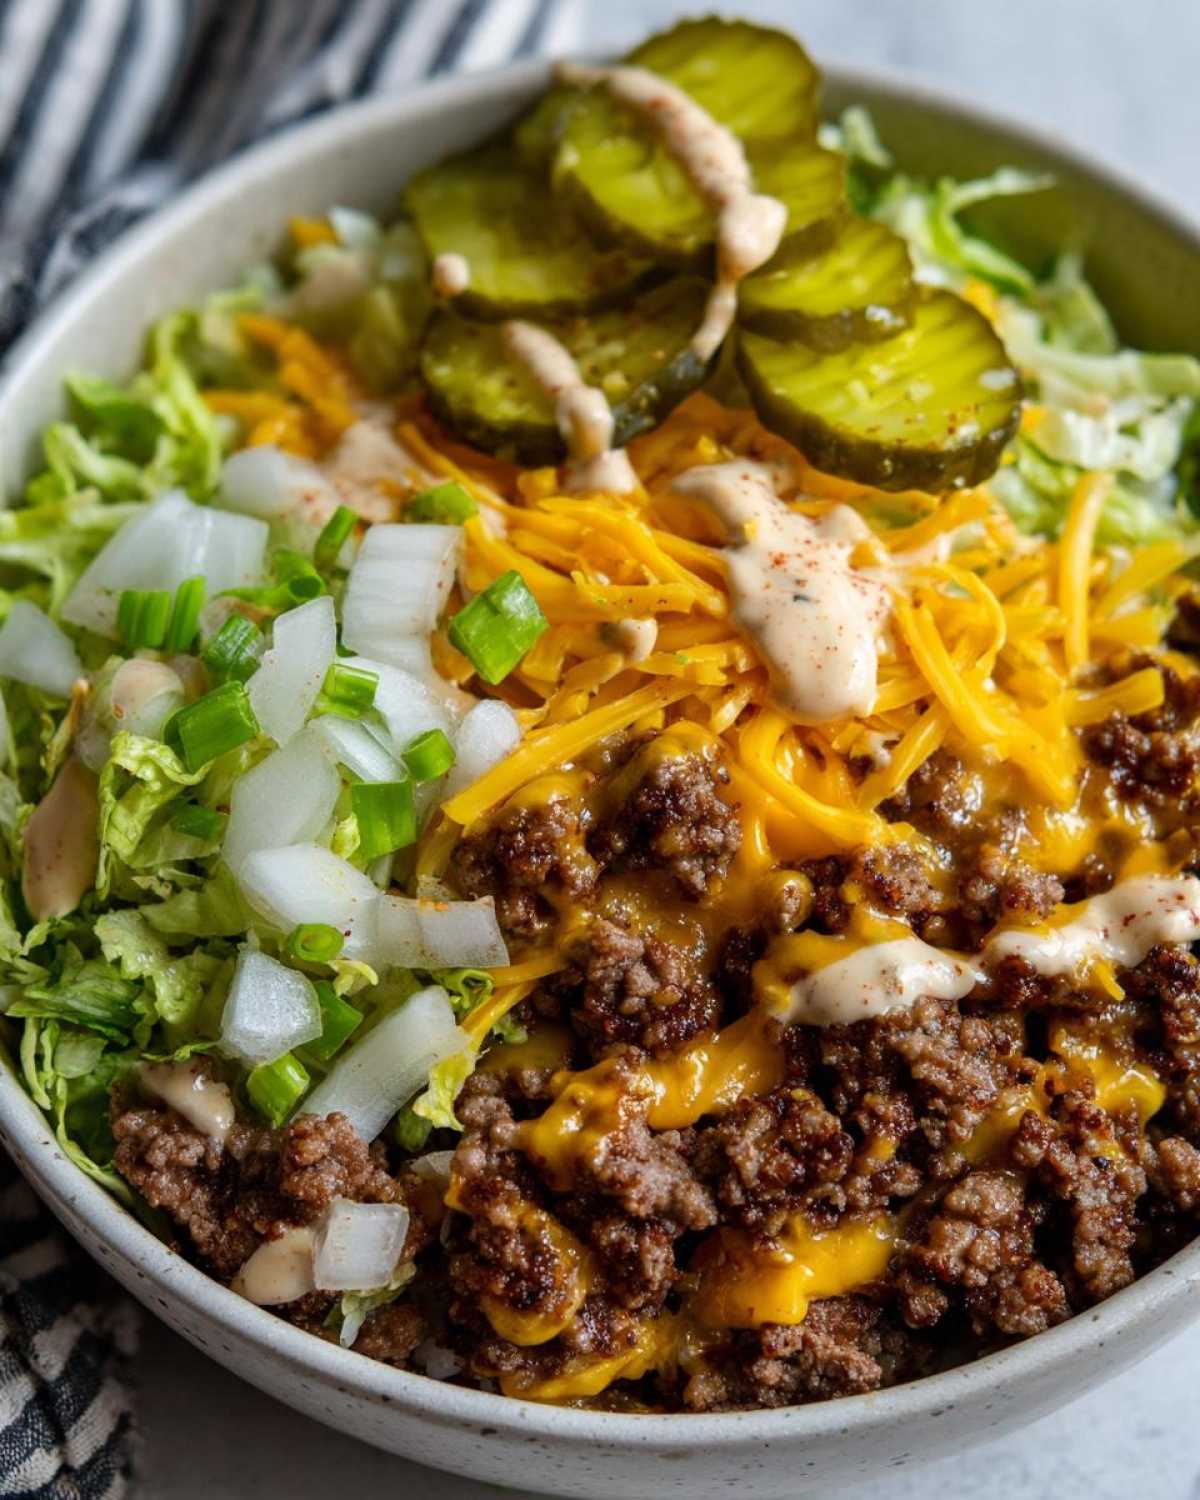
Assembling Your Deconstructed Burger
Now we build! Divide the hot, drained ground beef evenly into your four bowls or containers. Right away, plop one slice of cheddar cheese on top of the hot beef in each one—cover the pan for just a minute or two so it gets perfectly melty and gooey. Once the cheese is softened, layer on your cold toppings: the fresh shredded lettuce, the crunchy dill pickles, and the diced white onion. Finally, drizzle that homemade sauce lavishly over everything. Cool everything down before you seal those lids up if you’re prepping them for later!
Ingredient Notes and Substitutions for Your Cheeseburger Bowl
I love that you guys are asking about swaps because that’s what really turns a good recipe into *your* favorite recipe! This format is so forgiving, which is fantastic for keeping things interesting and diet-friendly. We aren’t glued to the beef here; we can customize this cheeseburger bowl to fit whatever you have on hand or whatever you’re craving this week. It’s all about those core burger flavors, no matter the protein underneath.
If you are looking for other lean protein ideas, I actually have a great teriyaki turkey wrap recipe that uses similar flavor principles if you ever want to branch out!
Protein Swaps for a Healthier Hamburger Bowl
If beef isn’t your thing, or maybe you’re trying to keep the fat down, don’t stress for a second! You can absolutely use ground turkey (white or dark meat works) or even ground chicken in this Healthy Hamburger Bowl recipe. Just keep in mind that poultry cooks up a little faster and can sometimes be drier than the fatty ground beef. I usually season the turkey a tiny bit heavier with garlic powder when I use it, just to boost that savory flavor.
Keto Cheeseburger Bowl Base Options
The base layer is where you can really solidify the low-carb count. While the shredded lettuce I list works great, if you are going strict Keto or just want a different texture, cauliflower rice is my go-to base for any Keto Cheeseburger Bowl. You can steam it lightly first or even serve the beef mixture right on top of cold cauliflower rice. It soaks up that extra delicious burger juice and sauce perfectly!
Tips for Success with Meal Prep Burger Bowls
When you’re making a batch of these Meal Prep Burger Bowls, texture is everything! You want that satisfying crunch from the onions and pickles to survive the journey from the fridge to your lunch break. My biggest piece of advice, seriously, is this: you have to let everything cool down completely before you seal the lids.
If you trap warm beef and melted cheese under plastic, you create steam, and steam equals sad, soggy toppings. I always spread the cooked beef out on a baking sheet for five minutes right after draining before portioning it out. It cools fast!
Also, if you can possibly manage it, keep that amazing tangy sauce separate! You can store it right in a tiny little container with the bowl. When you reheat your beef and cheese—maybe pop it stovetop for a minute, or just microwave it—then you add the cold toppings and drizzle the sauce on last. That separation keeps everything crisp. It’s an extra tiny step, but it makes reheating feel like you just made a fresh cheeseburger bowl! For more tips on keeping things fresh during batch cooking, check out my thoughts on meal prepping grain bowls; the cooling rules are the same!
Storage and Reheating Instructions for Your Cheeseburger Bowl
Since we designed this as the ultimate set of Meal Prep Burger Bowls, storage is super important for maintaining that fresh-off-the-grill texture. Once everything—the beef, the cheese, the toppings—has cooled down completely, you want to seal those containers tight. Airtight is the magic word here, folks. You can safely keep these ready-to-eat bowls in the fridge for up to four whole days!
When lunchtime rolls around, reheating is easy. The microwave works great just for warming up the beef and melting the cheese again. If you have five extra minutes, though, pop the beef and cheese into a small skillet over medium heat instead. That stovetop method gets the beef sizzling nicely again, making your cheeseburger bowl taste almost freshly made!
Serving Suggestions for This Bunless Burger Dinner
Even though this Bunless Burger Dinner is basically a perfect meal all on its own, sometimes you just want a little something extra on the side, right? We want to keep things simple because the whole point here is speed, so skip anything complicated!
My favorite thing to pair with this savory, cheesy bowl is a side of green veggies. Roasted broccoli tossed with a little salt and pepper is unbelievably good next to the tangy sauce. If you need a little crunch on the side, I highly recommend roasting up some chickpeas—they add great texture! You can find my favorite recipe for garlic parmesan roasted chickpeas in that link if you want something addictive to snack on while you eat!
Frequently Asked Questions About the Cheeseburger Bowl Recipe
It’s so common to have questions when you’re adapting a classic comfort food, especially when you’re skipping the bread! I get asked all the time about swapping proteins or making sure this cheeseburger bowl fits strict diets. Don’t worry, I’ve got the answers to keep your Ground Beef Bowls delicious and simple!
Can I use turkey instead of ground beef in this Low Carb Burger Bowl?
Absolutely! I mentioned this briefly, but yes, you can swap the beef for ground turkey or chicken to make a leaner Low Carb Burger Bowl. Since poultry tends to be less flavorful than beef, I highly recommend adding about half a teaspoon of smoked paprika to the seasoning mix. That little bit of smokiness really bumps up the savory factor so you don’t miss the beef at all!
What makes this recipe suitable for Keto?
The Keto compatibility is one of the best parts of the deconstructed burger. The main thing is that we ditch the bun completely—no hidden carbs there! Plus, the homemade Burger Sauce Recipe relies on mayonnaise and mustard, which are naturally low in sugar and carbs. As long as you use low-sugar ketchup (or skip it entirely), this is a fantastic, flavor-packed Keto Cheeseburger Bowl ready for your macros!
How long can I store these Meal Prep Burger Bowls?
Because we cook the meat and keep the fresh stuff slightly separate, these Meal Prep Burger Bowls hold up really well. You can store the cooked beef, cheese, and toppings in an airtight container in the fridge for a solid four days. I’ve done five here and there, but four is my safety recommendation to ensure that lettuce stays crisp and the cheese stays good!
Share Your Perfect Cheeseburger Bowl Creation
Seriously, I need to know what you thought! Did you love how quick this cheeseburger bowl was? Did the sauce blow your mind? When you try this recipe—especially if you played around with the toppings or used ground turkey—please come back here and leave me a rating! Five stars if it saved your dinner, that’s what I’m hoping for!
I always get the biggest kick out of seeing how you all customize comfort food bowls. Did you load up on extra pickles? Did you use a different cheese instead of cheddar? Snap a picture and tag me on social media! Your feedback helps me know these simple, bunless dinners are hitting the spot for busy cooks everywhere!
Print
Low-Carb Meal Prep Cheeseburger Bowl with Tangy Sauce
- Total Time: 20 min
- Yield: 4 servings 1x
- Diet: Low Fat
Description
Make a deconstructed cheeseburger in a bowl format. This recipe is low-carb, great for meal prepping, and features a simple homemade tangy burger sauce.
Ingredients
- 1 pound ground beef (80/20 recommended)
- 1 teaspoon salt
- 1/2 teaspoon black pepper
- 1 tablespoon olive oil
- 1/2 cup shredded lettuce
- 1/4 cup chopped dill pickles
- 2 tablespoons diced white onion
- For the Sauce: 1/4 cup mayonnaise
- For the Sauce: 1 tablespoon yellow mustard
- For the Sauce: 1 teaspoon ketchup (low sugar if preferred)
- For the Sauce: 1/2 teaspoon apple cider vinegar
- 4 slices cheddar cheese
Instructions
- Combine the ground beef, salt, and pepper in a bowl. Mix gently with your hands until just combined.
- Heat the olive oil in a large skillet over medium-high heat.
- Add the seasoned beef to the skillet and cook, breaking it up with a spoon, until browned, about 6 to 8 minutes. Drain any excess grease.
- While the beef cooks, prepare the sauce: whisk together the mayonnaise, mustard, ketchup, and apple cider vinegar in a small bowl.
- Divide the cooked ground beef among four meal prep containers or bowls.
- Top each portion of beef with one slice of cheddar cheese. Cover the skillet briefly until the cheese melts slightly.
- Top the beef and cheese with shredded lettuce, dill pickles, and diced onion.
- Drizzle the tangy burger sauce over the toppings.
- Cool completely before sealing containers for meal prep. Reheat before serving.
Notes
- You can substitute ground turkey or chicken for the ground beef if you prefer.
- For a keto base, use shredded iceberg lettuce or cauliflower rice instead of lettuce.
- This recipe is naturally gluten-free.
- Prep Time: 10 min
- Cook Time: 10 min
- Category: Dinner
- Method: Skillet Cooking
- Cuisine: American
Nutrition
- Serving Size: 1 bowl
- Calories: 450
- Sugar: 3
- Sodium: 550
- Fat: 32
- Saturated Fat: 13
- Unsaturated Fat: 19
- Trans Fat: 0
- Carbohydrates: 5
- Fiber: 1
- Protein: 35
- Cholesterol: 105