Oh my gosh, I have finally cracked the code on the most frustrating pastry known to humankind: the humble scone! For years, I battled dry, crumbly messes or scones that spread out flat like pancakes—never that glorious, Instagram-worthy height you see in coffee shops. But trust me when I say, that changes today. This simple scone recipe delivers tall, flaky **blueberry scones** with that perfect tender crumb that absolutely rivals the bakery down the street. The secret, truly, is mastering the very cold butter technique. I spent months tweaking temperatures and handling times, but now that I know the drill, making these moist and tender scones feels like magic!
Why You Will Make the Best Blueberry Scones Every Time
I’ve baked enough scones to fill a small bakery, and I promise you, this technique is the key to consistent success. This isn’t some fussy recipe that requires you to pray over the oven. It’s practical, it’s fast, and the flavor is just sunshine in a pastry!
- They Are Seriously Tall: Forget flat discs! We use a specific cutting method that traps the cold air, ensuring you get that satisfying height.
- Buttermilk Magic: Using cold buttermilk gives these blueberry scones a slight tang that perfectly balances the sweetness of the sugar and blueberries. Plus, it creates phenomenal tenderness.
- Speedy Brunch Fix: Seriously, from turning on the oven to pulling them out, you’re looking at under 40 minutes for incredible homemade scones. Perfect for a last-minute weekend treat!
- Lemon Brightness: That little bit of lemon zest we add to the dough, plus the glaze, cuts through the richness of the butter. It makes them taste fresh, not heavy.
- Foolproof Flavor: Even if your butter melts a little too much (oops!), you still end up with a delicious, moist scone because the mixing method is so forgiving.
Achieving Bakery Style Scones From Scratch
The main difference between a mediocre scone and one you’d pay six dollars for at a fancy café is the layering. When you cut that cold butter into the flour just right—leaving those visible pea-sized chunks—you create little steam pockets in the oven. Those pockets expand rapidly, pushing the dough upwards, which gives you those satisfying, flaky layers. That’s how you get bakery style scones from scratch; it’s physics, not guesswork!
Ingredients for Fluffy Blueberry Scones with Lemon Glaze
Okay, let’s talk about what goes into the best blueberry scones you’ll ever make at home. The key word here is COLD. Everything needs to be cold, and I mean *ice* cold, especially the butter and the buttermilk. Don’t even think about using room temperature butter; that’s how you get flat scones!
Here is the lineup. Grab everything before you start mixing:
For the Scones:
- 2 cups all-purpose flour
- 1/4 cup granulated sugar
- 1 tablespoon baking powder (make sure it’s fresh!)
- 1/2 teaspoon salt
- 1/2 cup (1 stick) very cold unsalted butter, cut into small cubes
- 1 large egg
- 1/2 cup cold buttermilk (yes, cold!)
- 1 teaspoon vanilla extract
- 1 cup fresh blueberries
- 1 teaspoon lemon zest
For the Bright Glaze:
- 1 cup powdered sugar
- 2 tablespoons fresh lemon juice
Ingredient Notes and Substitutions for Moist and Tender Scones
I know sometimes we don’t have every exact thing on hand, so let me give you the cheat sheets for keeping these moist and tender scones perfect. The butter must stay chunky. Those chunks are what create the flaky layers when they hit the hot oven. If you don’t have buttermilk, don’t panic! Mix 1/2 cup of regular milk with half a teaspoon of white vinegar or lemon juice and let it sit for five minutes. Perfect substitute!
Also, fresh blueberries are always superior for texture and flavor, but if you’re making these in January, frozen ones work great too. Just don’t thaw them first; throw those frosty little guys right into the dough so they don’t bleed their color everywhere during mixing.
Step-by-Step Instructions for Perfect Blueberry Scones
Alright, put on your apron! This part is where we transform those rock-solid cold ingredients into tender, flaky clouds. We’re aiming for blueberry scones that look like they were shaped by a professional pastry chef, and trust me, that happens if you follow these steps closely and don’t rush the mixing. This recipe is nearly foolproof, similar to how simple my homemade mayonnaise recipe is, which you can check out here: simple scone recipe.
First thing: oven to 400°F (200°C). Line a tray. Don’t skip lining it; we want easy cleanup!
In your big bowl, whisk the flour, sugar, baking powder, and salt. Now comes the crucial part: the butter. You need to cut that butter into the dry mix. I usually use my pastry blender, or better yet, just use your fingertips really fast! You want the butter pieces to be about the size of small peas mingled with some flatter, lentil-sized pieces. Stop when it looks like coarse sand with some visible butter chunks—that’s the foundation for those flaky layers!
Next, in a separate little bowl, quickly whisk your cold egg, the cold buttermilk, and vanilla. Pour that liquid right into the flour mix. Use a fork and mix until things barely stick together. I mean it—stop mixing when you see streaks of flour. If you overmix here, you start developing gluten, and gluten means tough scones, and we swore off tough scones!
Gently fold in your fresh blueberries and that lovely lemon zest. Turn the dough onto a lightly floured countertop. Pat it down gently into a fat, ¾-inch thick circle. No kneading! Pat, pat, pat. Cut it like a pizza into 8 wedges. Place them on your prepared sheet, leaving a little space between them so they can rise tall.
Bake them for about 15 to 18 minutes until they look nicely golden on top. They cook fast!
Tips for Flaky Scones: The Cold Technique
If you want the absolute best results, remember the main lesson: Cold is your best friend. When those icy pockets of butter hit the heat in the oven, they turn instantly into steam, puffing your scone up. That’s the secret to those wonderful layers that make me feel like I’m eating a proper café breakfast. Another big tip for those ‘tall’ scones? When you cut the circle into wedges, press the knife straight down—don’t twist or saw! Twisting seals the edges, and sealing the edges prevents the maximum lift. Keep it clean and straight for those **tips for flaky scones**.
Preparing the Bright Blueberry Scones with Lemon Glaze
While the scones cool down just slightly—they should still be warm, not piping hot—we whip up the star of the show, the glaze. Seriously, this is so easy. Whisk the powdered sugar and the fresh lemon juice together until it’s smooth. You might need a touch more juice if it’s too thick, or a tiny sprinkle more sugar if it seems runny for your liking. I look for a consistency somewhere between thick yogurt and honey.
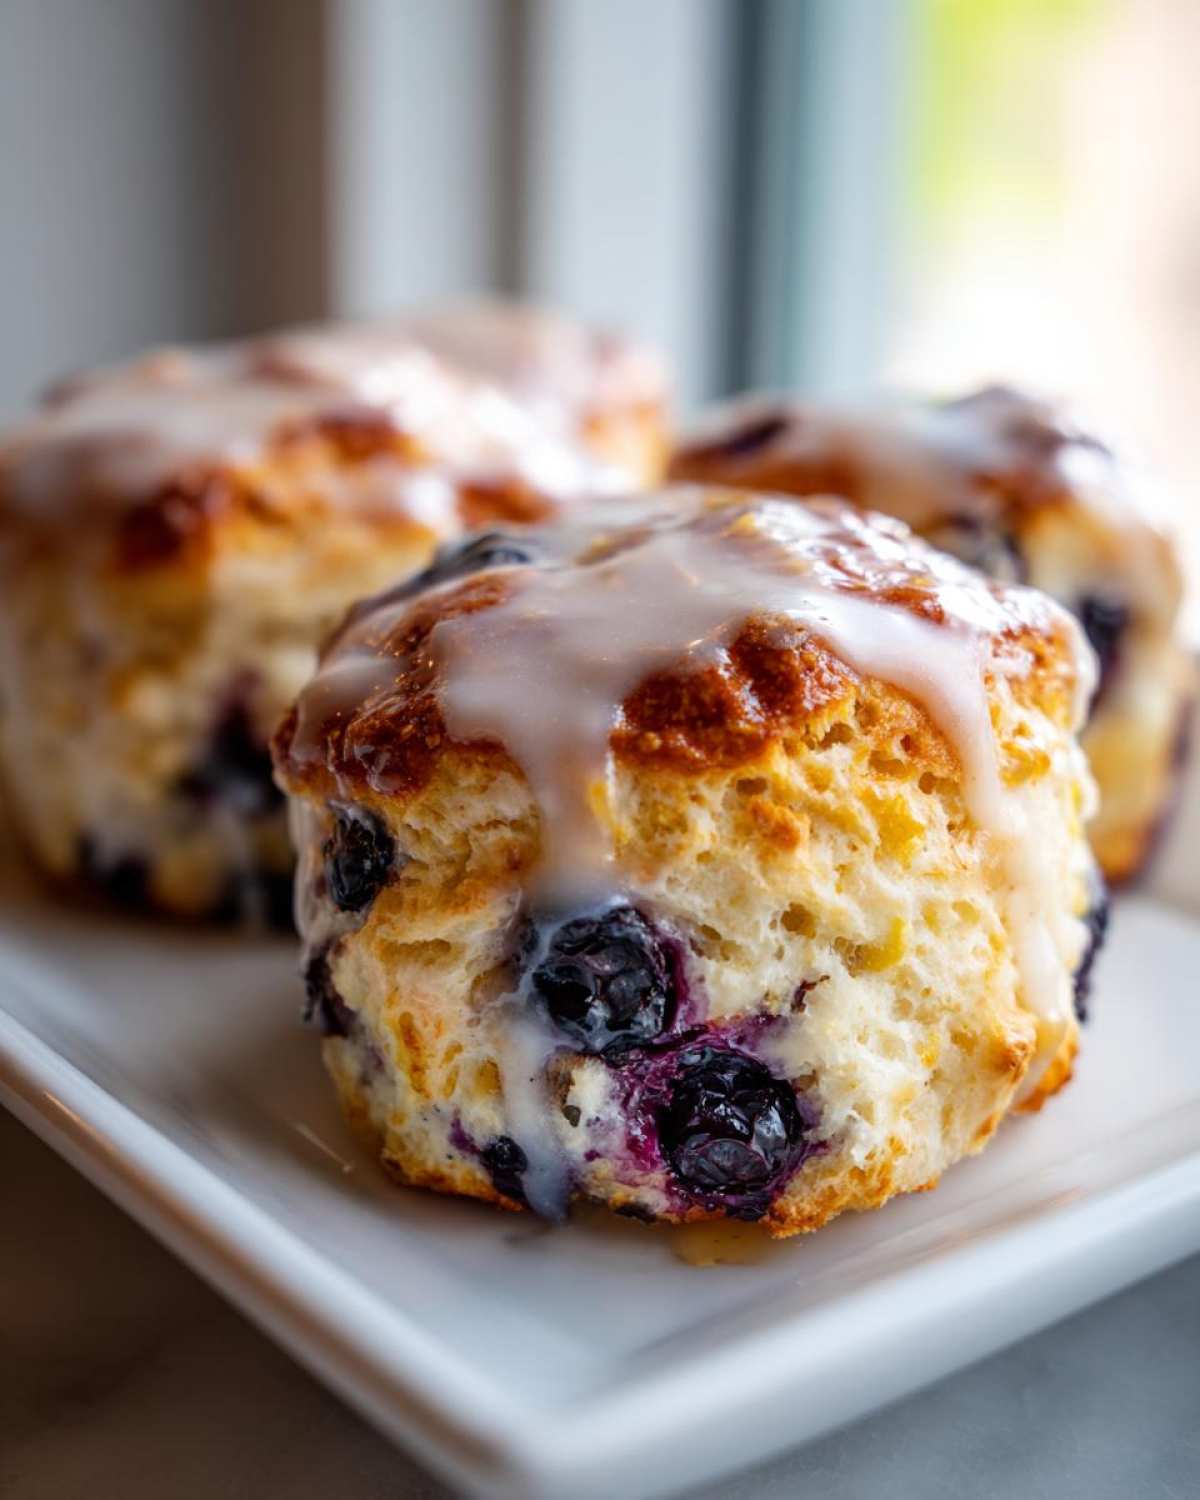
Once the blueberry scones have cooled down enough that you can handle them, drizzle that bright glaze all over the tops. The residual warmth helps the glaze set up ever so slightly without melting completely away. That final shimmer of citrus makes these absolutely irresistible for your brunch spread.
Serving Suggestions for Your Blueberry Scones
You’ve done the hard work, you’ve mastered the flakiness, and now you have these gorgeous, tender blueberry scones staring back at you! What do you do next? Well, the best way to enjoy them is while they are still slightly warm from the oven, letting that lemon glaze just barely glisten.
These aren’t just for breakfast, though they make an incredible quick brunch pastry. They are absolutely perfect for an afternoon break. Imagine pairing one with a cup of strong black coffee, or maybe a delicate Earl Grey tea.
If you want to elevate them slightly for guests—say for a bridal shower or a special Sunday brunch—don’t be afraid to serve them with a side pot of something special:
- A lovely homemade lemon curd on the side for dipping. It doubles down on that bright citrus flavor!
- A light smear of good quality clotted cream or even some cultured butter. The contrast between the hot scone and the cold cream is just divine.
- If you’re feeling decadent, serve them alongside a homemade pumpkin spice latte! Trust me, the warm spice complements the blueberry perfectly even though it’s not fall.
Honestly, though, the best way to eat my best blueberry scone recipe is plain, glaze and all. They really stand on their own as a fantastic blueberry breakfast treat!
Storage and Reheating Instructions for Blueberry Scones
Alright, you’ve made a whole batch of these perfect blueberry scones, and you’re smart enough to want some leftovers for tomorrow, right? Good! Because these are seriously addictive. But scones are tricky because they can go stale so quickly. The goal is always to lock in that wonderful tenderness we worked so hard to achieve.
For storage, keep it simple: an airtight container is your best friend. I prefer not to keep them in the fridge unless the weather is super humid, because the cold air can sometimes dry them out faster. Room temperature is totally fine for two days, especially with that glaze on top acting as a bit of protection.
If you made too many and need them to last longer than that, you can absolutely freeze them! Let them cool completely first—and I mean completely, or you’ll get condensation. Wrap each individual scone tightly in plastic wrap, and then put them all into a heavy-duty freezer bag. They’ll be great for up to two months this way.
Reviving Your Scones to That Fresh-Baked Texture
When it’s time to eat them again, you want to bring back that warm, flaky texture. I have strong feelings about reheating scones, and this is where the microwave loses! Microwaving them, even for just 15 seconds, makes them instantly chewy and ruins the tender crumb structure we built.
The absolute best way to reheat is in a conventional oven or a toaster oven. Set your oven to about 325°F (160°C). Pop the scone directly onto the rack or a small piece of foil. Heat them for about 5 to 8 minutes. This warms them gently all the way through and re-crisps the outside edges just a bit. You’ll hear them crackle a little—that’s the sound of success!
If you’re desperate and need one scone *right now*? Pop it in the toaster oven on a lower setting for just a couple of minutes; that works better than the microwave, too. Enjoy your second-day bakery treat!
Troubleshooting Common Issues with Blueberry Scones
Even with the best recipe in the world, sometimes things don’t go exactly as planned when baking. Don’t sweat it! I’ve been there, staring at a tray of disappointing pastries, wondering where I went wrong. The beauty of learning to bake from scratch is learning to diagnose the problem, and usually, it comes down to temperature or handling.
If you follow my instructions, you should get those gorgeous, tall, flaky layers, but just in case you don’t, here are my tried-and-true fixes for the two biggest scone struggles:
My Scones Spread Out Instead of Rising Tall
This is the number one call I get from people trying a new scone recipe. You wanted height, and you got width. Don’t worry, this is almost always a butter temperature issue. If your scones spread flat, it means your butter wasn’t cold enough when you mixed it in, or you overworked the dough to the point where the butter started melting back into the flour mixture before it hit the oven.
The Fix for Next Time: Stick the cubes of butter in the freezer for ten minutes right before you cut them in. When you mix, use your coldest hands possible—or even wear thin kitchen gloves! You need distinct chunks of butter. When you cut the wedges, press straight down. If you feel the dough starting to get sticky or soft while you’re working it, put the whole batch (including the cut wedges) onto the baking sheet, pop the sheet in the freezer for a quick 15-minute chill, and *then* bake them. That cold shock will help them rise up instead of melting out.
My Blueberry Scones Turned Out Dry and Crumbly
Ugh, the dreaded dry scone. Sometimes they are still tasty dipped in coffee, but they aren’t that wonderfully moist and tender scone we are aiming for. This usually happens for two reasons, both related to overworking the dough or overbaking.
If you mixed the wet and dry ingredients for too long, you developed too much gluten, making the scones tough and dry. You were looking for a shaggy, barely-combined look, remember? If you see very smooth lumps of dough instead of flaky layers, that’s likely the culprit.
The other reason is simply baking them too long. Because scones are small, they cook fast. If you baked them for 20 minutes when they only needed 16, you baked the moisture right out of them. Always check two minutes before the recipe says they are done. You want golden tops but a center that still feels slightly soft to the touch.
If they are already baked and dry, my best advice is to use them for something else! Crumble the dry blueberry scones over yogurt or use them as a base for a quick blueberry shortcake topped with whipped cream. Nothing goes to waste in my kitchen!
Frequently Asked Questions About Making Blueberry Scones
I know sometimes after you bake something this rewarding, you end up with a few lingering thoughts, especially if you’re trying to achieve that perfect texture. Here are the questions I get asked the most about my recipe for blueberry scones!
What makes this the best blueberry scone recipe?
What sets this apart as the best is the focus on texture! We aren’t looking for dense or cakey here; we want flaky, tender layers. That comes from keeping the butter ice cold and carefully handling the dough so we don’t develop too much gluten. Plus, that hit of fresh lemon zest mixed with the berries just brightens everything up. It tastes like a true bakery treat!
Can I use frozen blueberries instead of fresh?
Absolutely! If fresh aren’t available, frozen berries work perfectly fine, especially if you are looking for quick blueberry breakfast treats. The main, non-negotiable rule here is: Do not thaw them! Toss them straight from the freezer into your dough mix. Thawing them causes the juices to bleed out, turning your dough blue and sticky.
How do I ensure I get moist and tender scones every time?
That moisture largely comes from two places: the buttermilk and the fat content (the butter!). Buttermilk tenderizes the gluten structure, making the crumb soft. Also, don’t bake them past the point where they are just golden brown on top. Over-baking is the fastest way to create a dry scone. Check them at 15 minutes even if the recipe says 18!
If I don’t have buttermilk, can I still make these?
Yes, you can still manage a great, simple scone recipe without specialized buttermilk. Just measure out the 1/2 cup of regular milk, stir in a teaspoon of lemon juice or white vinegar, and let it sit on the counter for about five minutes until it looks slightly curdled. That’s your homemade buttermilk substitute!
Estimated Nutritional Data for These Blueberry Scones
Now, let’s talk fuel! I’m not a nutritionist, of course, so please take these numbers with a grain of salt—or maybe a sprinkle of that lemon glaze! These figures are based purely on the ingredients listed in the recipe and are meant to be a general guide, not gospel. If you use extra butter or add loads of extra sugar to your glaze, your numbers will change, naturally.
This provides a pretty satisfying little breakfast or brunch treat, packed with fat for flavor, but thankfully not overloaded with sugar compared to a donut!
- Serving Size: 1 scone
- Calories: 320
- Sugar: 18 (mostly from the berries and glaze!)
- Sodium: 250 mg
- Fat: 16g
- Saturated Fat: 10g
- Unsaturated Fat: 6g
- Trans Fat: 0g
- Carbohydrates: 40g
- Fiber: 1g
- Protein: 6g
- Cholesterol: 75mg
Remember, these are estimates for one of our beautifully tall, flaky blueberry scones topped with the standard amount of glaze. If you decide to skip the glaze because you’re being extra healthy—which I rarely do, let’s be honest—your sugar and calories will drop significantly! Enjoy them!
Share Your Bakery Style Scones From Scratch Experience
Now that you’ve got the recipe for the best blueberry scone recipe, I really, truly want to know how it went! Did you hit that elusive flaky texture? Did those wedges rise up tall like they were supposed to, or did they spread a little bit? Every baker, even me, learns something new every time they mix up a batch of pastry.
Please, please leave a comment below! Tell me what you thought, how you rated the tenderness, and if you dared to try any variations. Did you use frozen berries? Did you try a different topping? Your feedback helps everyone else reading this recipe feel confident they can master bakery style scones from scratch too.
And if you took a picture—and I know you did, because these are beautiful—I would absolutely love to see your success! Tag me on social media if you post a picture of your gorgeous blueberry scones. It makes my entire week seeing your kitchen triumphs.
If you have any lingering questions that I maybe didn’t cover in the FAQ section, or if you just want to send a virtual ‘thank you’ note for saving your Saturday brunch, feel free to reach out through my contact page here: contact. Happy baking, friends!
Print
Tall and Flaky Bakery-Style Blueberry Lemon Scones
- Total Time: 33 min
- Yield: 8 scones 1x
- Diet: Vegetarian
Description
Make moist, tender blueberry scones with a flaky texture similar to coffee shop versions. This recipe includes a bright lemon glaze.
Ingredients
- 2 cups all-purpose flour
- 1/4 cup granulated sugar
- 1 tablespoon baking powder
- 1/2 teaspoon salt
- 1/2 cup (1 stick) cold unsalted butter, cut into small cubes
- 1 large egg
- 1/2 cup cold buttermilk
- 1 teaspoon vanilla extract
- 1 cup fresh blueberries
- 1 teaspoon lemon zest
- For the Glaze: 1 cup powdered sugar
- 2 tablespoons fresh lemon juice
Instructions
- Preheat your oven to 400°F (200°C). Line a baking sheet with parchment paper.
- In a large bowl, whisk together the flour, granulated sugar, baking powder, and salt.
- Cut in the cold butter using a pastry blender or your fingers until the mixture resembles coarse crumbs with some pea-sized pieces of butter remaining.
- In a small bowl, whisk the egg, buttermilk, and vanilla extract together.
- Pour the wet ingredients into the dry ingredients. Mix gently with a fork until just combined. Do not overmix.
- Gently fold in the fresh blueberries and lemon zest.
- Turn the dough out onto a lightly floured surface. Gently pat the dough into a 3/4-inch thick circle.
- Cut the circle into 8 equal wedges, like a pizza. Place the wedges onto the prepared baking sheet, leaving about 1 inch between them.
- Bake for 15 to 18 minutes, or until the tops are lightly golden brown.
- While the scones cool slightly, whisk together the powdered sugar and lemon juice to create the glaze.
- Drizzle the glaze over the warm scones before serving.
Notes
- For the flakiest scones, keep all your ingredients, especially the butter and buttermilk, very cold.
- If using frozen blueberries, do not thaw them before adding them to the dough.
- To achieve tall scones, avoid twisting the knife when cutting the wedges; press straight down.
- Prep Time: 15 min
- Cook Time: 18 min
- Category: Breakfast
- Method: Baking
- Cuisine: American
Nutrition
- Serving Size: 1 scone
- Calories: 320
- Sugar: 18
- Sodium: 250
- Fat: 16
- Saturated Fat: 10
- Unsaturated Fat: 6
- Trans Fat: 0
- Carbohydrates: 40
- Fiber: 1
- Protein: 6
- Cholesterol: 75