Oh my goodness, are you tired of sweet potatoes that come out either rock-hard in the middle or slimy on the outside? I totally get it! For years, I wrestled with this seemingly simple vegetable. It’s supposed to be the star side dish, right? But you end up with something that feels more steamed than roasted. Well, stop worrying right now, because I finally cracked the code!
I’ve tested every trick under the sun—foil, no foil, high heat, low heat—and I’m telling you, this technique guarantees the ultimate **baked sweet potato** every single time. We’re talking about an interior so fluffy it practically melts, paired with a beautifully caramelized, slightly crisp skin. Trust me, after making hundreds of these for holiday dinners and weeknight sides, this is the one foolproof method you need in your back pocket.
Why This Is the Best Way to Make a Baked Sweet Potato
So, why do I swear by this particular setup? It’s all about managing moisture, my friend. Most recipes try to baby the sweet potato by wrapping it in foil, but that traps all that lovely steam inside. And what happens when steam stays trapped? You get a mushy, steamed mess instead of a vibrant, fluffy interior. We want that high, dry heat kissing the skin!
When you place the **baked sweet potato** directly on the rack at 400°F, you encourage all that inner liquid to turn to steam, which lifts the flesh away from the skin. It’s chemistry, but it feels like magic! If you’re looking for the absolute best sweet potato side for your next gathering—maybe even better than those amazing fluffy sweet potato biscuits—trust this direct-heat approach.
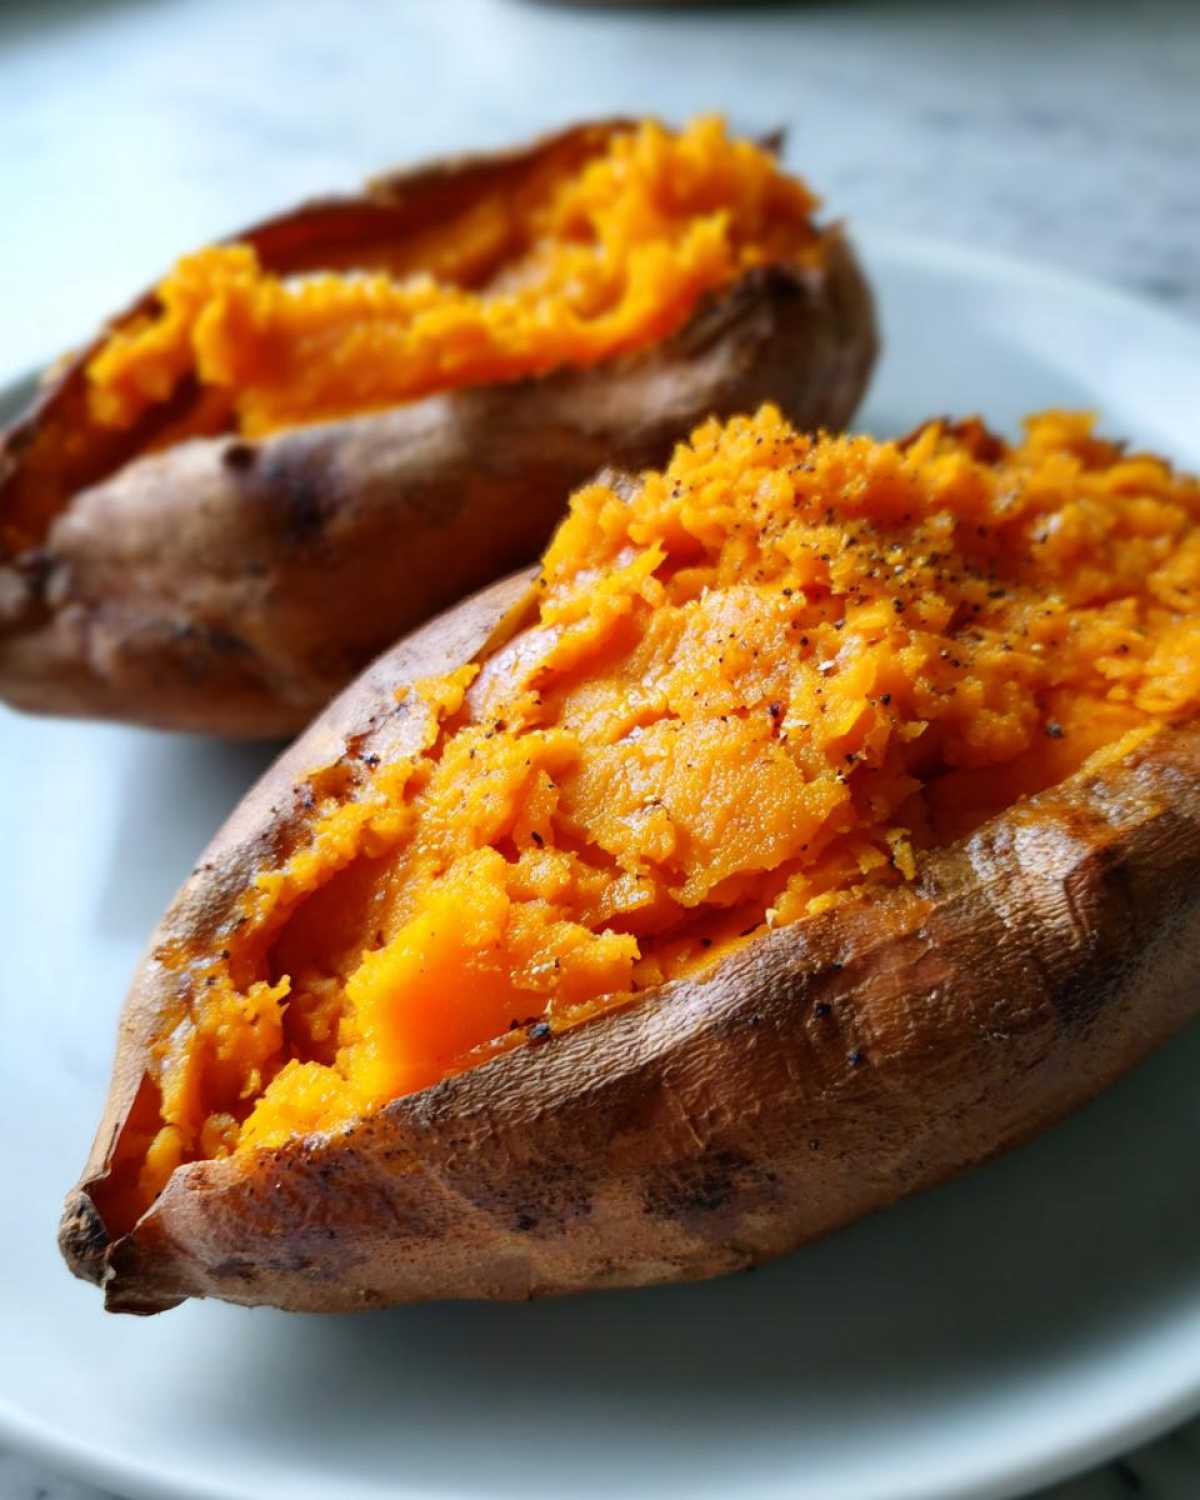
Achieving the Perfect Sweet Potato Texture
That fluffy result we all dream about comes down to just a couple of things. First, you absolutely must pierce the skin aggressively. Those five or six holes are your potato’s escape routes! If the steam can’t get out, it cooks the starch unevenly, making it denser.
The high temperature helps set the starches just right, locking in the sweetness. When you finally slice it open, the steam rushes out, and you’re left with that light, airy, **perfect sweet potato texture**. It just breaks apart beautifully when you touch it with a fork—it’s unbeatable!
The Secret to a Crispy Skin Sweet Potato
This is where everyone asks about the foil. And I say a hard NO! Foil is the enemy of crispiness. Wrapping it up steams the outside, leaving you with soft, chewy skin that no topping can really fix. If you want skin you can actually bite into, you need to go naked, potato-style.
For that extra bit of crackle, a tiny brush of olive oil helps create a barrier that crisps up beautifully in the dry oven heat. A sprinkle of coarse salt on top just enhances the flavor and pulls out moisture from the skin. It’s the easiest way to get a truly **crispy skin sweet potato**!
Gathering Ingredients for Your Baked Sweet Potato
Honestly, this recipe is so easy because the ingredient list is tiny! You only need four medium sweet potatoes to start. That’s it! The real star here is the potato itself, so please try to find ones that are roughly the same size; it helps everything cook evenly. Remember, we aren’t adding tons of stuff now, which is why cooking the **baked sweet potato** perfectly is so important.
If you want that slightly toothsome skin, grab some olive oil and some coarse salt. If you really just care about the fluffy inside and plan on slathering it with butter and brown sugar later, skip the oil and salt altogether. Simplicity wins!
Ingredient Notes and Substitutions
That little bit of olive oil isn’t for flavor so much as it is for texture; it kind of fries the outside of the skin, helping it get that lovely crispness we talked about. The coarse salt pulls out surface moisture, which also aids the crisping process. But here’s the thing: if you only have the potatoes, you are still going to get a great result. This is fundamentally a two-ingredient recipe: potatoes and the oven!
How to Bake Sweet Potatoes: Step-by-Step Instructions
Okay, now for the moment of truth—the actual process! Don’t let this simple instruction list scare you; this is where we lock in that **baked sweet potato** perfection. Remember, keeping it simple is the goal here since we want this to be your new weeknight staple, but we’re also setting the stage for a show-stopping holiday side dishes vegetables contender!
First things first: temperature! Preheat your oven to 400 degrees Fahrenheit. We need that consistent heat. Then, we move straight into prep. We aren’t using baking sheets, we aren’t using foil—the potatoes go straight onto the middle rack. This allows that hot air to circulate all around them for even cooking.
Prepping the Sweet Potatoes for Baking
You have to wash them! Give those sweet potatoes a really good scrub under running water to get off every speck of dirt. Then, and this is key, dry them off completely with a paper towel. If they are wet, they steam! Once they are dry, grab a sharp fork or a sturdy knife. You need to pierce each potato four or five times, going all the way through to the center. Seriously stab them good! This gives the built-up internal steam somewhere safe to escape so your potato doesn’t turn into a noisy science experiment on the rack above your dinner!
Determining the Correct Sweet Potato Cooking Time
The range for **sweet potato cooking time** is usually about 45 minutes to an hour, but it totally depends on how big you went grocery shopping! If you have smaller, slender potatoes, start checking them around the 45-minute mark. If you picked out those big, beefy ones, you might be looking closer to 60 minutes.
The visual check is fine, but honestly, you need to feel it. Gently squeeze the side of the potato—it should give way easily. If you can slide a fork right into the middle with zero resistance, you’ve hit the jackpot! That’s how you know you got that wonderfully tender interior. If it fights you, pop it back in for ten-minute increments. We want tender, not tough!
Once they are done, let them rest just for a few minutes outside the oven heat before you slice them open. If you slice them immediately, all the moisture rushes out and you lose some of that glorious fluffiness we worked so hard to achieve. Don’t forget you can turn these into something fun like my chipotle lime roasted sweet potatoes later, but for now, let’s just focus on this perfect base!
Serving Your Fluffy Baked Sweet Potato
Okay, they are perfect! They are tender, they smell incredible, and the skin is just begging to be eaten. Now, the absolute final, crucial step before you can dive in: don’t slice them immediately when they come out of the oven! I know, I know, the temptation is real, but give your **baked sweet potato** about five to ten minutes on the cooling rack.
This resting period lets the internal structure firm up just a tiny bit so when you slice them open lengthwise, that beautiful steam releases gently, leaving behind the most incredible **fluffy baked sweet potato** flesh. Then, take a fork and gently fluff up that inside—it’s like digging into a cloud of sweetness!
Sweet Potato Topping Ideas for Every Taste
This base recipe is amazing all on its own, but it really shines when you dress it up! Since the potato itself is naturally sweet, you can go one way or the other with your **sweet potato topping ideas**. For a sweeter treat, a pat of melted cinnamon butter (I have a great recipe for that in my mashed sweet potato post!) and a sprinkle of brown sugar is divine.
But honestly, sometimes I go savory, especially when I’m meal prepping for lunch. Try a smear of Greek yogurt, a sprinkle of smoked paprika, chives, and a little sea salt. Or maybe some crumbled feta and black pepper! It completely transforms the experience from a simple side dish to a satisfying, light lunch.
Variations on the Classic Baked Sweet Potato
Once you master the technique for the perfect base **baked sweet potato**, you realize you have unlocked a serious amount of dinner potential! This simple side dish can easily morph into a whole meal or a fantastic centerpiece for a holiday spread. It’s basically a blank canvas for flavor, which is why I love having these on hand for impromptu dinners.
Since the flesh is already cooked, tender, and fluffy, the next step is turning it into something show-stopping. We’ve got a couple of variations here that barely increase your active cooking time but completely change the final result. Get ready to take notes!
Making Twice Baked Sweet Potatoes
If you want to upgrade this from a side dish to a serious comfort food experience, you have to try **twice baked sweet potatoes**. Once your potatoes are perfectly cooked and cooled slightly, just slice them in half lengthwise. Carefully scoop out about two-thirds of that beautiful, hot flesh and leave enough behind to keep the shell intact.
Now, mix that scooped-out flesh with whatever makes your heart happy! I love adding cream cheese, a touch of maple syrup, and cinnamon for a sweet version. But for a savory twist, try mixing in some sautéed onions, black beans, and cumin. Spoon that fun mixture back into the empty skin shells. Then, pop them back into the 400°F oven for just about ten more minutes. That final quick bake sets that delicious topping and warms everything through perfectly. Check out how I incorporate sweet potatoes into things like loaded skins for some inspiration!
Quick Alternate Cooking Methods for Sweet Potato
Look, sometimes 50 minutes is just too long when you’re starving! If you’re in a real pinch, the microwave is your friend, but you have to manage your expectations. You can totally cook a sweet potato using the microwave until it’s soft—usually about 5 to 8 minutes, depending on the size.
The downside is that it steams them, so you won’t get the wonderful fluffy texture or the crispy skin from the traditional oven method. My trick? Microwave it until it’s *almost* done, then slice it open and put it under the broiler or in a 400°F oven for five to ten minutes just to crisp up that exterior. It’s a trade-off, but it works in an emergency. You can also use this base for things like sweet potato topping on a shepherd’s pie!
Storage and Meal Prep for Your Baked Sweet Potato
One of the best parts about mastering the **baked sweet potato** is how fantastic they are for planning ahead! They are such a sturdy vegetable, they hold up beautifully in the fridge. Once they’ve cooled down completely—don’t store them warm, unless you want condensation to make them soggy—pop them into an airtight container or a zip-top bag.
They keep wonderfully for about four days, making them an excellent option for **sweet potato meal prep**. When you’re ready to eat, reheating is easy! You can microwave them for about a minute, but honestly, if you want that original fluff, pop them back into a 375°F oven for about 10 minutes. That dry heat brings back that lovely texture. These baked guys are the backbone of so many great lunch recipes, like the grain bowls I make on Sundays!
Tips for Success with Oven Baked Sweet Potatoes
Even with the simplest method in the world, sometimes things go a little sideways, right? That’s totally normal in the kitchen! I’ve made hundreds of **oven baked sweet potatoes**, and I’ve tripped over every potential pitfall along the way. Let’s talk about troubleshooting so your next batch is absolutely flawless. If your potato ends up unevenly cooked, it almost always comes down to what you picked up at the store to start with.
The biggest area where people mess up is selecting the wrong potatoes for baking in the first place. Don’t grab anything soft or bruised! You want firm, heavy potatoes that feel robust in your hands. Any soft spots mean those areas are going to turn mushy and might cook way faster than the rest of the potato.
Choosing the Right Potatoes
Always inspect them! Look for sweet potatoes that are free of major blemishes, deep cuts, or little green spots—unless you plan on peeling them completely, you want that skin looking pristine. Also, size matters way more than you think. If you put one massive potato next to two very tiny ones, the small ones will be mushy messes before the big one is even halfway done!
Try to select potatoes that are visually similar in weight and dimension. This ensures that the 45-to-60-minute cooking window applies to all of them equally. If you happen to have a mix size, just pull the smaller ones out first when they test done, and let the big guys have a little more time on the rack. That little bit of attention makes all the difference!
FAQ About Baking a Perfect Sweet Potato
Should I wrap my sweet potatoes in foil when baking?
Nope! Seriously, resist the temptation. If you wrap your sweet potato in foil, you are essentially boiling it in its own steam. That’s how you get a soft, sometimes slimy skin and an interior that feels heavy instead of fluffy. For the best results—that crispy skin we talked about—they need to be unwrapped and naked directly on the oven rack so the dry heat can work its magic!
How long does it take to bake small vs. large sweet potatoes?
This is where eyeballing it comes in handy! For medium, average-sized sweet potatoes, stick to that 45 to 60-minute window at 400°F. If you have smaller ones, say the length of my palm, start checking at 35 minutes. For those massive, football-sized spuds, you might need to cook them for up to 75 minutes total. Always rely on that fork test rather than the clock, because potato size varies wildly!
Can I bake these as a healthy baked side dish?
Absolutely, you definitely can! This base recipe itself is incredibly wholesome. It’s naturally vegan, packed with vitamins, and has zero added fat unless you choose to rub that optional olive oil on the skin. If you focus on simple herbs like rosemary or just a squeeze of lemon instead of heavy butter and sugar, this becomes the perfect **healthy baked side dish**. It’s so versatile!
Nutritional Estimates for This Easy Sweet Potato Recipe
I know some of you are tracking your macros or just wondering what exactly you’re putting into your body, especially when you’re looking for that perfect **easy sweet potato recipe**. So, here are the rough estimates for one medium baked sweet potato, using just the potato itself—no oil, no salt, and definitely no butter or brown sugar yet!
Please remember, these are just ballpark figures based on the single potato itself. Once you start piling on the cinnamon butter or making those delicious savory stuffings, your numbers are going to change quite a bit. Think of this as the baseline nutrition for your healthy side dish foundation!
- Serving Size: 1 medium potato
- Calories: 112
- Sugar: 10g
- Sodium: 70mg
- Fat: 0g
- Carbohydrates: 26g
- Fiber: 4g
- Protein: 2g
See? Even before we add anything fun, this is a powerhouse of flavor and nutrients. Considering how simple this recipe is, it’s an amazing, versatile base for anything you want to whip up!
Share Your Perfect Baked Sweet Potato Creations
I’ve given you my ultimate foolproof secrets for getting that impossibly fluffy center and crispy skin on your **baked sweet potato**—now it’s your turn to get baking! I truly hope this becomes your go-to method, whether it’s for a quick Tuesday night side dish or the star of your Thanksgiving table.
I would absolutely love to know how your potatoes turned out! Did you stick to the simple salt and oil, or did you go wild with a savory topping like feta and chives? Drop a comment down below and give us all some topping inspiration. Hearing how you customize recipes is honestly one of my favorite parts of running this blog. You can learn a little more about my kitchen philosophy over on my About Me page, but for now, tell me about those potatoes!
And if you made this and loved the results, please leave a star rating right above this section! Your feedback really helps other cooks find this reliable method. Happy baking, and I can’t wait to see what you create!
Print
The Ultimate Foolproof Baked Sweet Potato (Fluffy Inside, Crispy Skin)
- Total Time: 60 min
- Yield: 4 servings 1x
- Diet: Vegan
Description
Learn the simple, reliable method for baking sweet potatoes in the oven until the inside is perfectly tender and the skin is slightly crisp.
Ingredients
- 4 medium sweet potatoes
- 1 tablespoon olive oil (optional)
- Coarse salt (optional)
Instructions
- Preheat your oven to 400 degrees Fahrenheit (200 degrees Celsius).
- Wash the sweet potatoes thoroughly under running water. Scrub the skin well to remove any dirt. Pat them completely dry with a paper towel.
- Pierce each sweet potato four to five times deeply around the sides using a fork or a sharp knife. This allows steam to escape.
- For a slightly crispier skin, rub the outside of each potato lightly with olive oil and sprinkle with coarse salt. If you prefer a softer skin, skip the oil and salt.
- Place the potatoes directly onto the middle oven rack. Do not wrap them in foil; wrapping traps moisture and results in a steamed, soft skin rather than a crisp one.
- Bake for 45 to 60 minutes. The exact time depends on the size of your potatoes.
- Check for doneness by squeezing the potato gently; it should yield easily, or insert a fork into the center—it should slide in with no resistance.
- Remove from the oven. Let them cool for 5 to 10 minutes before slicing open lengthwise. Fluff the inside flesh with a fork.
- Serve immediately with your preferred toppings.
Notes
- For a sweeter interior, you can bake the potatoes directly on the oven rack without a baking sheet underneath. Any drips will burn off.
- If you want a twice-baked sweet potato, scoop out the cooked flesh, mix it with butter, brown sugar, or savory spices, and return it to the skin shells to bake for another 10 minutes.
- For a faster method, you can microwave the potatoes for 5 to 8 minutes until soft, then finish them in a 400°F oven for 10 minutes to crisp the skin.
- Prep Time: 5 min
- Cook Time: 55 min
- Category: Side Dish
- Method: Baking
- Cuisine: American
Nutrition
- Serving Size: 1 medium potato
- Calories: 112
- Sugar: 10
- Sodium: 70
- Fat: 0
- Saturated Fat: 0
- Unsaturated Fat: 0
- Trans Fat: 0
- Carbohydrates: 26
- Fiber: 4
- Protein: 2
- Cholesterol: 0